

Help Center / Smarter Voice / Advanced / Connect Zapier
Advanced
Connect Zapier to Business Phone
If you don’t already have a Zapier account, you can create one for free at the Zapier Sign Up page.
On this page
Visit our Zapier Integration feature page to find our full list of Zapier templates and to learn more about the structure of Zapier apps.
Visit our Developer Site for documentation on API’s
Creating a Zapier Account and Linking to VirtualPBX
First, create a Zapier account or log in to your existing account. You can find the “Sign In” / “Sign Up” buttons in the upper part of the Zapier homepage.
Navigate to “My Apps” from the side menu bar. This will open up a new screen where you can view the connections you’ve created in your zaps to other services. For example, a VirtualPBX App login to a Google Sheets login.

A search bar will be present in the “My Apps” screen — noted with the “Connect a new account…” phrase.
Click it to search for “VirtualPBX”. Then click the VirtualPBX listing to open a new window.
Enter your VirtualPBX credentials into the login screen to connect your VirtualPBX app to Zapier.
When you’re logged in to VirtualPBX, you can start creating an automation! Use a pre-made Zap or create your own with the Zap Editor. Creating a Zap requires no coding knowledge and you’ll be walked step-by-step through the setup.
Building and Customizing a Zap
The following tutorials can direct you toward specific goals in creating and customizing a Zap. You can begin from scratch or by using one of our pre-built Zap Templates.
Log my call data
Send my call data to a Google Sheets Spreadsheet
Send my voicemail data to Google Sheets
Keep a running count of weekly calls in Gmail Reports
Automate my reporting
Automatically deliver weekly Gmail events containing call data
Send Slack notifications when call events happen (call is received, voicemail is left)
Keep an ongoing log in Google Sheets of all calls on your VirtualPBX account
Create Trello cards, using conditional logic to reach different teams (Sales, Marketing, etc)
Make sense of call data
Use Google Sheets for calculations (total calls, voicemails left this week, etc)
Log your voicemail data in Google Sheets
Make sense of call data (such as calculating average call duration)
Notify my team about inbound calls or voicemails
Send Slack notifications when a call takes place
Automate email-based reports through Gmail that include call data
Building Your Own Zap from Scratch
You can create you own Zap from scratch by first signing in to your Zapier account. Then, on your Home screen in the left-hand side menu, click the Make a Zap button.
A new screen will load. In the search box, type “virtualpbx” to find our app. Then click the app icon that appears
Next, choose your trigger event — the action you want to the Zap to look for — such as Call Started to take action when a new call starts on your VirtualPBX account.
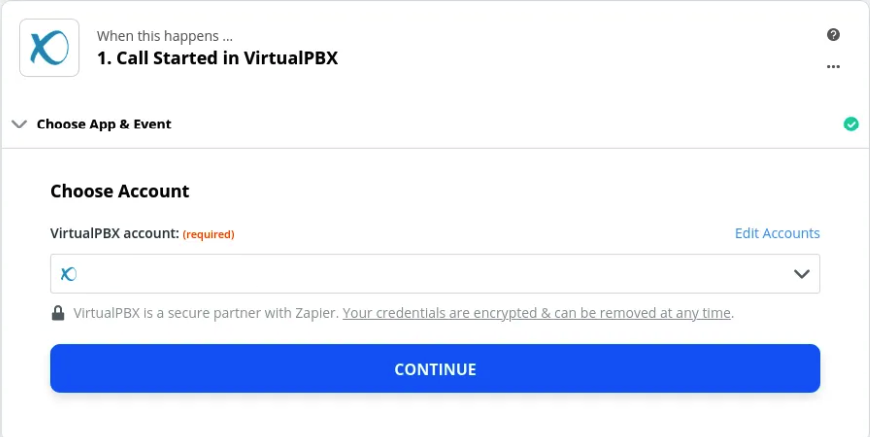
Then choose your VirtualPBX account. Instructions for connecting the VirtualPBX app in your Zapier account are listed above. Or you can log in on this screen.
If calls have been made while your Zapier account has been linked to you VirtualPBX account, you can find test data in this next step. You can click the Test and Continue button to move to the next step, or click the “Skip Test” text to proceed without it.
This is your opportunity to choose what happens after your VirtualPBX trigger (such as Call Started) fires. You can search for other apps, like Google Sheets, to log your started calls in a spreadsheet. You can add additional apps by clicking the plus sign underneath any existing step.
When your Zap is complete, you can turn it on by clicking the button at the top of your screen. All new Zaps are off by default and will be turned off when actively edited.
Hook Configuration
Dash Webhooks can be configured to send HTTP(S) requests to report URLs and supports GET and POST requests. The data delivered depends on the Trigger event selected. The current version of Dash Webhooks only supports Channel events, which are directly related to call activity.
You should not send multiple Dash Webhooks to the same Zapier URL. Zapier will not handle differences in the payloads in a way that allows you to process all the data. Using separate Zapier Triggers and URLs is the best approach.
Click on the Menu Icon at the top right
Click on Webhooks
Click on New Webhook
Fill out the form
Click on Create Webhook
Hook Trigger Events
A Webhook will deliver data about the selected channel events to the configured URL. Currently the available events include:
Channel:AnswerBridgeCreateDestroy
ACD Queue:Queue JoinQueue LeaveRecipient AwayRecipient DeliveredRecipient HangupRecipient LoginRecipient LogoutRecipient OfferRecipient ReadyRecipient RejectedRecipient Status Change
Call Parking
SMS
Notifications Webhook (including the following custom data types):Callflow Webhook TriggeredVoicemail Message SavedNew Voicemail MessageVoicemail Box FullRegistrationPortedPort UnconfirmedPort ScheduledPort RequestPort RejectedPort PendingPort CommentPort CancelPassword RecoveryInvalid Email-to-Fax EmailFax Transmission ErrorSuccessful Fax TransmissionNew UserMissed CallFax Reception ErrorSuccessful Fax ReceptionDe-RegistrationCNAM Update
Channel events deliver information about calls in the form of a call detail record. The information is formatted as a JSON payload.
Hook Payload
Here’s what you can expect to receive when a webhook fires to your server – most of these fields should be present on all payloads:
Base Payload
hook_event: the type of hook being fired
call_direction: “inbound” or “outbound”, relative to your Dash system
timestamp: Gregorian timestamp of the event
account_id: ID of the account generating the event
request: SIP Request
to: SIP To
from: SIP From
call_id: SIP Call ID
other_leg_call_id: if bridged, the Call ID of the other leg
caller_id_name: Caller ID Name
caller_id_number: Caller ID Number
callee_id_name: Callee Name
callee_id_number: Callee Number
Hook Specific
channel_createhook_event: channel_create
channel_answerhook_event: channel_answer
channel_destroyhook_event: channel_destroyhangup_cause: SIP Hangup Cause (NORMAL_CLEARING, ORIGINATOR_CANCEL, etc)hangup_code: SIP Hangup Code (404, 503, etc)
Configuring Zapier with a Webhook
Zapier accepts Webhooks which can be chained to other services. When configuring a Zapier Webhook, keep in mind the volume of calls a system receives will generate one or more events for each call event. This can quickly consume Zapier Tasks if multiple webhooks are configured or your account has a high volume of call traffic. Please review Zapier’s Plans for more detail.
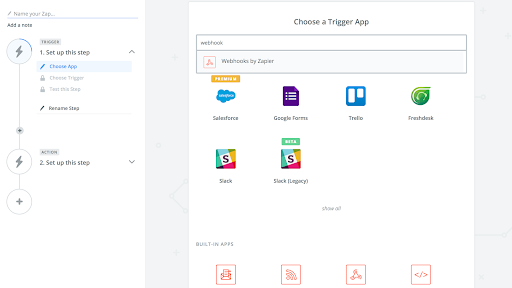
Create a new Zap, locate Webhooks by Zapier and select that App.
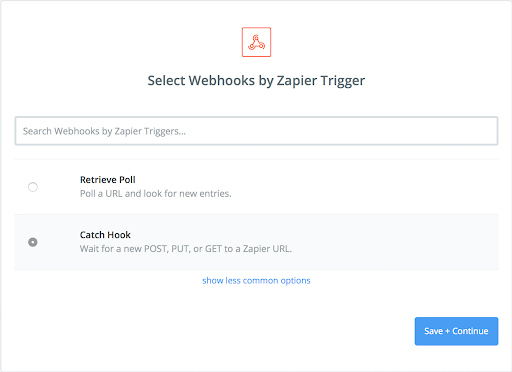
Select “Catch Hook” as the Zapier Trigger.
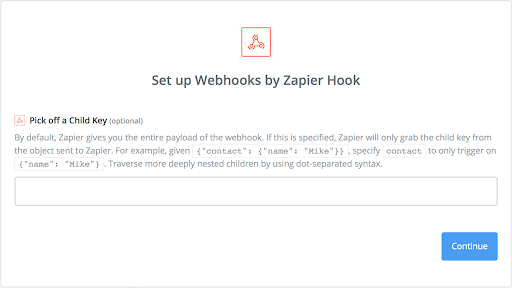
Pick off a Child Key should remain empty to capture all data delivered.
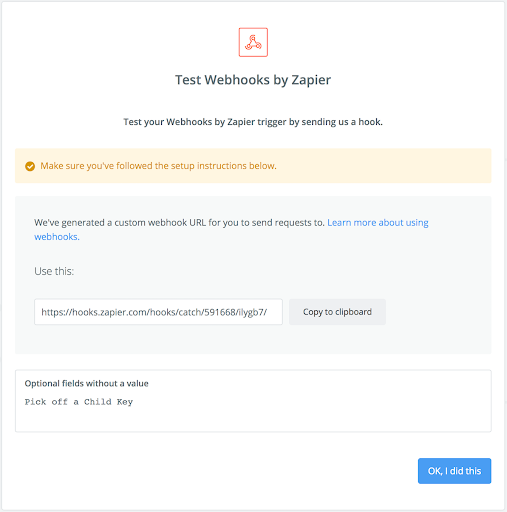
Next, copy the Webhook URL. This is needed to create the Webhook on Dash.
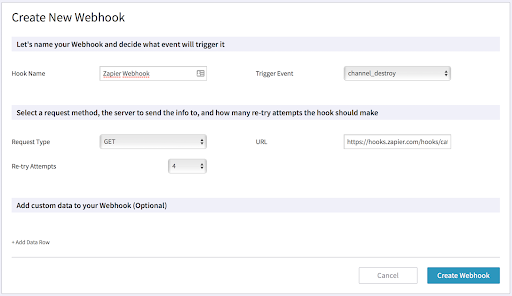
In Dash, create a Webhook. Select a Trigger event – Channel Destroy provides ideal data for capturing call activity. Enter the Zapier Webhook URL into the URL field and select 4 Re-try Attempts and finally Create Webhook.
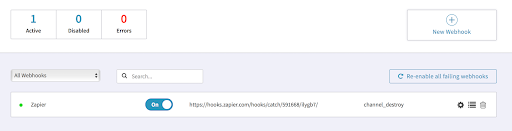
The Webhook will now be created. Make sure it’s toggled to On. This must be completed before completing configuration in Zapier.
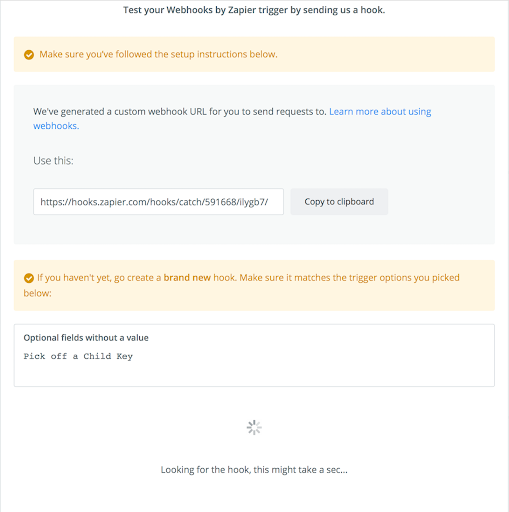
In Zapier, continue the to the next step. Zapier will wait for the Dash Webhook to send a request. You must place a call to a number on your account, wait a few seconds, then hang up to trigger the Dash Webhook.
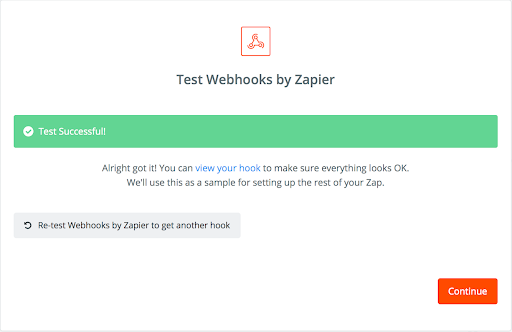
When Zapier receives the Dash Webhook test call request, you will see the following screen.
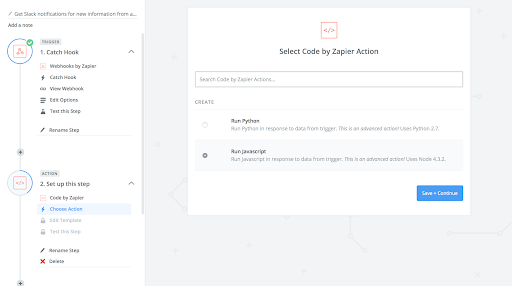
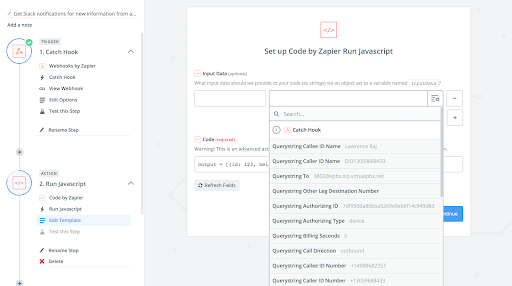
Finally, you can select whatever service you want Zapier to use to process incoming Dash Webhooks.
Webhook Example: Receive a Slack Notification Displaying Caller ID
Phase 1: Prepare a Slack Channel to Receive Notifications
Log into your Slack account and create a new channel by clicking on the + at the top of your Channels list.
Give your channel a name (in this example, we will be using “dash-phonesystem”) keeping note that the title must be all lowercase and contain no spaces, mark it public or private, set the channel’s purpose (optional), and invite team members (optional). When you are finished, click Create Channel.
Next, log into Zapier and select Slack from “Connected Accounts”. Complete the authentication steps to connect Slack to Zapier.
Once your account has been authorized, you will see Slack in your list of connected accounts.
Phase 2: Configure Zapier to Accept a Webhook from Dash
Select “Make a Zap”, name your Zap, and select Webhooks
Select “Catch Hook”
“Pick off a Child Key” should remain empty to capture all data delivered
Next, copy the Webhook URL. It is needed to create the Webhook on Dash
Zapier is now ready and waiting for a Webhook to be sent to the URL. Stay logged into Zapier. In a new browser window, log into your Dash account.
Phase 3: Configuring Dash to send the Webhook to Zapier
In your Dash account, select Webhooks from the dropdown hamburger menu in the upper right of your screen.
Name the Webhook (in this example, we will be using “Zapier”), select the trigger as “channel_create”, set the re-try attempts to 4, enter the URL we just got from Zapier, and click “Create Webhook”.
The Webhook will now appear in your Webhooks list – make sure it’s toggled on.
Now it’s time to test the Webhook. Go back to the Zapier Zap configuration where we left off. Press the “OK, I did this” button and now place a call into your VirtualPBX Dash System.
If everything is working, you should see the page change to show that Zapier caught the Dash Webhook successfully.
Now let’s set Zapier up to send this new data to our Slack channel. Choose Slack from your list of apps to continue.
Select “Send Channel Message”.
Select your Slack account and click “Save + Continue”.
Now we’ll configure the message that gets sent to Slack: select the Slack channel created earlier, customize your message, and name the bot. You may return to this page later to tailor the slack message with icons, threaded messages, and other options. Press Continue at the bottom of the page when you are finished.
Now we’re ready to test the integration. Start by turning on your Zap.
Next, place a call into your Dash phone system. You should get a notification in Slack similar to this:
It works! We have now captured all the incoming calls with a Slack message. If you have multiple inbound numbers you may modify the Zap to show which number a caller has dialed and added a bit of formatting for fun.
Phase 4: Formatting Your Notification
In our example, the Webhook from Dash adds an IP address after the number. We need to strip that out to make the message look pretty.
We can solve this by adding a “Formatter by Zapier” action to the Zap.
Update your Formatter by Zapier screen to match the following settings:
At this point, your notification in Slack will look the same as before. Our final step is to modify the Slack message to use the formatted version of the text field and not the original. Select your action “Send Channel Message” and change “Step 1” in your message to “Step 2”
The message now looks like this.
Slack will now show the properly formatted result.
You may see notifications when someone from your company makes an outbound call. These may also appear as two notifications, indicating two legs of the call – an inbound call from the user to the system and then the system placing the outbound call. If you do not wish to see these notifications, please continue to filter them out of your Slack channel.
To exclude outbound calls, we need to modify the original ZAP to filter out all calls except inbound callers dialing into our system. This is achieved by adding a filter to the Zap in-between the Catch Hook and the Formatter that will only allow the Zap to continue IF the call meets the following conditions:Call Direction (Text) Exactly Matches “inbound”Caller ID Number (Text) Starts with “+” (this indicates that it is a Caller ID number)
Solved! We have now filtered the results to ONLY show incoming calls to our Dash phone system.