Help Center / Smarter Voice / Advanced / Set up a call queue
Advanced
Set up a call queue in Business Phone
Call Center is an add-on feature priced depending on your plan type. Contact us to review options if you’re interested!
On this page
This guide walks you through the complete process of creating and managing a call queue in the Call Center. It also introduces key Pro Features for agent and queue management.
First Steps Inside the Call Center
Learn how to access the Call Center App and navigate the layout to begin managing queues and agents.
Access the Call Center App
This section describes how to enter the Call Center App and adjust your availability.
Logging In and Accessing the Call Center
Follow these steps to access the Call Center workspace:
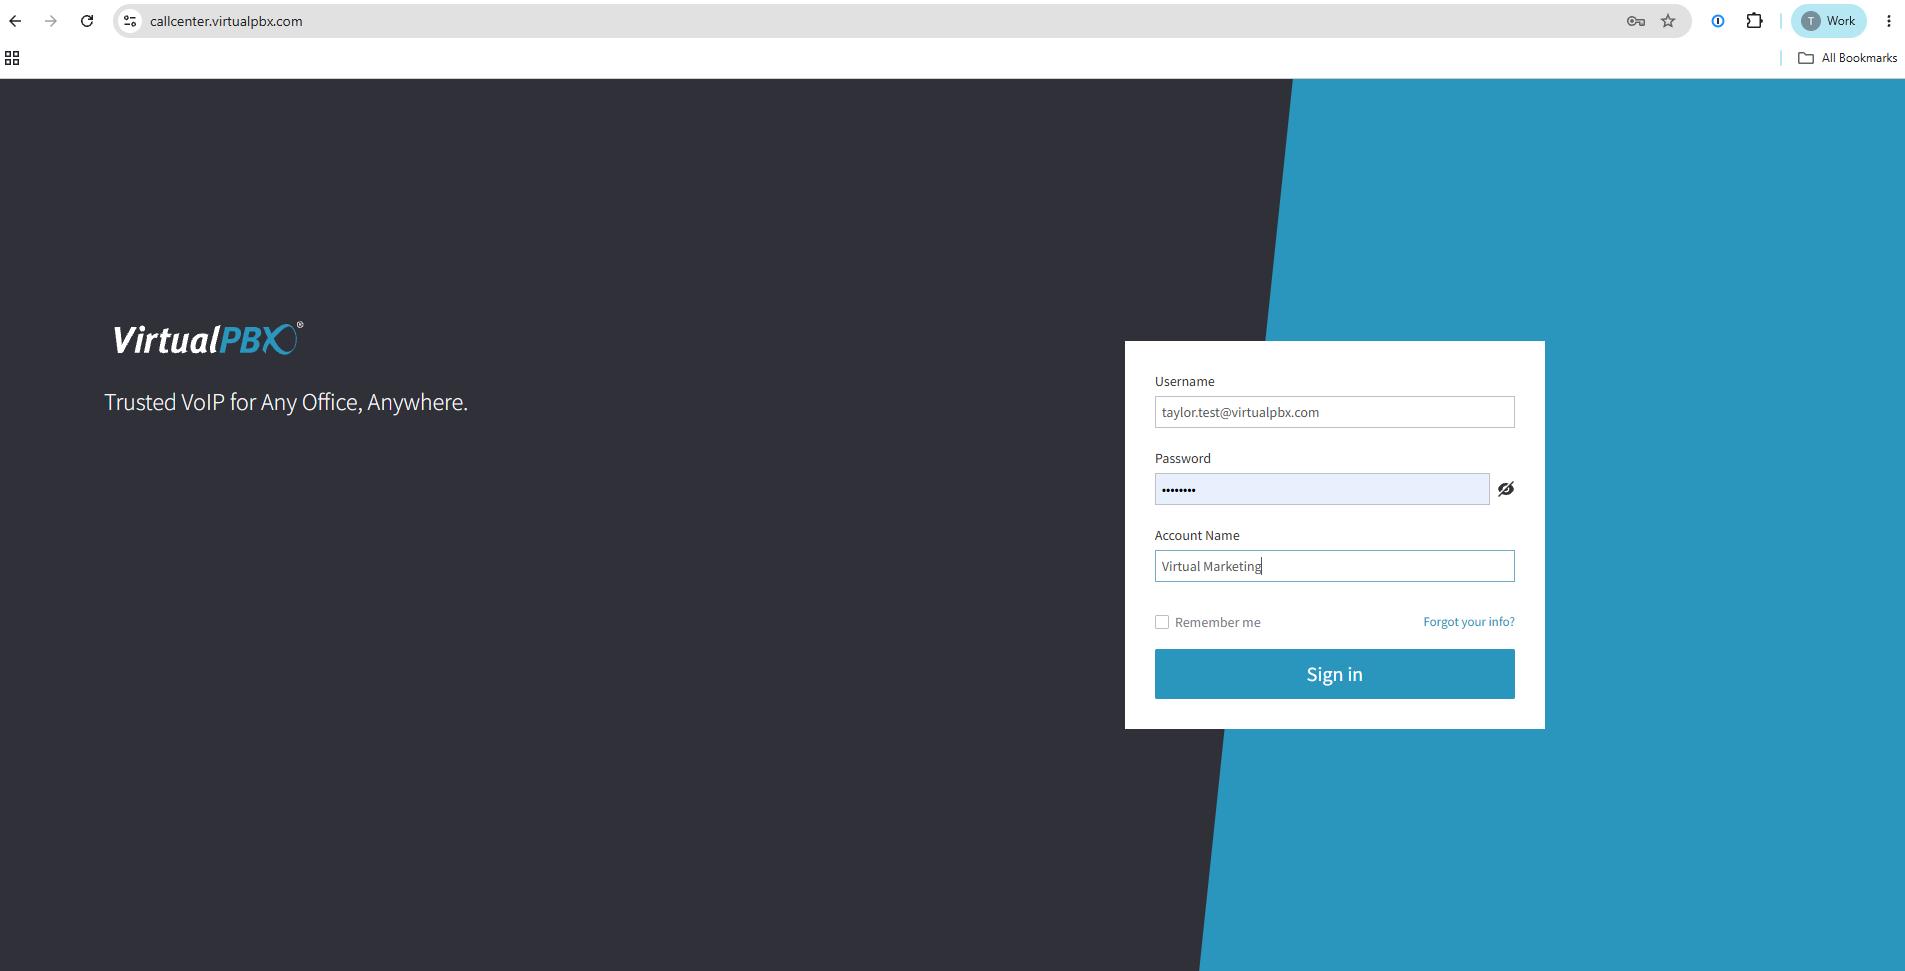
Go to: callcenter.virtualpbx.com
Log in with your Dash account credentials.
Call Center Layout Overview
Call Center Menu
In this section, you will find everything you need to manage queues, agents, and call center settings from a single workspace.
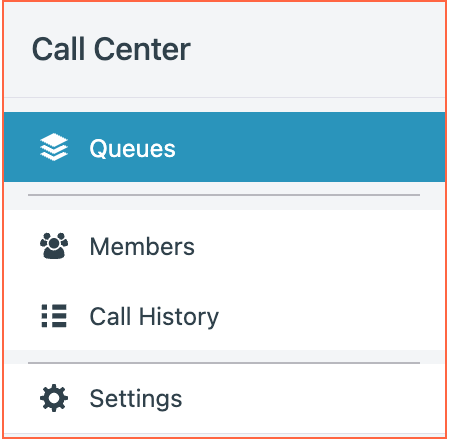
The menu is located on the left side of the screen, where you can access:
Queues to create and manage call queues.
Members to add users and manage Call Center memberships.
Agent Management to monitor agent status in real time.
Call History to review completed and active calls.
Settings to enable Pro Features and manage system configuration.
The center of the screen displays the configuration panel based on the menu item you select, such as the queue list, member management, or enable pro features.
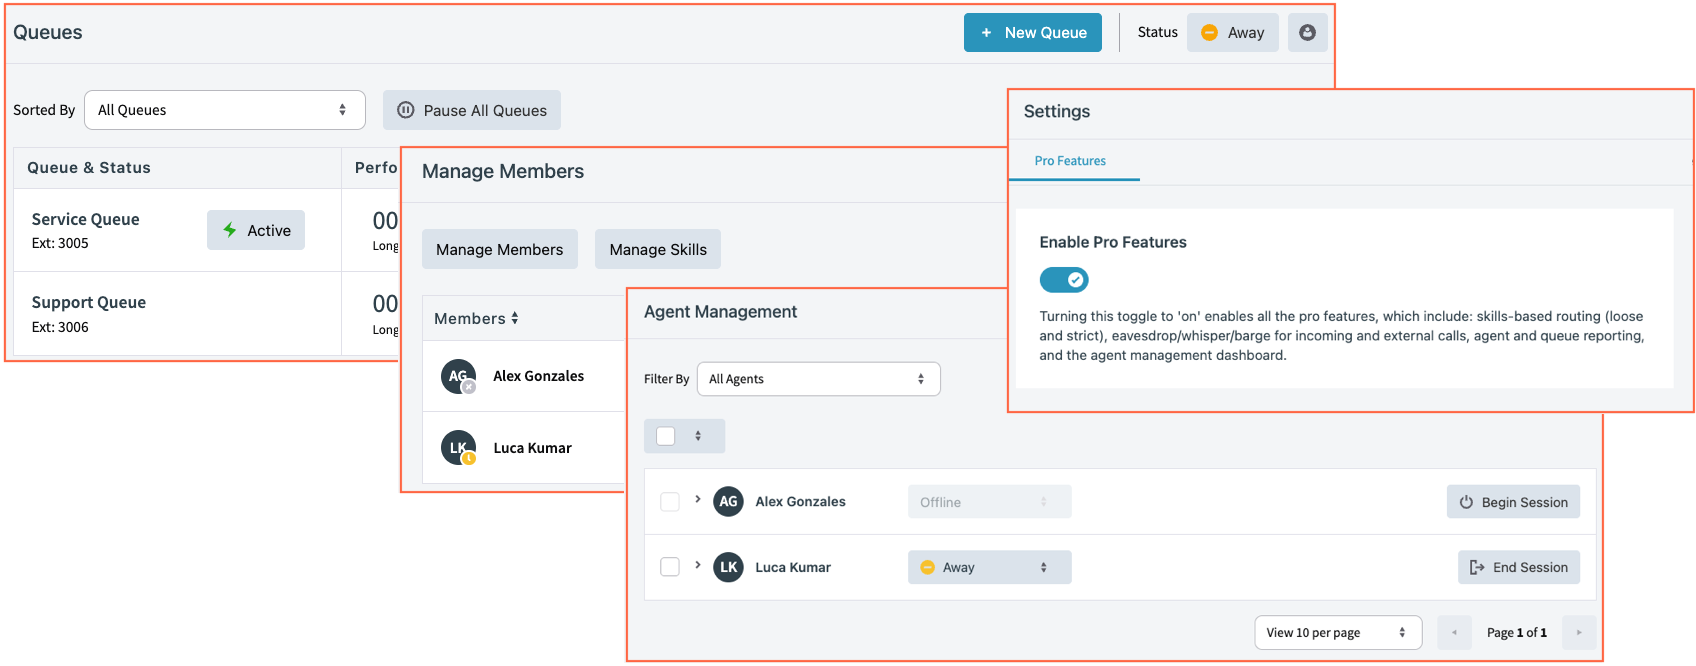
Tip: Navigating between sections is simple — just select an option from the left-hand menu and the relevant workspace will appear in the center of your screen.
Preparing to Build Your Queue
Before creating a queue, add users and enable Pro Features if applicable.
Manage Members
This section explains how to manage agents, assign them to queues, and configure key attributes like skills and call recording.
Navigating the Members Section
When you click on Members, you can:
Add Call Center members
Manage Member Skills
View available users in the system
Select users and click Add as Member
View current Call Center members
Select and remove members from the Call Center
View each member’s session duration, assigned queues, call recording status, and skills
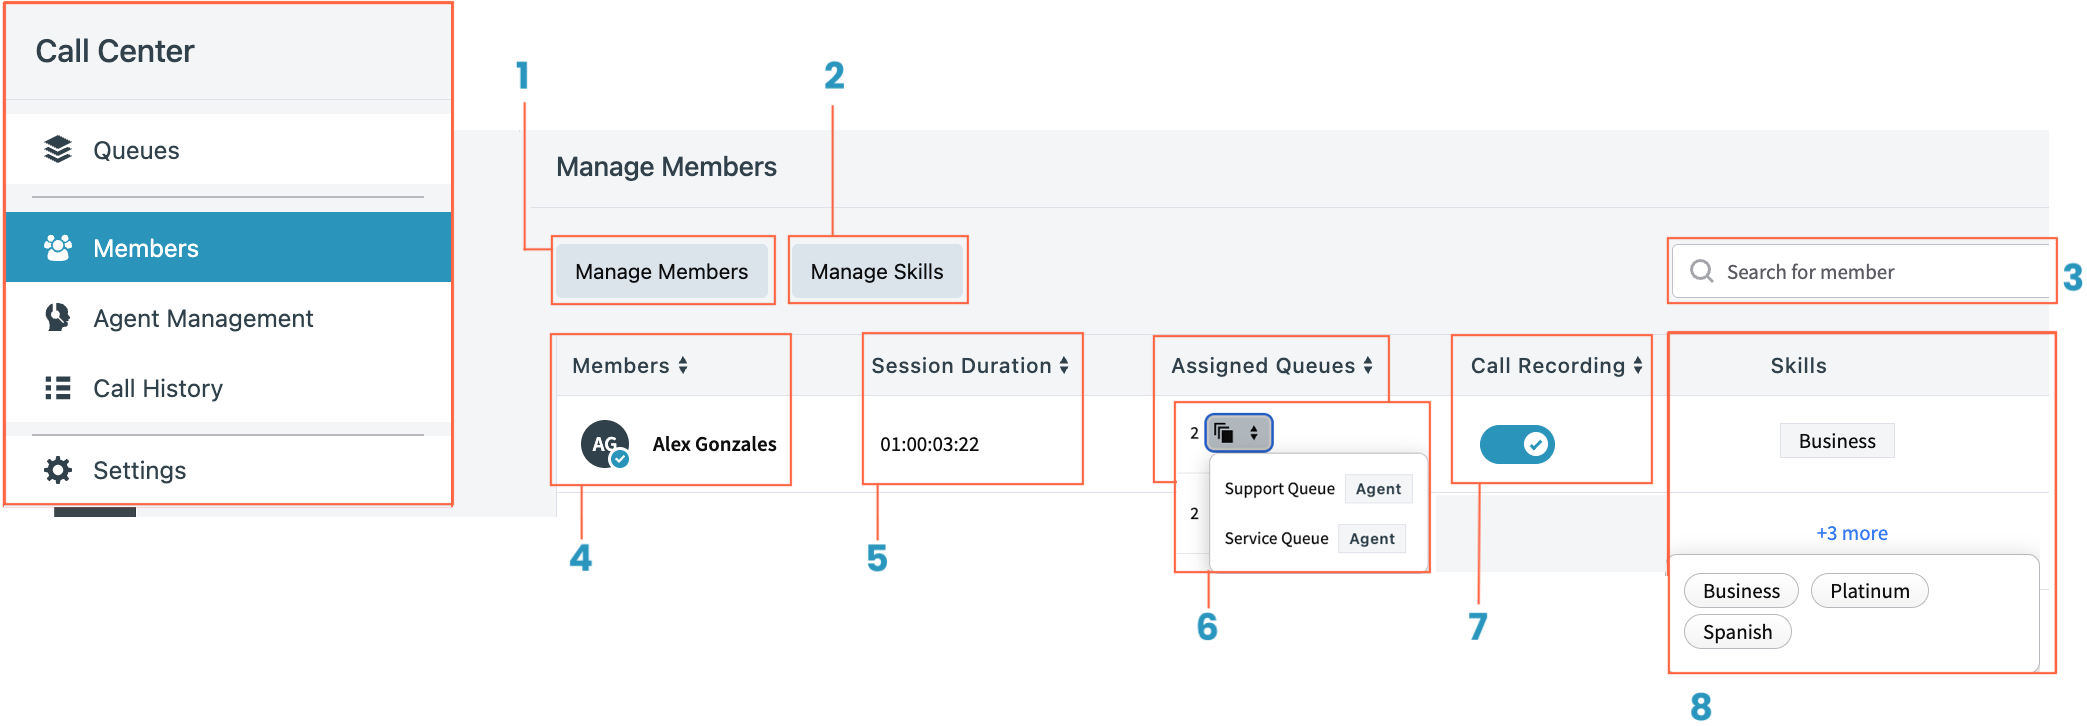
When you click on Members from the left-hand menu, you will see several tools and management options:
Manage Members: Access the list of users who can be added as Call Center agents or managers. Add new members or remove existing ones.
Manage Skills: Assign and manage skill tags for agents to support skill-based routing strategies.
Search Members List: Use the search bar to quickly find specific members by name.
Members (Name): Displays the user's name and role.
Session Duration: Shows how long the agent has been logged into their session.
Assigned Queue: Displays the queues the agent is currently assigned to.
Call Recording Button: Toggle call recording on or off for the individual agent.
Skills: Displays any skills assigned to the agent.
Tip: Use the Search, Skills Management, and Assigned Queue tools to quickly organize and update your agent list as your call center needs change.
Add or Remove Call Center Member
The Manage Members screen is divided into two panels: Available Users and Call Center Members. Each panel has simple tools to search, select, and manage users.
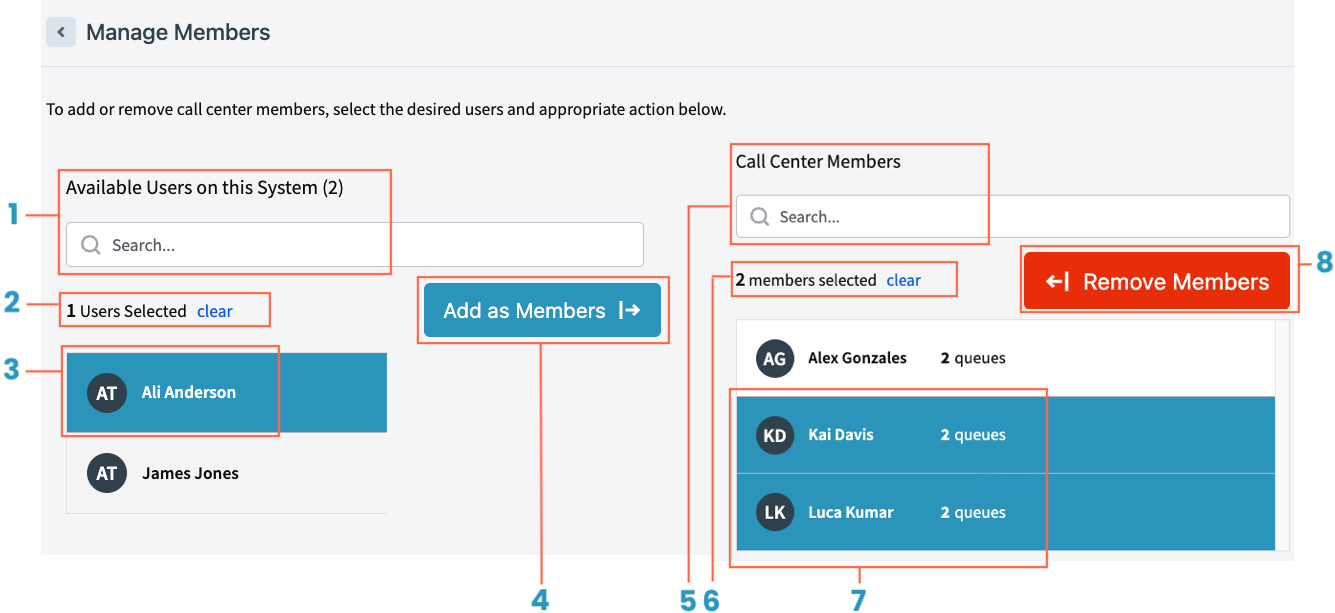
Available Users Panel
Manage users who have not yet been added as Call Center members.
Available Users and Search: View the total number of available users and search by name.
Users Selected – Clear: Displays how many users are selected; click Clear to unselect all.
Select User: Click on a user to select them.
Add as Member (Button): After selecting, click to add users to the Call Center.
Call Center Members Panel
Manage users who are already active members of the Call Center.
Search Member Field: Search for existing Call Center members by name.
Members Selected – Clear: Displays how many members are selected; click Clear to unselect all.
Select User: Click on a member to select them.
Remove Member (Button): After selecting, click to remove users from the Call Center
Enable Pro Features
This section covers enabling additional routing and reporting options for advanced queue setups.
Turn On Pro Features (If Available)
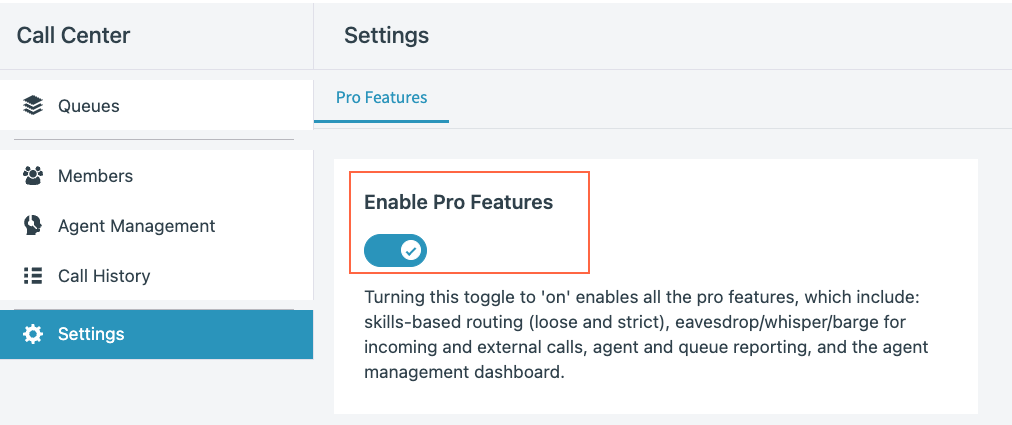
Enable enhanced routing, metrics, and monitoring tools.
Click Settings from the left menu.
Enable Pro Features available to your account:Skills-Based Routing (Strict or Loose)Agent Management DashboardQueue and Agent MetricsVisibility ControlsCall Recording and Monitoring Enhancements
Only Account Admins can enable or disable Pro Features.
Access Queues
Learn how to open the Queues section and manage both new and existing queues.
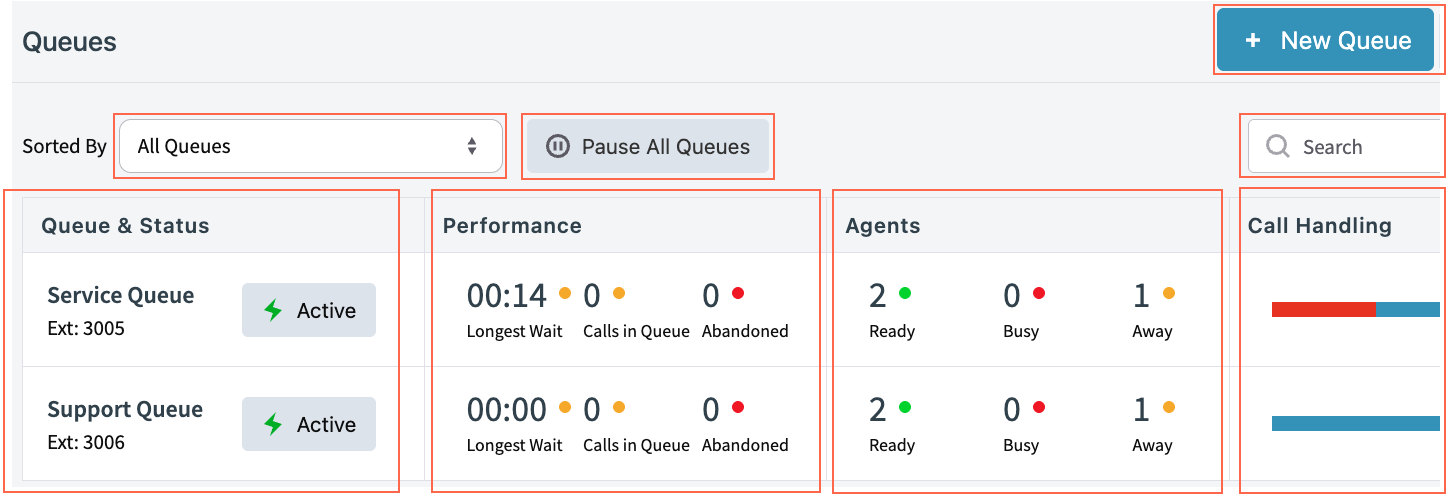
Queue Layout Overview
Review, monitor, and manage queues using top-level controls and quick stats.
Navigation and Controls
Sorted By: Sort queues by name, extension, or status.
Pause All Queues and Active When Ready: Use the Pause All Queues button to pause all active queues at once, and control agent auto-activation with the Active When Ready toggle.
+ New Queue: Click to create a new queue and begin configuring its settings, members, and routing behavior.
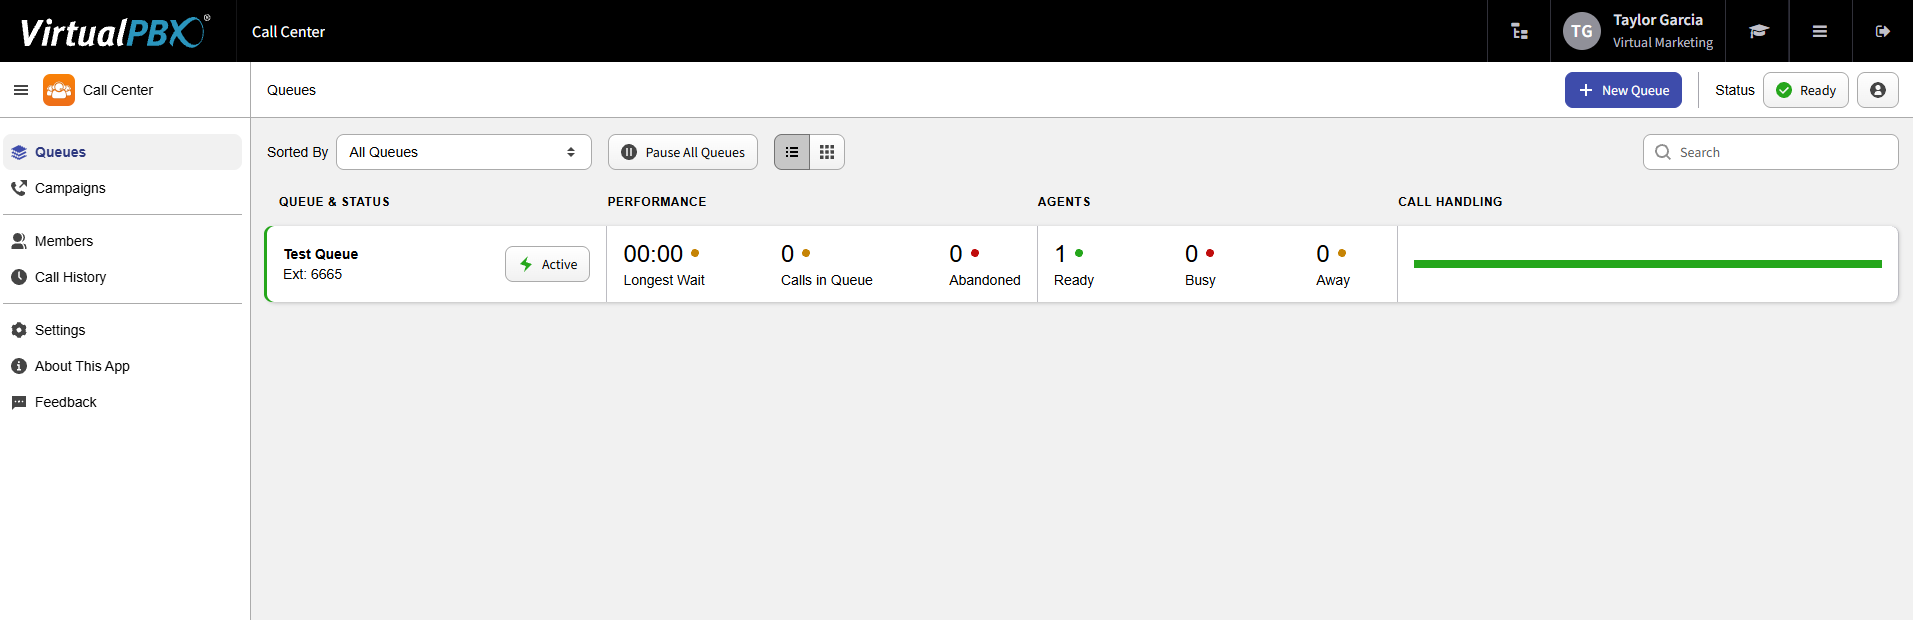
Queue List: Displays all queues currently created in your system.
Quick View Queue Statistics:
Queue & Status: See if the queue is active or paused.
Performance Metrics: View real-time data such as:Longest Wait TimeCalls in QueueAbandoned Calls
Agents: See agent status counts:Ready, Busy, and Away
Call Handling Bar: Visualize handled versus missed calls with color indicators (blue for handled, red for missed). Managing Queue SettingsPause or Activate a Queue: Pause or reactivate an individual queue once you are inside its settings. Click a Queue: Click on a queue name to open and manage it. Access the Settings GearOpen the full configuration menu to update:General SettingsRouting StrategyHold TreatmentAgent BehaviorMember AssignmentEscalation and Dropout Options
Accessing Queue Configuration
After selecting a queue from the list, you’ll be taken to its detailed configuration view.
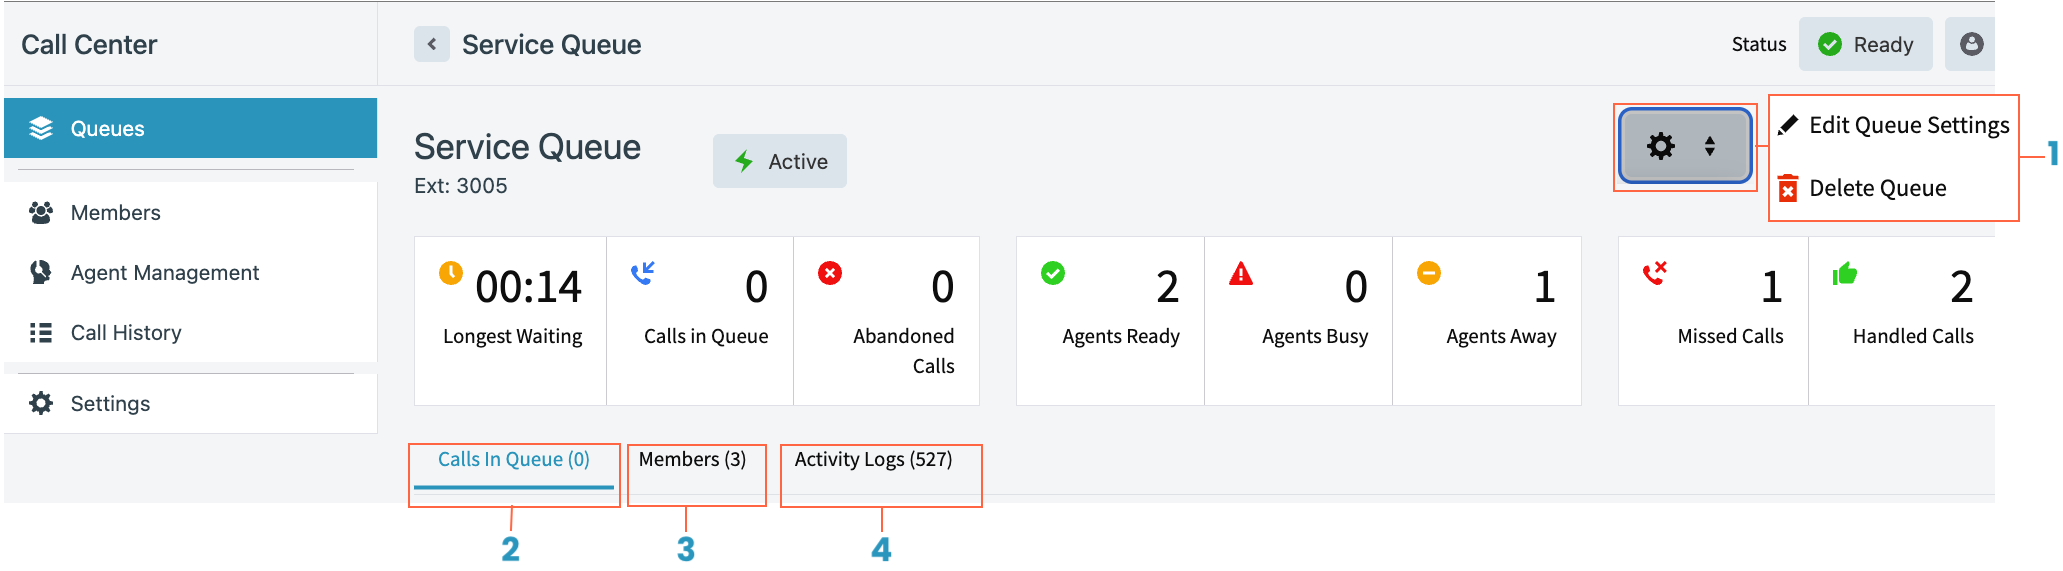
From this screen, you can perform key actions to manage the queue:
Edit the Queue: Click the gear icon, then select Edit to update the queue’s name, extension, routing behavior, or hold treatment.
View Live Calls: Monitor any active calls currently waiting in or connected through the queue.
Add Members: Add or remove queue members directly from this view to manage agent availability.
Activity Log: Review a detailed log of recent updates or changes made to the queue for visibility and troubleshooting.
Create or Manage a Queue
Learn how to create a new queue or open an existing one to update its configuration.
Creating a New Queue
To create a new queue:
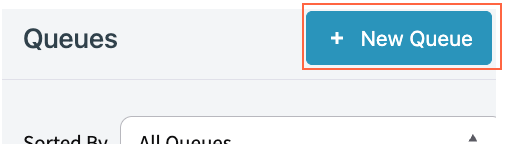
Click the + New Queue button located at the top right of the Queues screen.
Editing an Existing Queue
To make changes to an existing queue:
Locate the queue in the Queues list.
Click the queue name to open it.
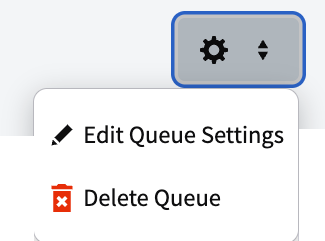
Click on the Settings Gear.
Select Queue Settings.
Begin Queue Configuration
This section explains how to set basic information for the queue.
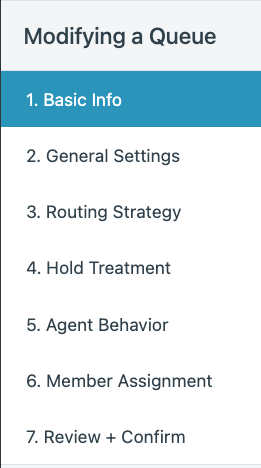
Once you create or open a queue, you’ll begin configuring:
Basic Info
General Settings
Routing Strategy
Hold Treatment
Agent Behavior
Member Assignment
Basic Information
Provide the name and number or extension for the new queue.
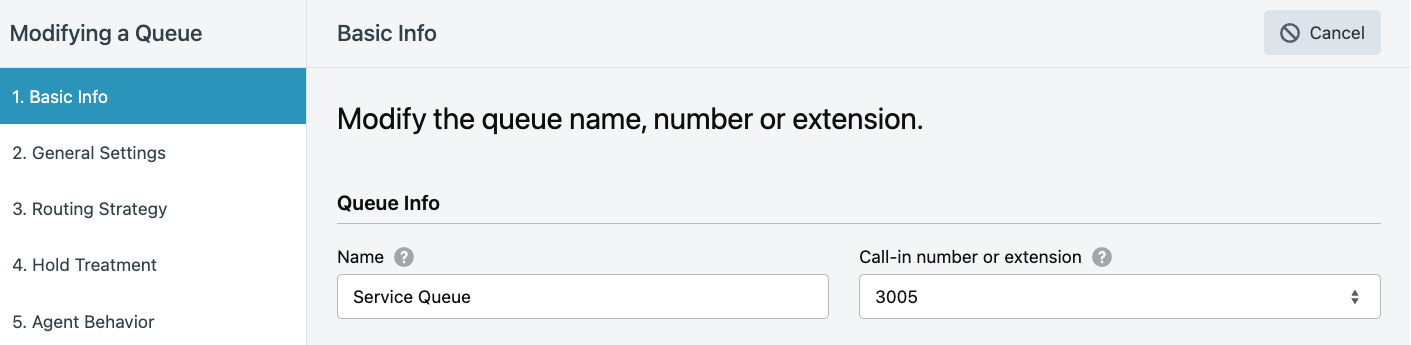
Queue Name: Enter a descriptive name for the queue.
Call-in Number or Extension: Select a spare number or assign a new extension.
Click Next to confirm.
Configure General Settings
This section covers setting the basic behavior of the queue.
General Settings
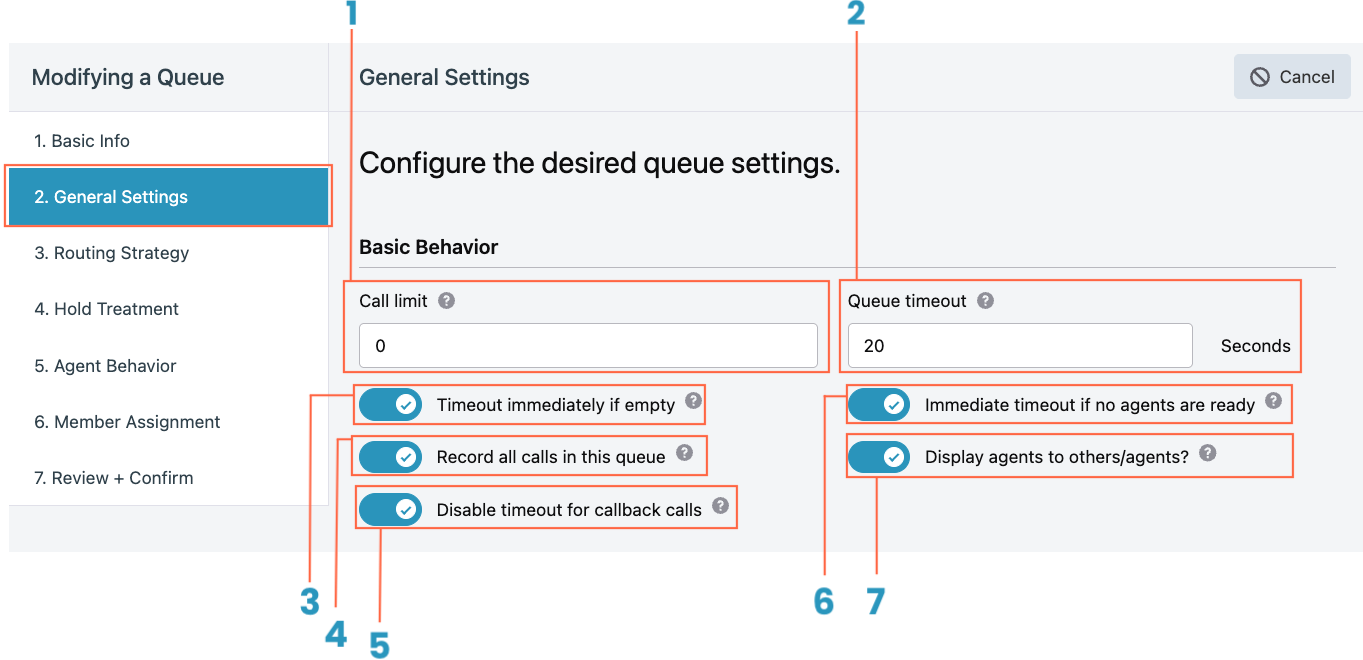
Set rules for call handling, timeouts, and visibility.
Call Limit: Maximum number of queued callers.
Queue Timeout: Maximum wait time before redirect.
Timeout Immediately if Empty: Redirect immediately if no agents logged in.
Record All Calls: Enable if needed.
Disable Timeout for Callback Calls: Allow callbacks to stay longer in the queue.
Immediate Timeout if No Agents Ready: Instantly redirect if no ready agents.
Display Agents to Other Agents: Show agent statuses to peers.
Set Escalation and Dropout Options
This section explains how to manage call overflow and give callers exit options.
Escalation After Timeout
Define fallback routing when wait time is exceeded.
Escalation Callflow After Timeout: Route to voicemail, another queue, or device.
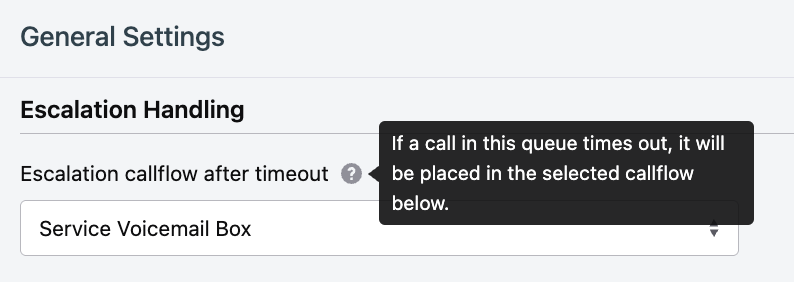
Important: If no callflow is set, the call will drop.
Dropout Options
This section details the caller-initiated actions available during hold.
Configure Redirects and Callback Options
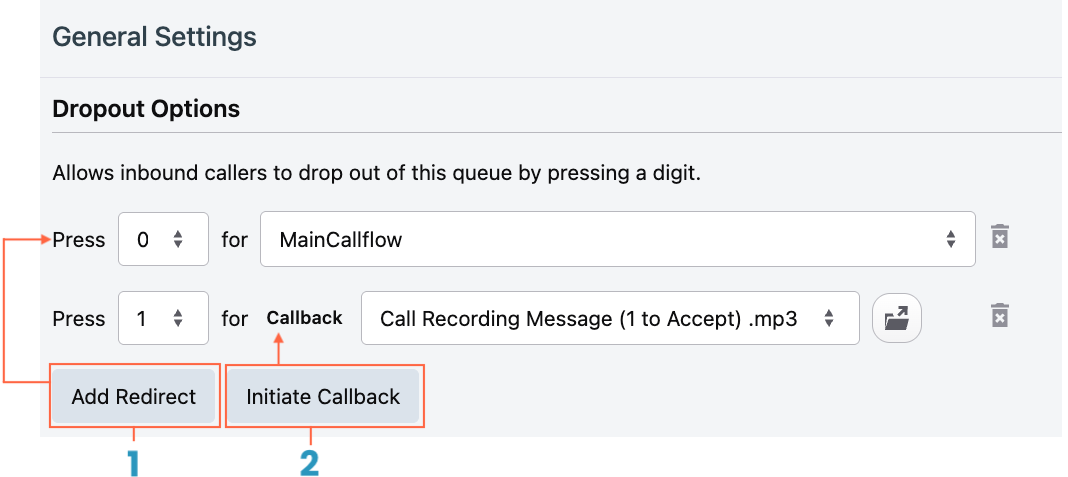
Provide callers with options to leave the queue while waiting.
- Add Redirect:
Add an action allowing callers to press a key (e.g., "Press 1") to be redirected immediately to:Another queueA voicemail boxA specific user or deviceA callflow, such as returning to the main menu or routing through a different call path
2. Initiate Callback:
Allow callers to press a key to request a callback rather than continuing to hold. Their place in the queue is saved, and they will be automatically called back when an agent becomes available.
Tip: If no Redirect or Callback options are added, callers will remain in the queue until their call is answered, times out, or escalates
Caller Announcements
This section outlines how to add greetings, optional caller responses, and connection settings before connecting callers to agents.
Set Up Caller Announcement Options
Use these fields to control the caller experience before they reach an agent:
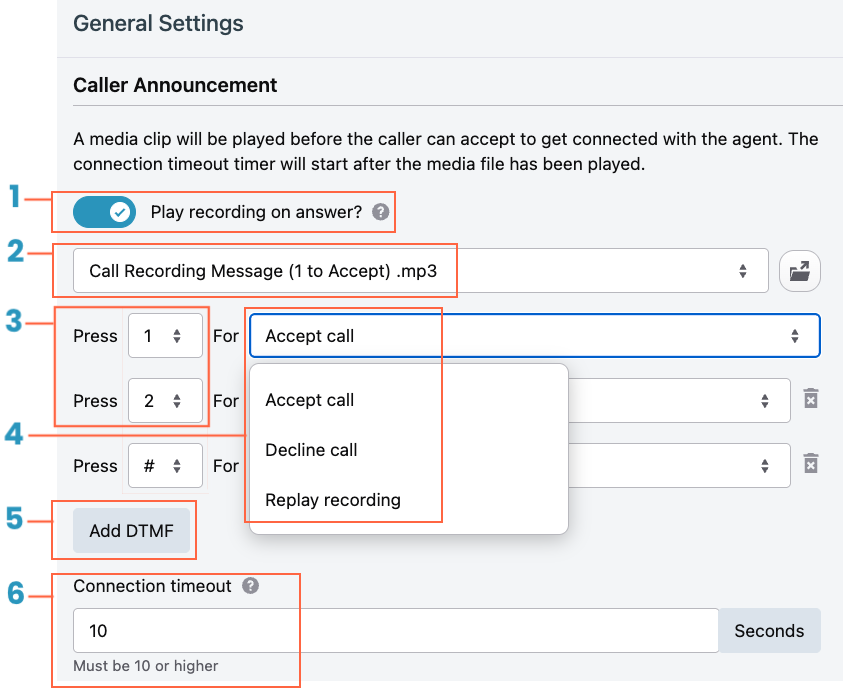
Play Recording on Answer: Choose whether to automatically play a recorded message to the caller before attempting to connect to an agent. Example: A welcome message like "Thank you for calling [Company Name]. Please hold while we connect you."
Upload or Select Media: Upload a new media file or select an existing file from the media library to use as the recording. Example: Upload a custom greeting, instructions, or important announcements.
Press: Assign a required keypress option if needed. Select a key between 0-9, #, or to allow caller interaction after the recording.
For: Define the action that occurs after the caller presses the key:Accept Call: Proceed to connect the call to an available agent. Decline Call: End the call without connecting to an agent. Replay Recording: Replay the announcement for the caller.
Add DTMF (Optional): Enable this if you want to require a keypress confirmation before moving the caller forward. Useful if you need callers to acknowledge the message before continuing.
Connection Timeout: Set the number of seconds the system should wait for the agent to answer after the caller is ready. Important: The connection timeout must be set to 10 seconds or higher to allow sufficient time for agent pickup.
Tip: Using Caller Announcements with DTMF options is a great way to ensure callers acknowledge important information before being routed to an agent.
Choosing a Routing Strategy
This section explains how calls will be distributed to agents.
Routing Strategy Options
This section explains the available call routing methods.
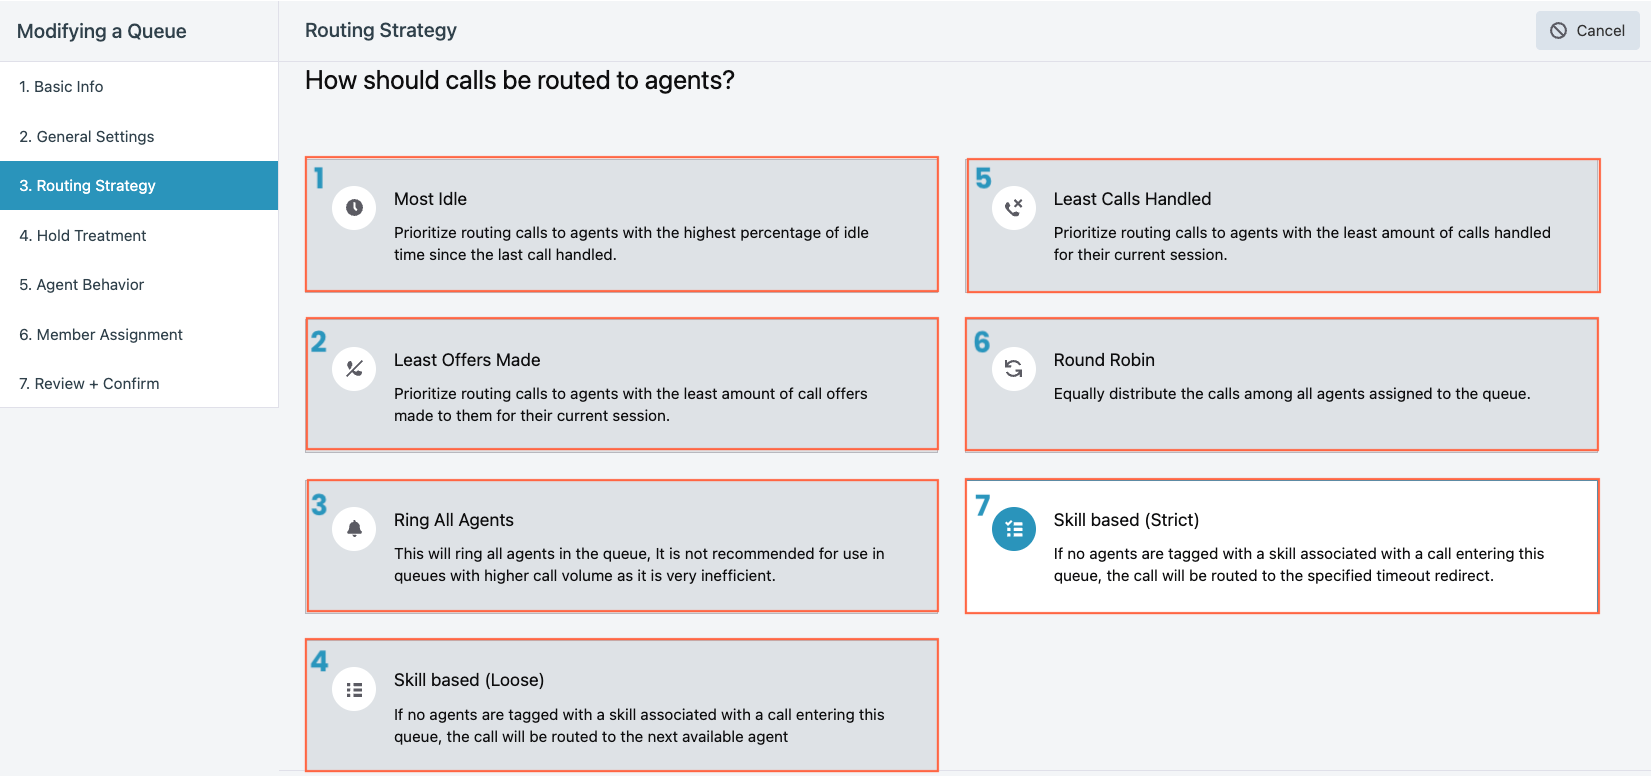
Select a Distribution Method
Choose how calls are assigned to agents.
Most Idle: Route the call to the agent who has been idle the longest since their last call.
Least Offers Made: Prioritize agents who have received the fewest call offers during their session.
Ring All Agents: Ring all available agents at the same time until one answers.
Skill-Based (Loose Match): Prioritize agents with matching skills, but allow other available agents to take the call if needed.
Least Calls Handled: Assign calls to agents who have handled the fewest total calls.
Round Robin: Distribute calls evenly across agents by rotating assignments.
Skill-Based (Strict Match): Only route calls to agents who exactly match the required skill for the call.
Designing Hold Treatment
This section outlines how to configure caller experience while on hold.
Set Up the Media Loop
This section describes the actions that can be used in the hold loop.
Customize On-Hold Experience
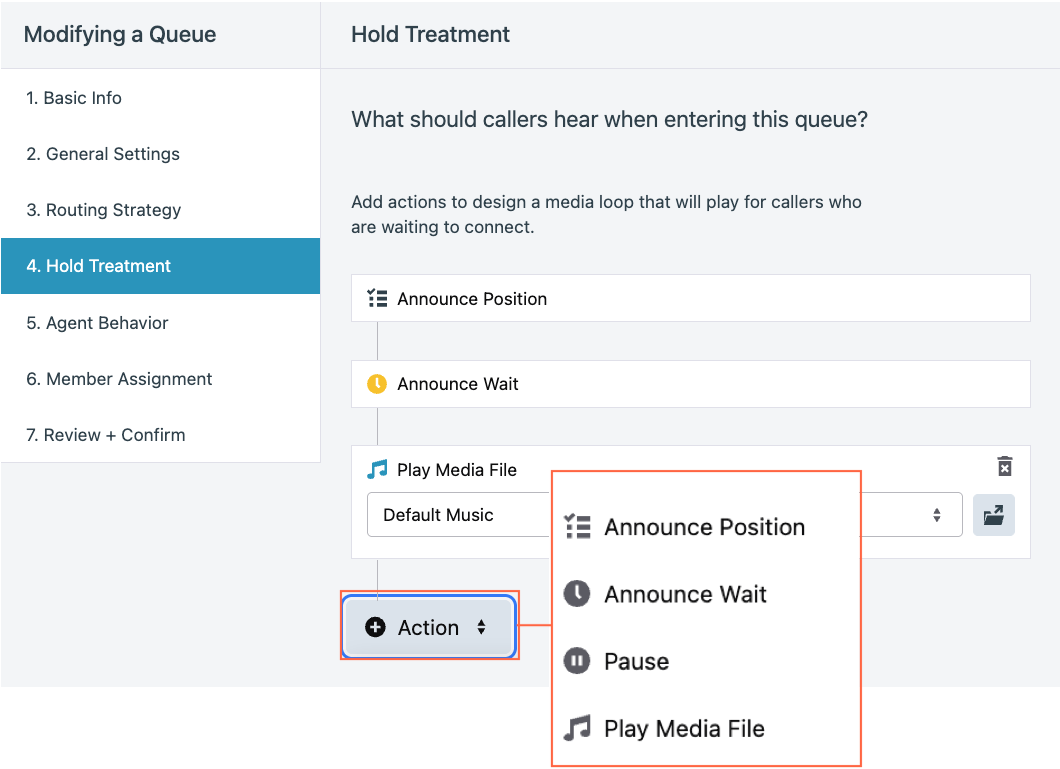
Add announcements, pauses, and music for waiting callers.
Announce Position: Tell callers their queue position.
Announce Wait Time: Share estimated wait times.
Pause: Insert silent gaps.
Play Media File: Provide hold music or informational audio.
Configuring Agent Behavior
This section covers how agents interact with incoming calls.
Set Agent Handling Options
This section explains how to fine-tune how agents receive calls and manage their availability between interactions.
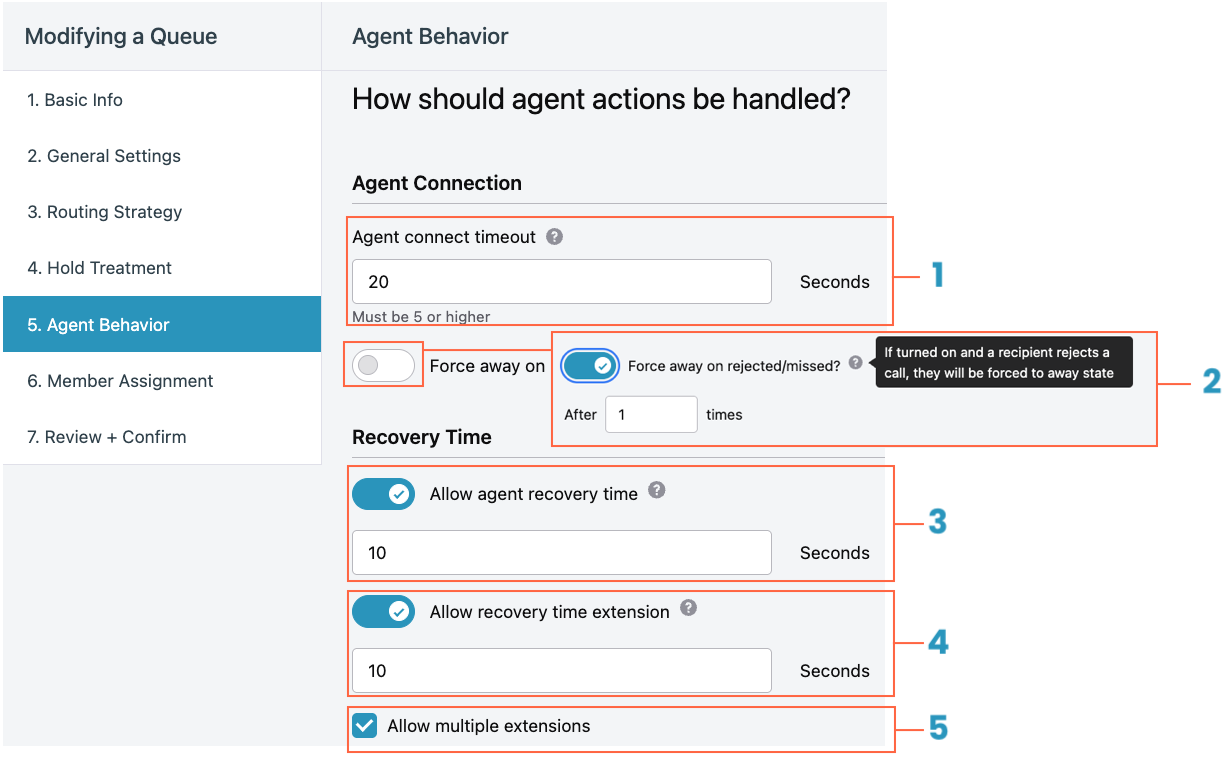
Agent Connection
Configure how long the system waits for agents to connect to calls, and what happens when they reject or miss a call.
Agent Connect Timeout: Set how long the system waits for an agent to answer an incoming call. Must be set to 5 seconds or higher.
Force Away on Rejected/Missed Calls: Automatically sets the agent’s status to Away after a rejected or missed call. Helps prevent repeated routing to unavailable agents.
Recovery Time
Control how agents transition between calls and whether they can extend their post-call recovery period.
Allow Agent Recovery Time:
Enables a recovery period between calls.
Set the number of seconds to wait before delivering the next call.
Example: 10 seconds
Allow Recovery Time Extension:Allows agents to manually extend their recovery time if needed. Set the number of seconds per extension. Example: 10 seconds
Allow Multiple Extensions:Enable this option to let agents extend their recovery time more than once if required.
Assigning Members to the Queue
This section explains how to attach users to the queue.
Manage Members Screen Overview
The Manage Members screen is divided into two panels:
Assign Agents and Managers
Set user roles for the queue.
Select users from the list.
Click Assign to Queue.
Each panel has simple tools to search, select, and manage users.
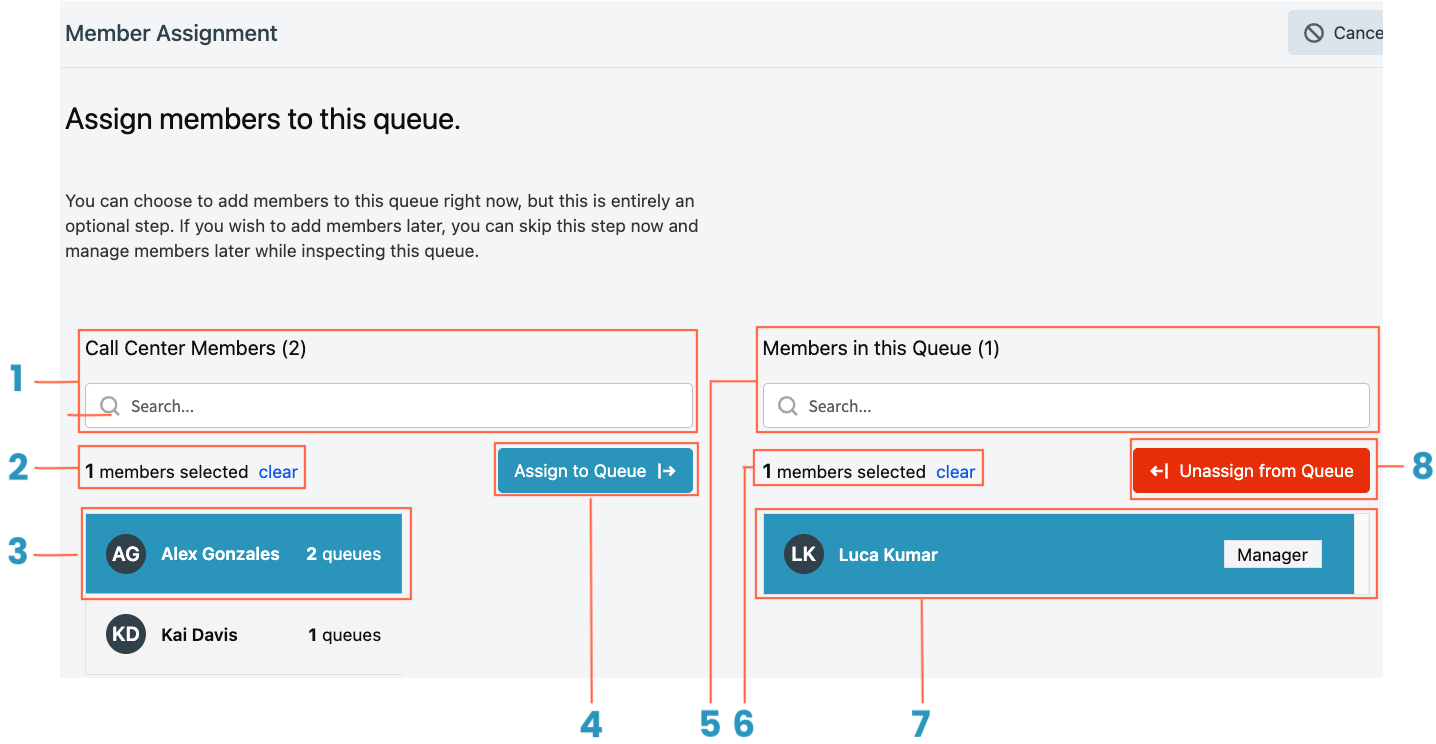
Available Users Panel
Manage users who have not yet been added as Call Center members.
Available Users and Search: View the total number of available users and search by name.
Users Selected – Clear: Displays how many users are selected; click Clear to unselect all.
Select User: Click on a user to select them.
Add as Member (Button): After selecting, click to add users to the Call Center.
Call Center Members Panel
Manage users who are already active members of the Call Center.
Search Member Field: Search for existing Call Center members by name.
Members Selected – Clear: Displays how many members are selected; click Clear to unselect all.
Select User: Click on a member to select them.
Remove Member (Button): After selecting, click to remove users from the Call Center
Final Review and Saving
This section covers reviewing and saving the entire queue setup.
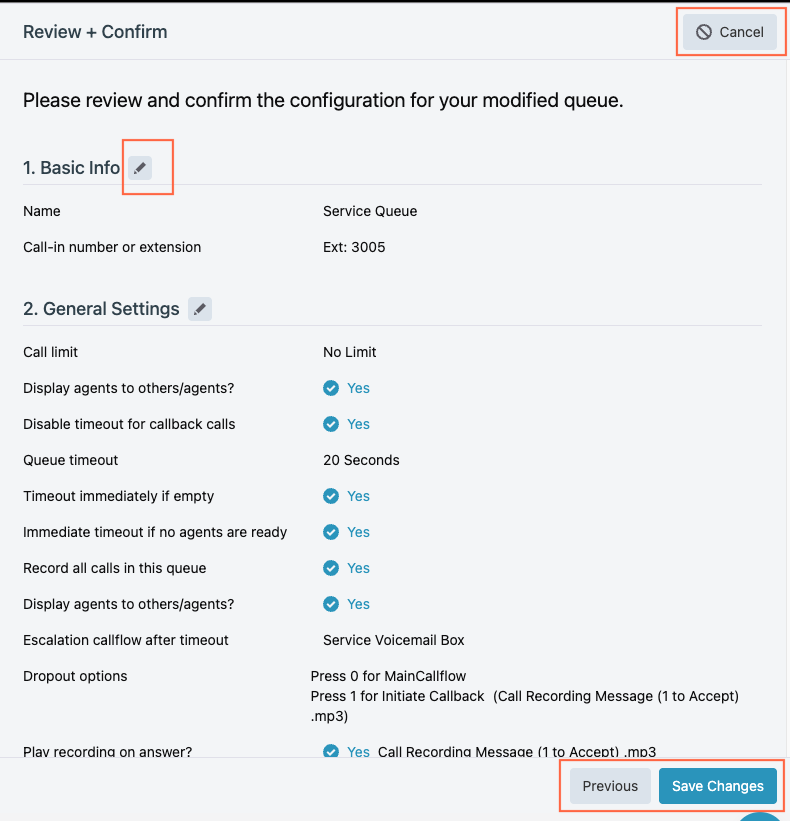
Review and Confirm Setup
This section shows how to complete queue setup.
Finalize Configuration
Double-check and save your settings.
Review all key sections: Basic Info, General Settings, Routing Strategy, Hold Treatment, Agent Behavior, and Member Assignment
To make edits, click the pencil icon next to the section you want to update
Use the Cancel button in the upper-right corner to discard any unsaved changes
Click Save Changes at the bottom to confirm and apply your updates
Once saved, your configuration changes will take effect immediately