

Help Center / Smarter Voice / Voicemail and logs / Set up voicemail boxes
Voicemail and logs
Set up voicemail boxes in Business Phone
Voicemail Boxes are obviously good methods for when your team is unavailable, whether busy or after hours. The first thing to know, is that when creating a user through the Dashboard, a voicemail box is automatically created and assigned to that user. Here we will cover:
On this page
Introduction
How to add standalone voicemail boxesGreat for departments instead of individuals
Editing Voicemailbox Options
Options to listen to voicemails
Creating a Non-User Voicemail Box
While creating a user, you have the option to automatically create a voicemail box for them, which will link to the email address of the user. (For more information on creating users, refer to our User Creation Guide). For other options in the system such as Ring Groups or Auto Attendants, you will need to manually create a voicemail box.
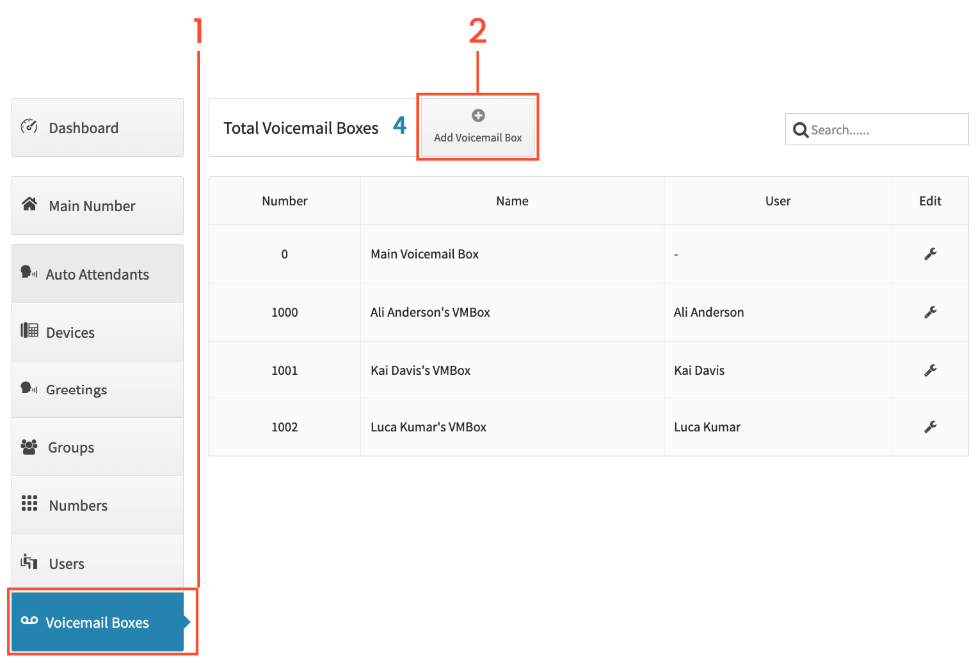
From the Dashboard click on Voicemail Boxes
Click on Add Voicemail Box
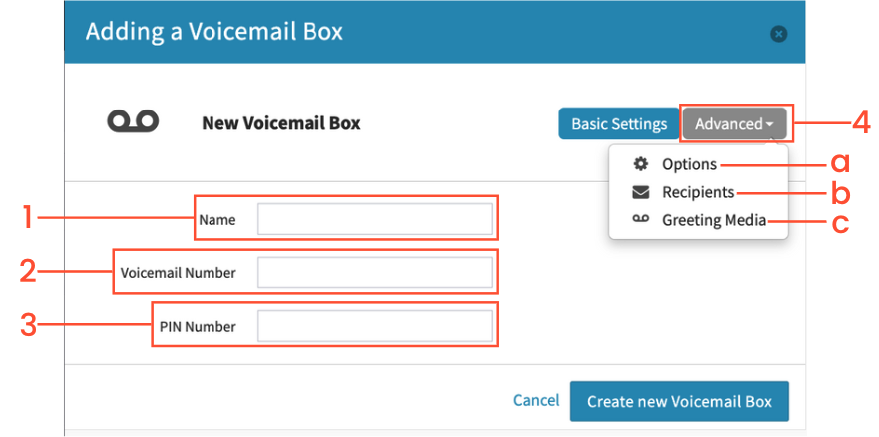
Enter the name of the new voicemail box - This is only for internal identification
Enter the voicemail box number you will use to access the voicemail boxThis can not be an existing extension numberNote: This voicemail box can not be accessed by dialing the Voicemail Number via a menu
Enter the PIN number you want to use to access the voicemail box (Optional, recommended for security)
Click on Advanced to show extra options for the voicemail boxOptions - This is where you can select options for the voicemail box’s setupRecipients - This option lets you manage who will be notified when someone leaves a message in this voicemail boxGreeting Media - This option allows you to change the media file that plays when someone reaches the voicemail box
Options
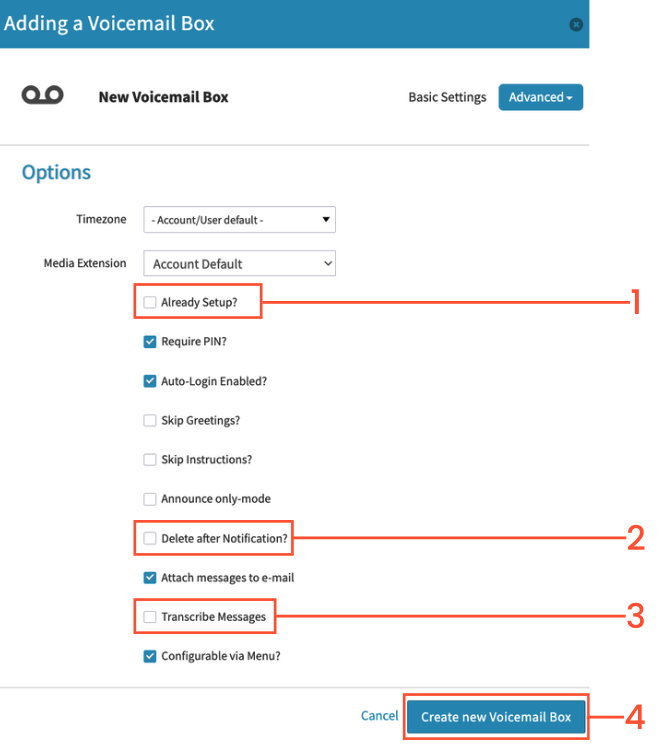
Already Setup - If this option is left unchecked, when one of your users logs in to it for the first time, it will prompt them to set up their voicemail greeting, and then automatically check this box when that is completed. With it unchecked, those leaving a voicemail will hear a messages saying it’s not set up, followed by being able to leave a voicemail.
Delete after Notification - this is completely preferential to your account set up. Your voicemail box has the ability to store up to 100 voicemails before callers will not be able to leave messages. Checking this will delete the voicemails from the back end of your system after the voicemails have been emailed to your set recipients.
Transcribe Messages - check this to receive a transcription of your voicemails in your email of the recording.
Click “Save Changes” to confirm the changes to the voicemail box.
Recipients
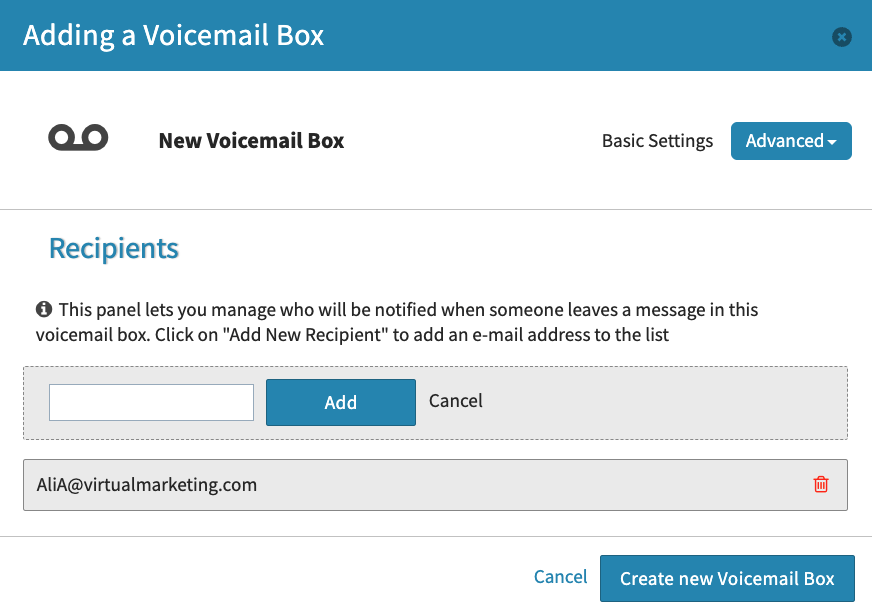
If this voicemail box was created attached to a user when the user was created, the email address of that user will be automatically linked to the voicemails and does not need to be put here a second time. You can add more recipients, or make sure there is at least one if this is a Non-User voicemail box.
Greeting Media
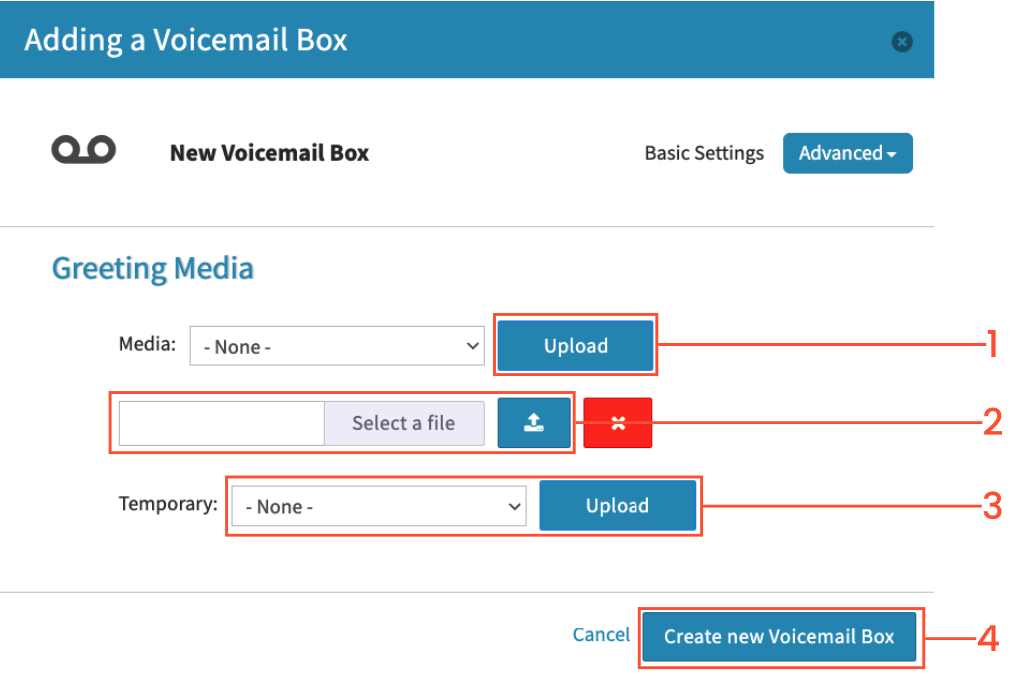
Click “Upload” to open the uploading options. You can also select a file from the existing media files on your system by selecting the dropdown to its’ left.
Select the file from your computer you wish to play when someone reaches the voicemail box, and click the blue ‘Upload’ button. When preparing files for use with your account, please use the following parameters: - MP3/Wav - 1 MB max file size
The Temporary option is generally handled in a better way, but this will override the file set in the “Media” option. This is usually used for the purposes of Vacation or Holidays. We recommend just manually changing the file in the dropdown for “Media” if you need to change voicemail box greetings.
Save changes once you are finished uploading / choosing your media files.
Setting Up Your Voicemail Box Using a Cell Phone or Landline
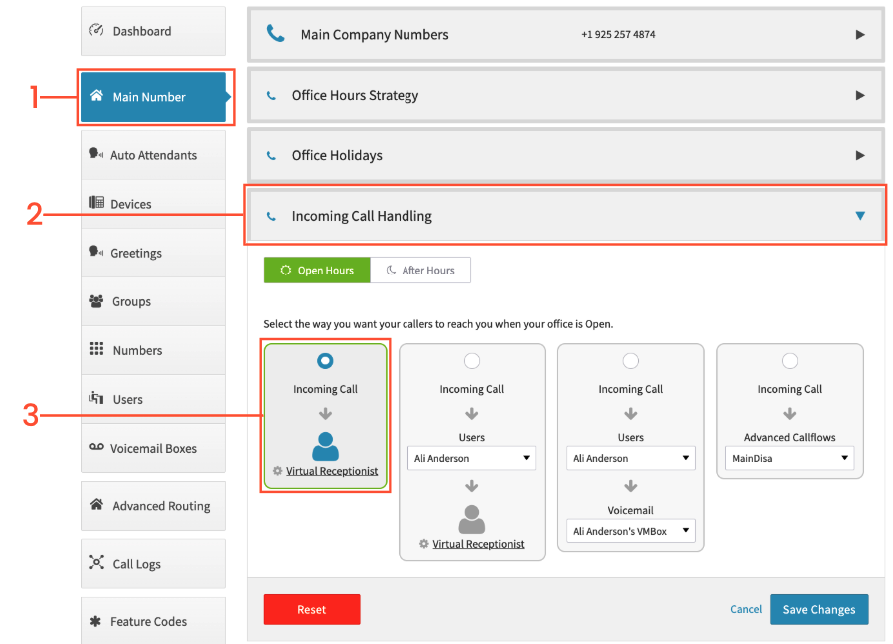
Click on Main Number
Click on Incoming Call Handling
Ensure the Incoming Call Handling is set to the Virtual Receptionist
Call your main number
Press *97
The system will prompt you to enter your extension number
The system will ask you for your current PIN
The system will prompt to record a voicemail greeting
Press any key to end recording
Press 1 to save, press 2 to listen, press 3 to re-record
Once saved, the system will say “your mailbox has now been configured”
Press 0 to return to voicemail main menu
Press 5 at the main voicemail menu to change any settings
Retrieving Voicemail Messages
The first time you access your voicemail box, the system will prompt you to set up the voicemail box including setting up a PIN. If Smart PBX Directory is enabled on your account, you will be prompted to state your name after creating a new PIN. This will be played back for confirmation if there is more than one person meeting the criteria for the name search.
From an Auto-Provisioned VoIP Phone
Press the Message button on the phone (Or dial *97)
Enter your mailbox number followed by the # key
Enter your password/PIN followed by the # key
From a Cell Phone/Landline
Call into a number on your system that goes to a menu (Virtual Receptionist)
Enter *97
Enter your message box number followed by the # key
Enter that box’s PIN followed by the # key
From a Softphone (Mobile Application)
On your Softphone dial *97
Enter your Mailbox number
Choose option 5 to update your voicemail
From the Admin Dashboard
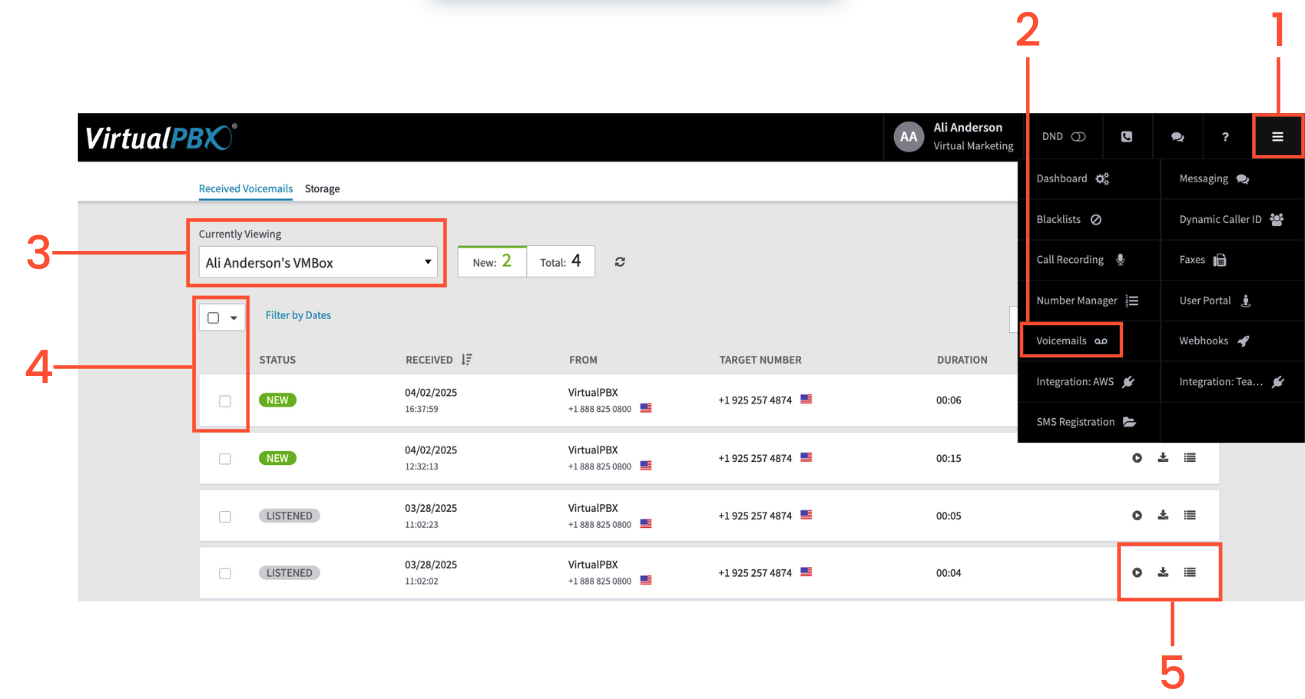
Navigate to the hamburger menu in the top right of the Dashboard
Select “Voicemails”
Choose the voicemail box that you want to access from the dropdown
You can either “Select All” near the top, or individually select which voicemail you want to access or delete
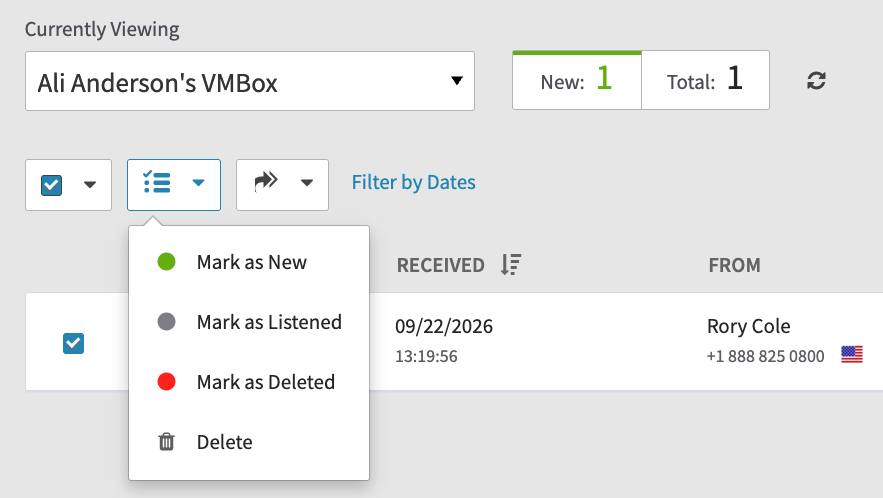
A. You will then have four options, Mark as New, Mark as Listened, Mark as Deleted and Delete. You can either select “Mark as Deleted or Delete before refreshing the page to delete the voicemails.
You can also choose to either Play / Download / Get more information about voicemails on the right side of the screen.
From User Portal
Log in as a User
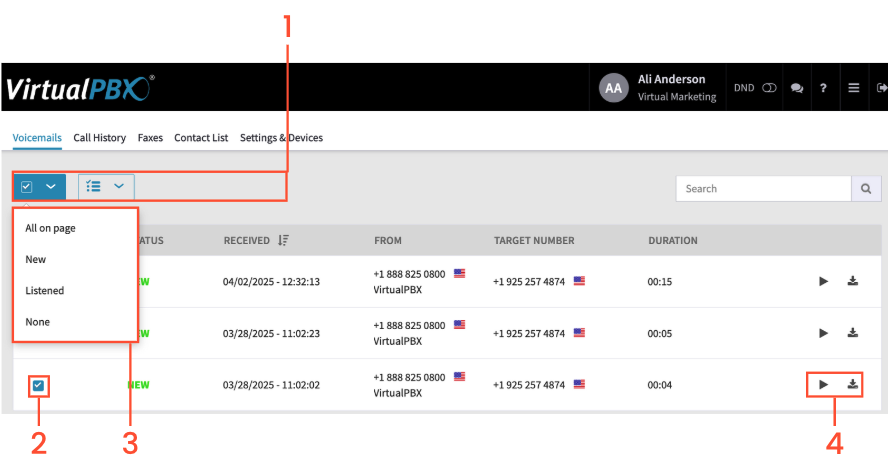
Click on the box in front of a Voicemail to change its status
You can choose to Mark as New, Mark as Listened or Mark As Deleted
To listen or download your voicemails click on the icons at the far right. The triangle is to play the message in your browser/computerThe down arrow icon is to download the voicemail to your device
Keep in mind that you can only store up to 100 voicemails before the voicemail box is full.