

Help Center / Smarter Voice / Messaging / Send a fax
Messaging
Send a fax in Business Phone
In order to set up a number for faxing, you will need a designated number for faxing. You can either use a spare number, or purchase a new number.
On this page
Main Faxbox Setup
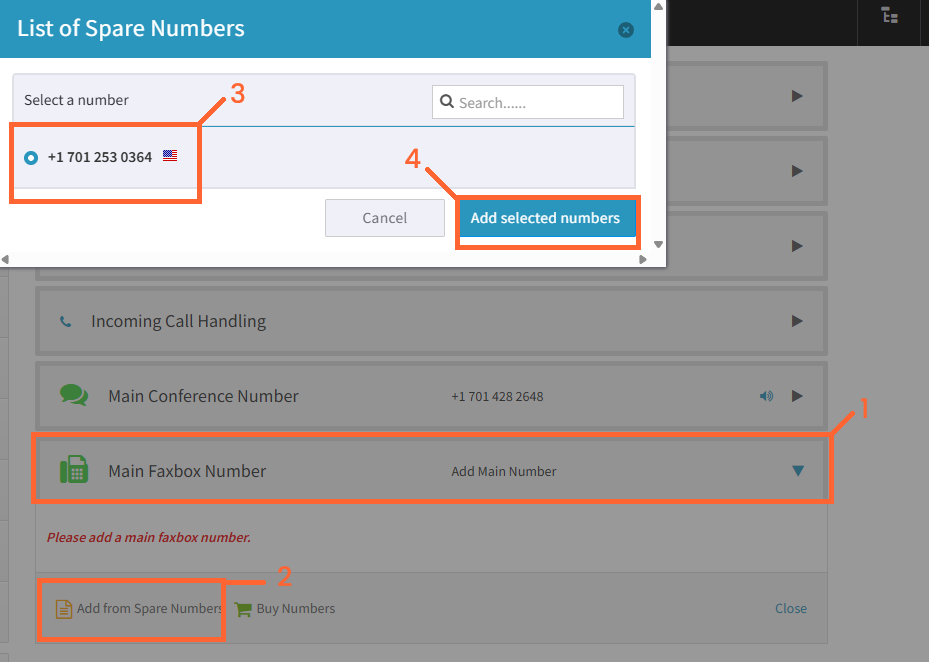
Click on Main Faxbox Number
Click “Add from Spare Numbers”
Select the number you wish to use for your faxing
Click “Add Selected Numbers”.
If you do not already have a spare number for faxing, you can click ‘Buy Numbers’ to purchase.
Once you have added a number to your Main Faxbox, you will have 2 fields; inbound notification emails and Email Permissions.
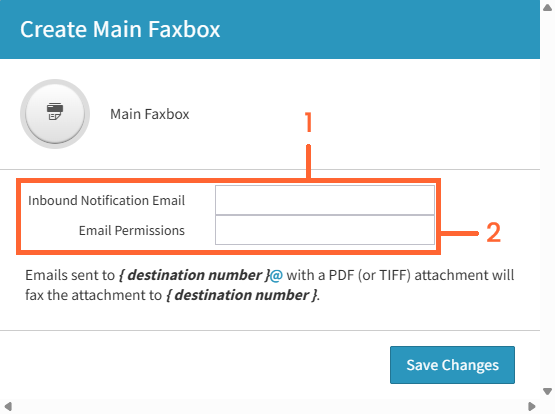
Inbound Notification Emails - This is who receives the faxes when they are sent to the number in question. They will also receive any errors that may occur in the faxbox.
Email permissions detail who are allowed to send email to fax documents through the VirtualPBX account. This can be a specific email (taylor.test@virtualpbx.com), or an email domain if you would like all individuals with the matching domain to be able to send faxes out (@virtualpbx.com)
User Faxbox
Click to Enable and the box will expand
Choose to Select a spare number, Buy a new number or Assign a New Extension
If you want the User to be able to send and receive faxes: Select Number to use for sending and receiving faxes. Can choose from available number on account (Spare Number) or Purchase (New Number). Once a number is chosen click on Save Changes.
If you want a User to only receive faxes, Assign a New Extension: This will create a new extension number that is specifically for inbound faxes for 1 user only. You will not be able to send faxes from this faxbox/using the faxbox credentials. This is because sending a fax requires CallerID information which is associated with an actual phone number.
Using an extension will only work for inbound faxing.
You will need to create a new extension that does not already belong to another object (user, group, etc) on your system.
This allows you to set up FaxBox on a user without having to purchase a phone number/assign a phone number to the Main faxbox.
Your user will need to inform the person faxing of their new extension. Once dialing the main number, this person can enter the new extension, which will then route to the Faxbox. Please note - you will need to have your incoming call handling set up with a Virtual Receptionist (Menu) for people to dial an extension.
Sending a fax through VirtualPBX
Requirements: You will need a Main Faxbox set up with email permissions, as outlined in the “Main Faxbox Setup” header.
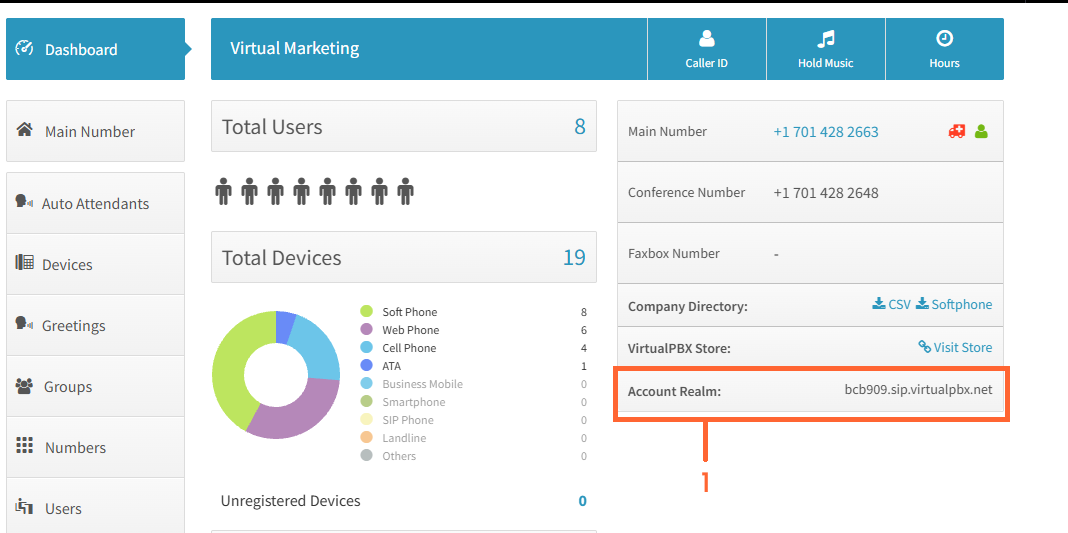
Navigate to your Dashboard, and copy down your Account Realm - This will be needed later when sending the email-to-fax.
Open your email client - this should be the same email that was set up under the email permissions.
Create a new email: In the “To” field, enter the following:
+1(Fax number you are sending to)@accountrealm - EG: If sending a fax to VirtualPBX at 415-221-6600 the email would look like:
+14152216600@bcb909.sip.virtualpbx.net
Attach a PDF file to the email (Smaller than 7MB) - and send the email - it should be converted to a fax and sent - successful transmissions or errors will be sent to the “Inbound Notification Email”.
A list of your faxes, both sent and received can be found in the dropdown menu in the top right, under “Faxes”.
Physical Fax Machines (VoIP Adapters)
To use a physical fax machine with VirtualPBX, you will need a SPA adapter - We have had success with the Cisco SPA 112 devices, as well as the Grandstream HT801/802 devices.
To begin, you will need to create a ATA device on a user. The fax device must be attached to a user with a DID (Direct Inward Dial) phone number.
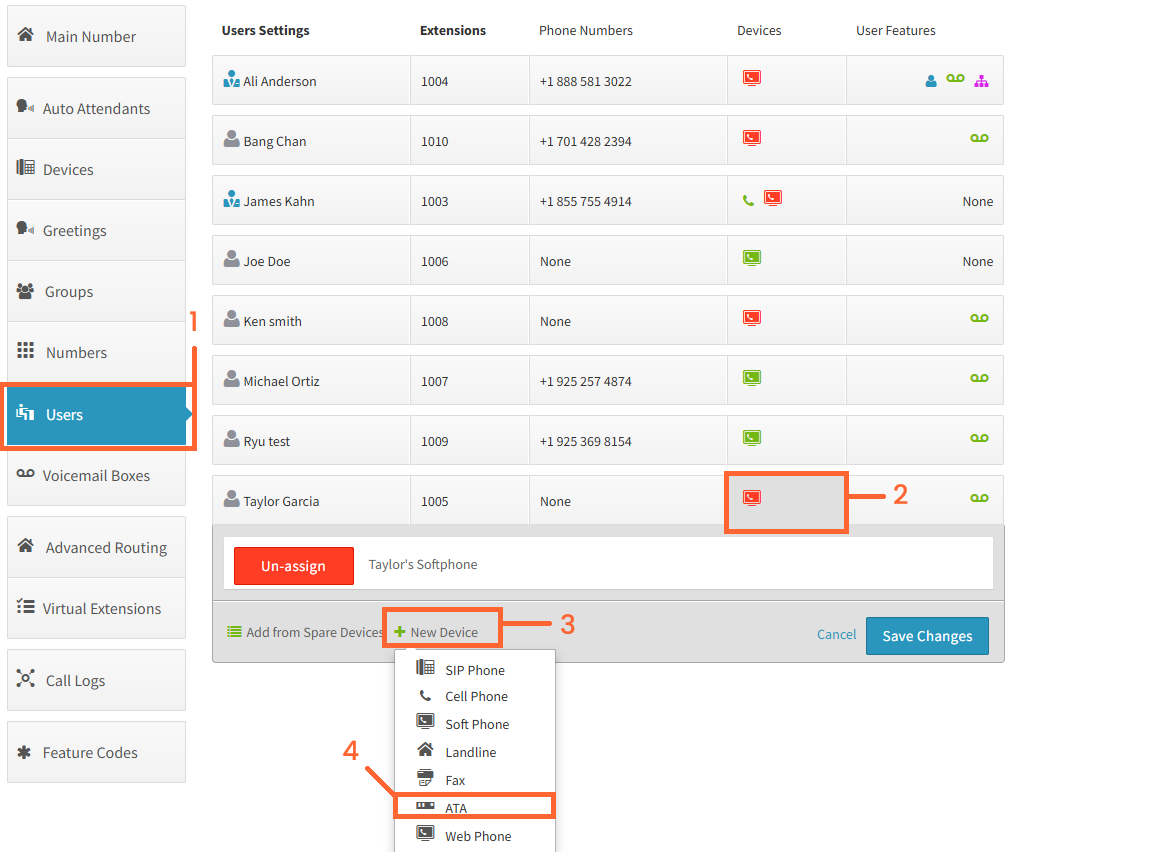
Click on Users on the left
Click on the “Devices” column
Click New Device
Click on ATA
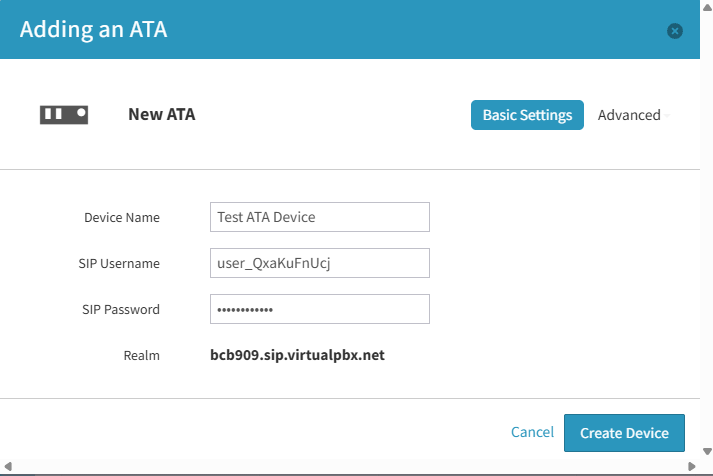
Give the device a name, and copy the SIP Username / SIP Password / Account Realm - These details should not be changed, and are what you are going to input into the SPA device to register it with VirtualPBX.
Create Device and Save changes.
Register your device using the steps in the guide below

Once the device has been registered, test a call to the DID of the user and you should hear fax tones; if so, this number should now be able to send / receive faxes!