---
notionId: "1bcf0d27c7988098ab36e21926775f75"
product: "business-phone"
cluster: "call-handling"
intent: "business-phone.main-number-setup"
docSlug: "main-number-setup"
task: "Set up the main number in Business Phone"
title: "Set up the main number in Business Phone | VirtualPBX"
meta_description: "Check the settings available to our phone numbers in our Number Settings Guide!"
answer: "Check the settings available to our phone numbers in our Number Settings Guide!"
audience: "admin"
updated: "2025-03-20"
legacy: ["main-number-setup"]
headings: [{"depth":2,"text":"Main Number Features","id":"main-number-features"},{"depth":2,"text":"Office Hours Strategy Setup","id":"office-hours-strategy-setup"},{"depth":2,"text":"Office Holidays Setup","id":"office-holidays-setup"},{"depth":2,"text":"Incoming Call Handling","id":"incoming-call-handling"},{"depth":2,"text":"Call Routing Options","id":"call-routing-options"},{"depth":3,"text":"Option 1: Incoming Call to Virtual Receptionist","id":"option-1-incoming-call-to-virtual-receptionist"},{"depth":3,"text":"Option 2: Incoming Call to a Specific Option, then to Virtual Receptionist","id":"option-2-incoming-call-to-a-specific-option-then-to-virtual-receptionist"},{"depth":3,"text":"Option 3: Incoming Call to a User, Group, or Device then to Voicemail Box","id":"option-3-incoming-call-to-a-user-group-or-device-then-to-voicemail-box"},{"depth":3,"text":"Option 4: Incoming Calls sent to an Advanced Call Flow or secondary Auto-Attendant","id":"option-4-incoming-calls-sent-to-an-advanced-call-flow-or-secondary-auto-attendant"},{"depth":2,"text":"Greeting Options for Virtual Receptionist","id":"greeting-options-for-virtual-receptionist"},{"depth":3,"text":"1. Text to Speech","id":"1-text-to-speech"},{"depth":3,"text":"2. Upload your own file","id":"2-upload-your-own-file"},{"depth":3,"text":"3. Choose from existing recordings","id":"3-choose-from-existing-recordings"},{"depth":3,"text":"4. Record it over the phone","id":"4-record-it-over-the-phone"},{"depth":3,"text":"5. Professional Recording Services","id":"5-professional-recording-services"},{"depth":2,"text":"Additional Menus (Auto-Attendants)","id":"additional-menus-auto-attendants"},{"depth":3,"text":"Adding a Phone Number to your Auto Attendant","id":"adding-a-phone-number-to-your-auto-attendant"},{"depth":3,"text":"Configuring your Auto Attendant Routing","id":"configuring-your-auto-attendant-routing"},{"depth":2,"text":"Main Conference Number","id":"main-conference-number"},{"depth":2,"text":"Main Faxing Number","id":"main-faxing-number"}]
lint: ["meta-answer","answer-first"]
---
## Main Number Features
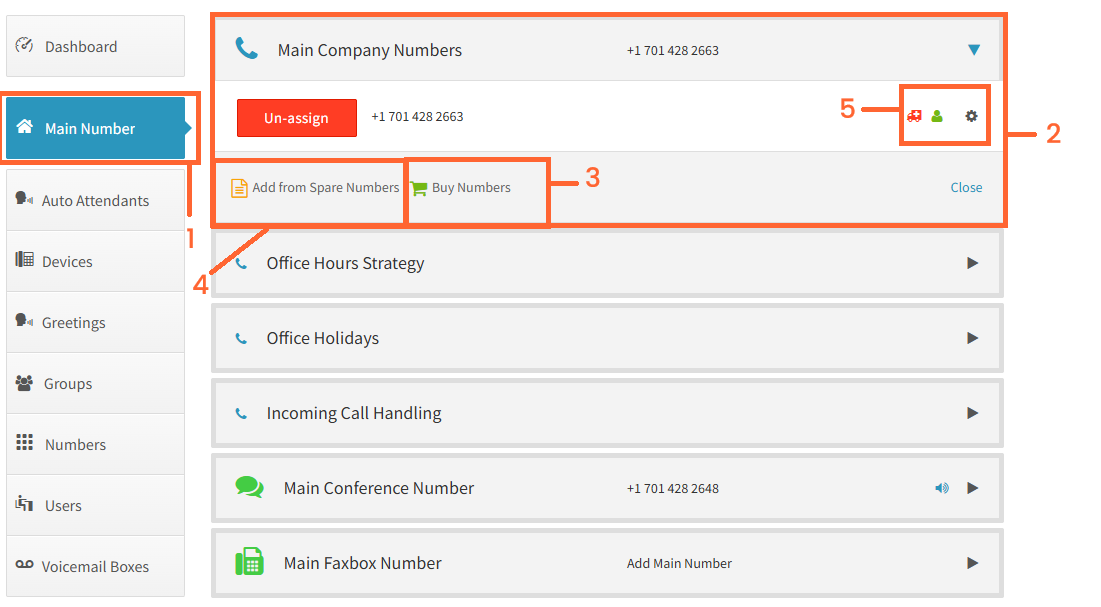
To access your Main Number routing, click “Main Numbers” on the left side of your Dashboard as an administrator.
Click on “Main Company Numbers” after to show further options on this screen.
## Office Hours Strategy Setup
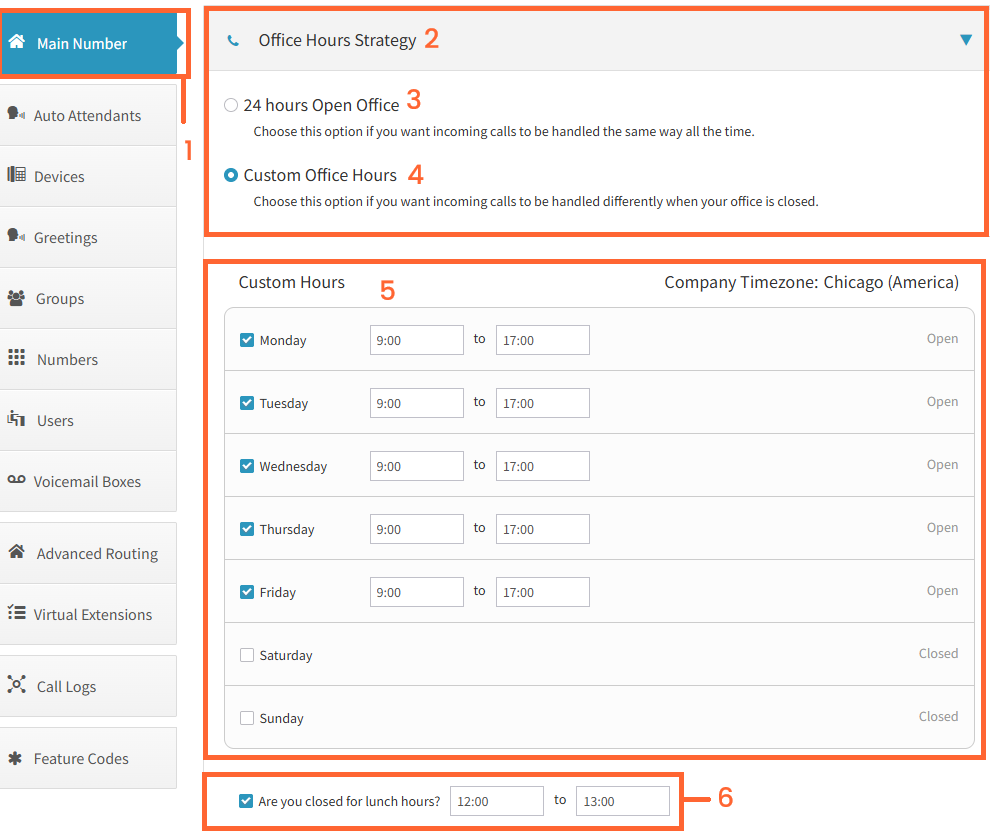
Through your main number routing, you can decide if you would like your routing to be the same 24/7, or if you would like to set up specific office hours.
Click on Main Number
Click on Office Hours Strategy
24 hours open office should be selected if you want your calls to all route the exact same way, regardless of the time of day
Custom Office Hours should be selected if you want to route your calls different during after hours and/or lunch hours.
If selecting custom office hours, set your hours of operation here. The timeframes set on this page will represent your ‘open’ hours for the business.
If you are closed or have alternate routing for lunch, please select this field as well and fill out your lunch hours.
## Office Holidays Setup
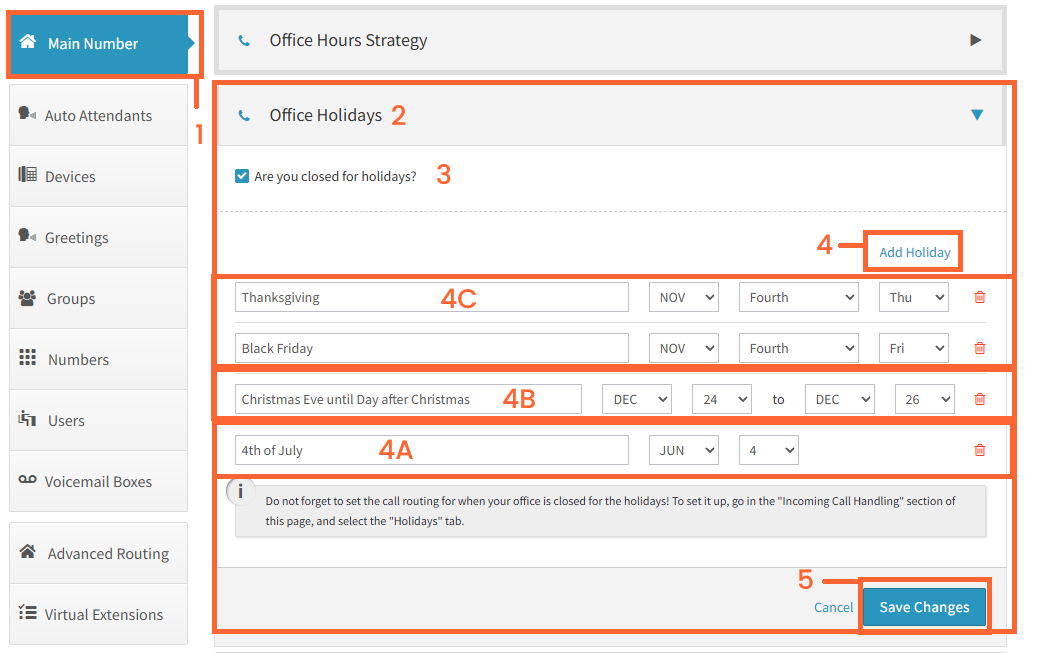
To setup Office Holidays, click on Main Number
Click on “Office Holidays” to open the dropdown menu
Make sure the box is checked if you are closed for Holidays
Click “Add Holiday” and select what kind of Holiday or date you’re setting up4a. Single Day - One day Holidays recurring yearly4b. Date Range - Range of dates for a Holiday Break (IE: Xmas break)4c. Advanced - Allows you to select certain days of the month (For example, the fourth Thursday in November for Thanksgiving)
Click Save Changes to save the new Holidays.
## Incoming Call Handling
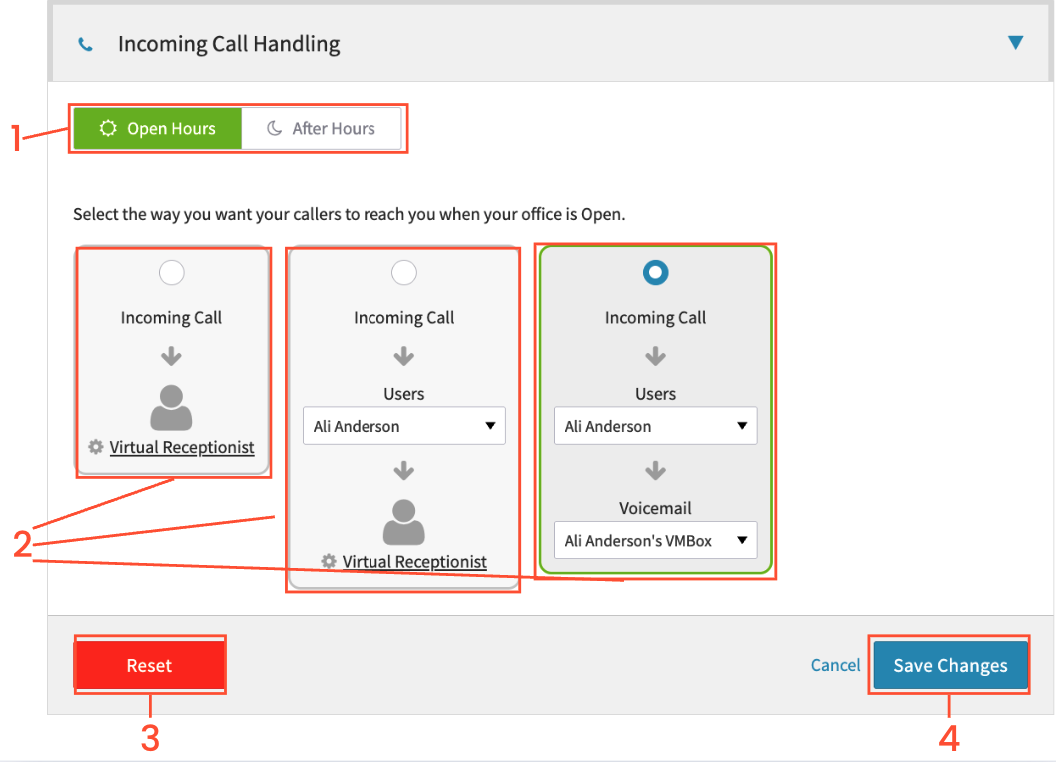
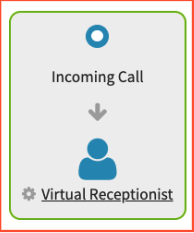
Incoming Call Handling allows you to control how incoming calls to your main business number will be routed.
Select the time frame you would like to edit the routing for. If you have office hours strategy and/or Holiday strategies turned on, choose which routing option you would like to work on
Select the routing option you wish to use
Reset will reset all incoming call handling settings. WARNING: This includes all Virtual Receptionist settings, and all of the various time options.
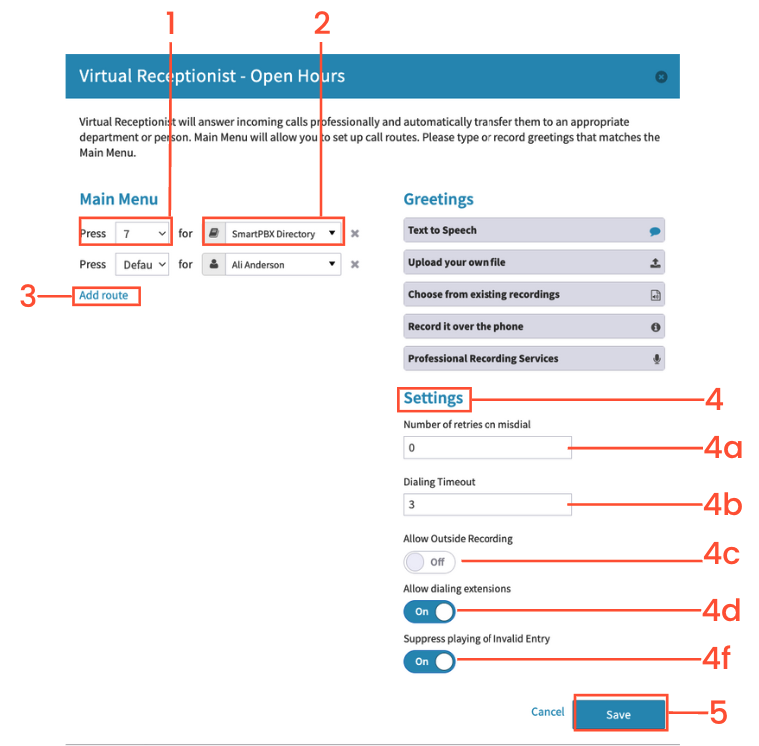
Click on the first dropdown and select 0-9, *. Additionally, there is “default” action, which will route directly to your chosen location when a caller does not choose an option, or presses the wrong option too many times, within the amount of greeting plays listed in step 4a and 4b below.
Click on the 2nd dropdown to select where the calls route. You can select, users, devices, groups, Voicemail boxes, the SmartPBX Directory or even media files. Devices and media files are not typically recommended, as the system does not know where to send the call to next, meaning the call would drop if not answered. We recommend to stick to users, groups, queues, or VM Boxes.
Add more menu options through ‘Add Route’
There are multiple settings to edit for your incoming call handling. Number of retries on misdial: The amount of times your greeting will replay after the initial greeting should your caller not choose an option presented or dial an incorrect number. Note this does not count the initial try. If an inbound caller cycles through all the greeting replays, and still does not choose, or places an incorrect option, the call will drop. To prevent this you can create a “Default” route from steps 1, 2, and 3 above. A default route will route the caller to that destination if you have one instead. Dialing Timeout: Amount of seconds the system will wait before repeating the greeting up to (Step 4a) times. Allow Outside Recording: Allows you you to record your main greeting using any phone, like a cell phone. Clicking here will give you the instructions to change the greeting via that kind of device. Please note that open and after hours have separate instructions, and changing those time periods requires calling in during those time periods (To change the after hours greeting, you must call in after hours)Allow dialing extensions: Allows callers to dial extensions for ring groups or users while in your menu. You will need this turned on if you are planning on using a directory of any kind in your greeting. PlaceholderSuppress playing of Invalid Entry: Prevents the system from saying ‘Invalid Entry’ should a caller choose an option not presented, and will replay the greeting media if you have a retry left. If no retries are left in the system, the call will drop unless
Once you have set your configuration, press ‘Save’ to make sure your account had been completely updated.
### Option 2: Incoming Call to a Specific Option, then to Virtual Receptionist
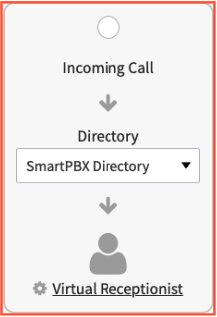
Using this option will route first to a selected user, group, or device. If the option routed to first fails to answer or is busy, the inbound caller will be transferred to the Virtual Receptionist.
This option has a set ring duration of 20 seconds for the initial user or group selected. If the call goes to the Virtual Receptionist, then rules for the user menu option or group will be followed. Note: This option will override device-level settings, i.e. Follow-Me and use cell phone voicemail.
Review the Virtual Receptionist instructions [here](/business-phone/main-number-setup)
### Option 3: Incoming Call to a User, Group, or Device then to Voicemail Box
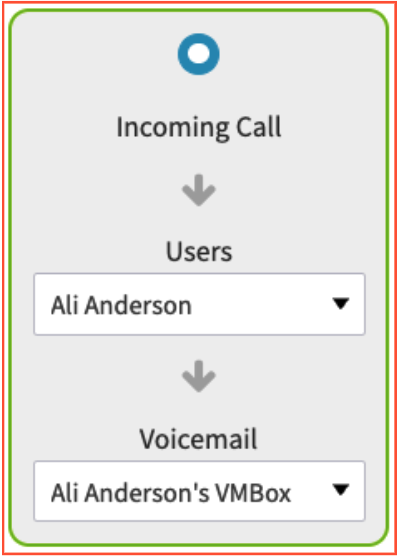
This routes inbound callers to a user, device or even a media file then will be transferred to the voicemail box of your choice. You can also choose to route directly to voicemail on this option.
Click on the dropdown to select a user, device, group, media file or Skip to Voicemail
Click the dropdown to select the voicemail box that you want the caller to end up at
Click on Save Changes
### Option 4: Incoming Calls sent to an Advanced Call Flow or secondary Auto-Attendant
This option is only for advanced features like SelectRoute or AutoRoute. If you do not have these features, you will not have this option shown to you. Contact us for more information!
## Greeting Options for Virtual Receptionist
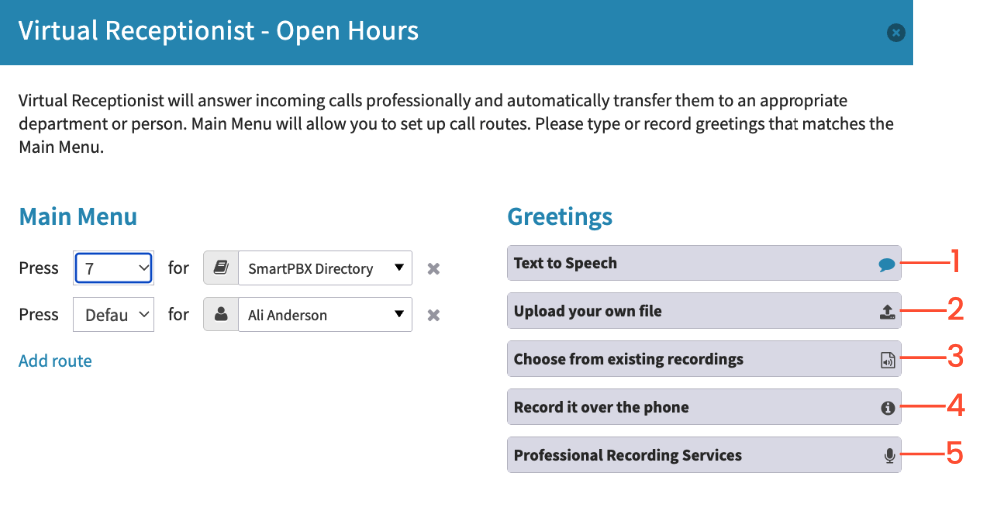
The Virtual Receptionist greeting is the first thing an incoming caller hears. There are multiple options for the greetings on your Virtual Receptionist. You can find these by clicking into the Virtual Receptionist on the first option or second option for call routing.
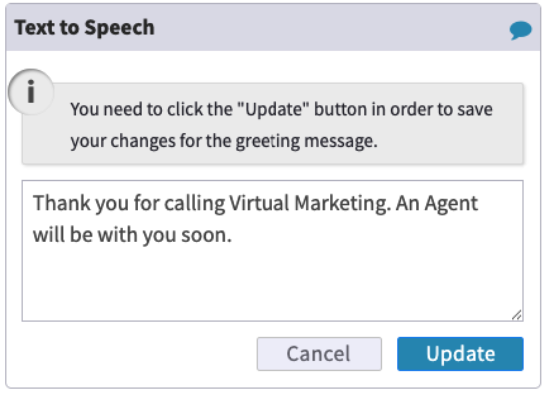
### 1. Text to Speech
Type in your script and a synthesized main greeting will be created for you. The character limit is 250-350 characters. Typically, you are aiming to identify your company name and tell callers what option to press to route the call to a specific department person or feature. This is a great feature
Doing this multiple times for the same period of hours (Open hours for example) will create multiple instances with the same media file name, so we recommend deleting or renaming old versions in your Greetings Manager (Menu on the left side of Dashboard) to avoid confusion.
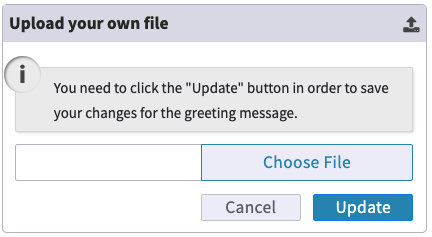
### 2. Upload your own file
The dashboard currently accepts . WAV and . MP3 file formats for upload. File size is currently limited to no more than 1 MB, which is approximately a 5-minute MP3 file.
When preparing files for use with Dash please use the following parameters:
MP3/WAV file format
1 MB max file size - MP3 is recommended for longer durations
You can use a program like [Audacity](https://www.audacityteam.org/) to record a file on your computer.
If the file you create is too large you will want to find a way to compress the file, either online or via an application.
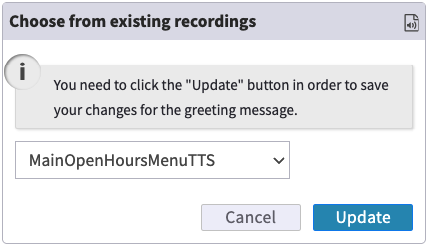
### 3. Choose from existing recordings
Use Choose from existing recording to select a media file you have already added to the system. The pull-down will show all media files, including hold music, voicemail greetings, or main greetings
### 4. Record it over the phone
Call the main number from a VoIP phone (Non-VoIP instructions further below), and dial the PIN for the hours period in which you are attempting to update. Please note if you are trying to change your after-hours greeting over the phone, you MUST call in during your after-hours period. The same idea applies to open, lunch, and holiday hours, if applicable.
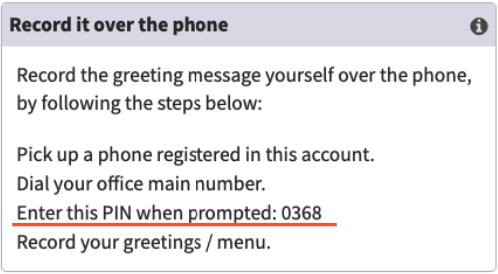
Please note that you must have a VoIP phone/device registered to your account. Record the greeting message yourself over the phone, by following the steps below:
Pick up a VoIP phone registered in this account
Dial your office's main number
Enter this PIN when prompted: XYZ (this will vary from account to account)
Record your greetings/menu
For Non-VoIP phones, you will need to turn on ‘Allow Outside Recording’ on the Virtual Receptionist’s settings. The person calling will now be able to do the same as a VoIP phone.
### 5. Professional Recording Services
You can order a professional recording through our partner SnapRecordings by either clicking ‘Order’ or going directly to [https://www.snaprecordings.com/virtualpbx](https://www.snaprecordings.com/virtualpbx)
## Additional Menus (Auto-Attendants)
Besides your main number Auto Attendant, you can also add additional auto attendants for extra routing. This can be used for different office locations, multiple businesses, if you have multiple menus in different languages, or an additional layer of menus for callers to pick from.
Note - There is a maximum limit of 20 auto attendants per account.
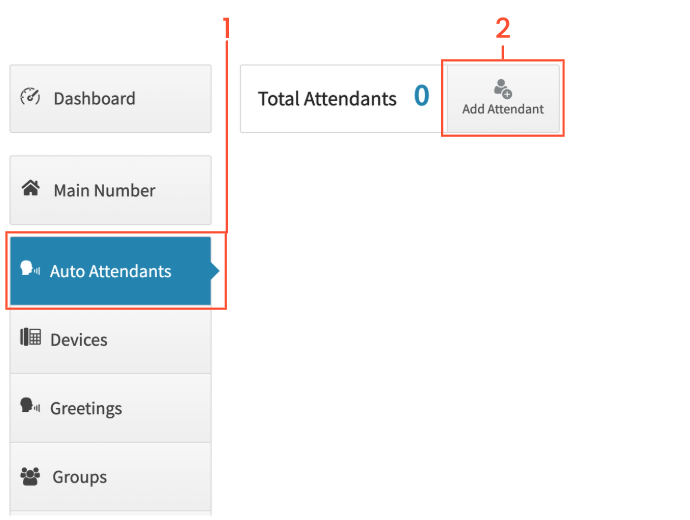
Click on Auto Attendants on the left column
You can add a new Auto attendant by clicking on the “Add Attendant” button.
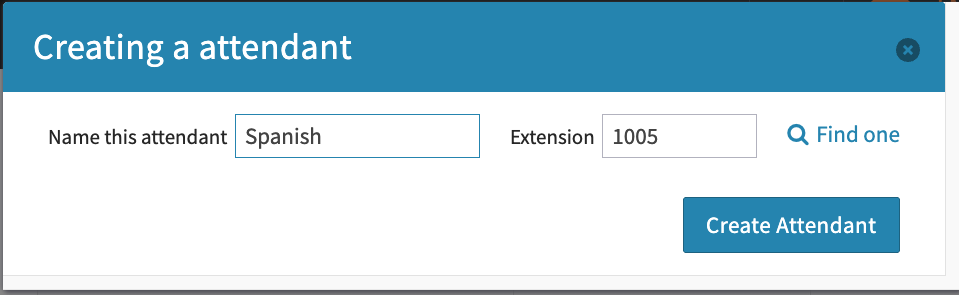
Enter a name for the attendant
Enter an extension number for the attendant. This is required, but unless a customer calls to a menu and knows this extension, they will not reach it by accident
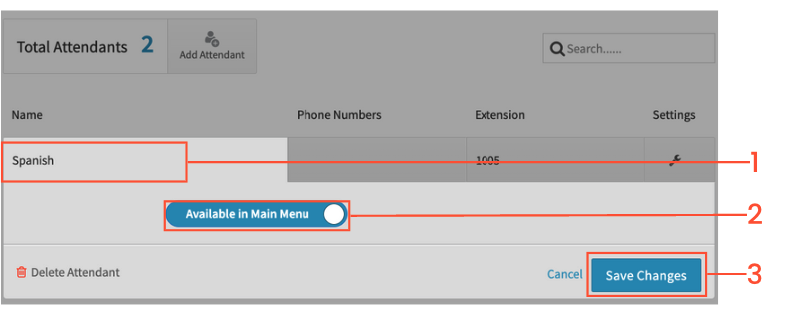
Click on the name of the Auto-Attendant
Choose to leave it as Unavailable in Main Menu or click to change to be Available in Main MenuUnavailable means you want this to be a standalone attendant that can not connect with other parts of your systemAvailable means this can be a menu option. This can essentially be used for a sub menusFor example, if option 1 is for English and 2 for Spanish, you would create an auto attendant with each respective language’s options, each as auto attendants, and set options 1 and 2 for the top menu as those attendants.
Click on Save changes
### Adding a Phone Number to your Auto Attendant
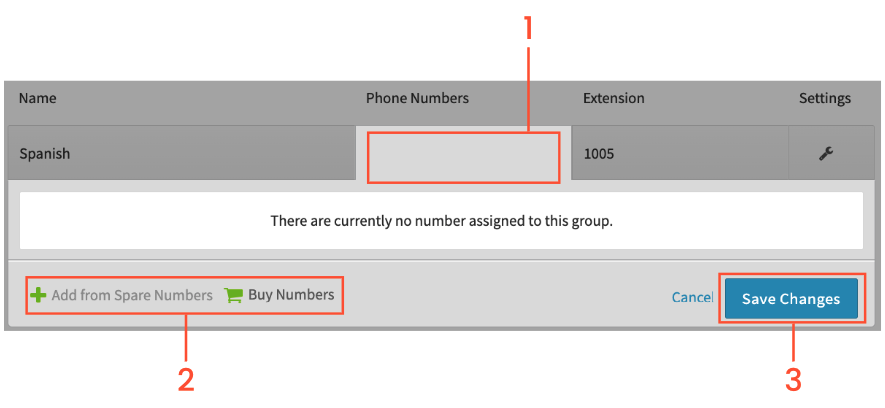
Click on the “Phone Numbers” column for the auto attendant in question
Choose to either add from a previously purchased spare number, or purchase a new number to assign to this attendant.
### Configuring your Auto Attendant Routing
Click the Settings Wrench on the right side
Choose the time of day you which to edit the routing for and click “Virtual Receptionist”
## Main Conference Number
Before your users are able to utilize conferencing, you will need to create a main conference number.
Find out more about faxing in our [Audio Conferencing](/business-phone/audio-conferencing) Guide!
## Main Faxing Number
Find out more about faxing in our [Faxing](/business-phone/send-a-fax) Guide!
 Using this option will route first to a selected user, group, or device. If the option routed to first fails to answer or is busy, the inbound caller will be transferred to the Virtual Receptionist.
This option has a set ring duration of 20 seconds for the initial user or group selected. If the call goes to the Virtual Receptionist, then rules for the user menu option or group will be followed. Note: This option will override device-level settings, i.e. Follow-Me and use cell phone voicemail.
Review the Virtual Receptionist instructions [here](/business-phone/main-number-setup)
### Option 3: Incoming Call to a User, Group, or Device then to Voicemail Box
This routes inbound callers to a user, device or even a media file then will be transferred to the voicemail box of your choice. You can also choose to route directly to voicemail on this option.
Using this option will route first to a selected user, group, or device. If the option routed to first fails to answer or is busy, the inbound caller will be transferred to the Virtual Receptionist.
This option has a set ring duration of 20 seconds for the initial user or group selected. If the call goes to the Virtual Receptionist, then rules for the user menu option or group will be followed. Note: This option will override device-level settings, i.e. Follow-Me and use cell phone voicemail.
Review the Virtual Receptionist instructions [here](/business-phone/main-number-setup)
### Option 3: Incoming Call to a User, Group, or Device then to Voicemail Box
This routes inbound callers to a user, device or even a media file then will be transferred to the voicemail box of your choice. You can also choose to route directly to voicemail on this option.
 ### 1. Text to Speech
Type in your script and a synthesized main greeting will be created for you. The character limit is 250-350 characters. Typically, you are aiming to identify your company name and tell callers what option to press to route the call to a specific department person or feature. This is a great feature
Doing this multiple times for the same period of hours (Open hours for example) will create multiple instances with the same media file name, so we recommend deleting or renaming old versions in your Greetings Manager (Menu on the left side of Dashboard) to avoid confusion.
### 1. Text to Speech
Type in your script and a synthesized main greeting will be created for you. The character limit is 250-350 characters. Typically, you are aiming to identify your company name and tell callers what option to press to route the call to a specific department person or feature. This is a great feature
Doing this multiple times for the same period of hours (Open hours for example) will create multiple instances with the same media file name, so we recommend deleting or renaming old versions in your Greetings Manager (Menu on the left side of Dashboard) to avoid confusion.
 ### 2. Upload your own file
The dashboard currently accepts . WAV and . MP3 file formats for upload. File size is currently limited to no more than 1 MB, which is approximately a 5-minute MP3 file.
When preparing files for use with Dash please use the following parameters:
### 2. Upload your own file
The dashboard currently accepts . WAV and . MP3 file formats for upload. File size is currently limited to no more than 1 MB, which is approximately a 5-minute MP3 file.
When preparing files for use with Dash please use the following parameters:
 ### 3. Choose from existing recordings
Use Choose from existing recording to select a media file you have already added to the system. The pull-down will show all media files, including hold music, voicemail greetings, or main greetings
### 3. Choose from existing recordings
Use Choose from existing recording to select a media file you have already added to the system. The pull-down will show all media files, including hold music, voicemail greetings, or main greetings
 ### 4. Record it over the phone
Call the main number from a VoIP phone (Non-VoIP instructions further below), and dial the PIN for the hours period in which you are attempting to update. Please note if you are trying to change your after-hours greeting over the phone, you MUST call in during your after-hours period. The same idea applies to open, lunch, and holiday hours, if applicable.
### 4. Record it over the phone
Call the main number from a VoIP phone (Non-VoIP instructions further below), and dial the PIN for the hours period in which you are attempting to update. Please note if you are trying to change your after-hours greeting over the phone, you MUST call in during your after-hours period. The same idea applies to open, lunch, and holiday hours, if applicable.
 Please note that you must have a VoIP phone/device registered to your account. Record the greeting message yourself over the phone, by following the steps below: