

Help Center / Smarter Voice / Devices / Auto-provision a device
Devices
Auto-provision a device in Business Phone
Once you choose the SIP option, you will be able to choose your device first by the brand, then by the model of the device. If the brand of your device is not listed, choose the above option and enter the MAC address and name your device.
On this page
Add your VoIP Device
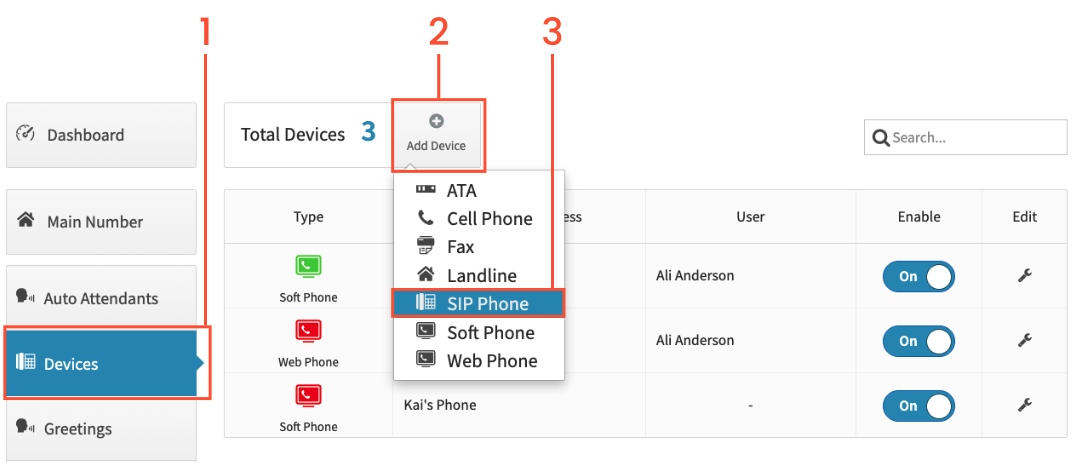
Click Devices on the left side menu
Click Add Device
Click SIP Phone
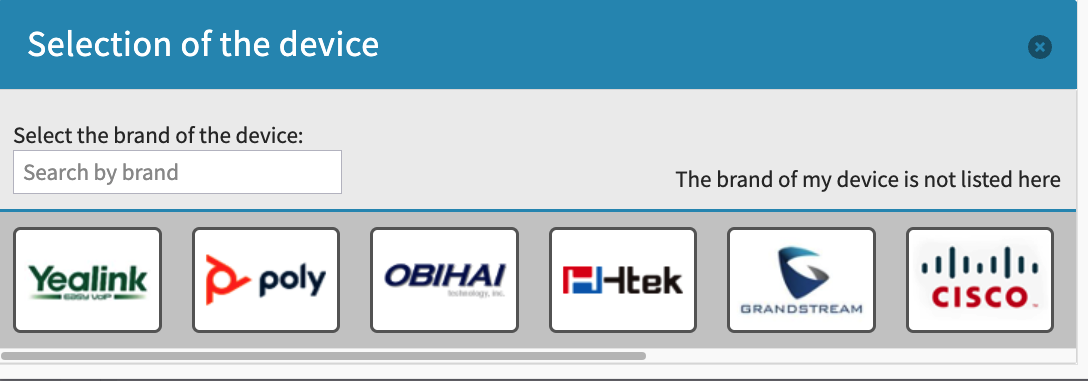
Click the name of the manufacturer your phone was made by
Click the device. If your device is not listed, it will need to be manually provisioned and may encounter limited support with VirtualPBX. Review our Manual Provisioning guides here.
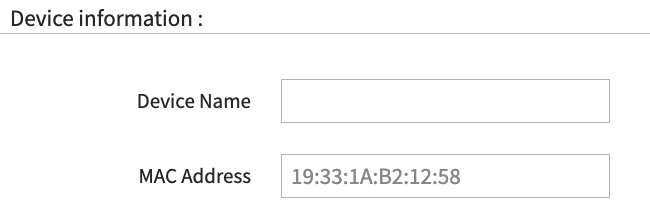
Add a Device Name and your device’s MAC Address.
Once you have entered your information, choose ‘Create Device’
Unlock your Phone
Before attempting to auto-provision a device, you should be sure to unlock the device first via the Dashboard. This will allow the device to pull the registration information from the auto-provisioning server.
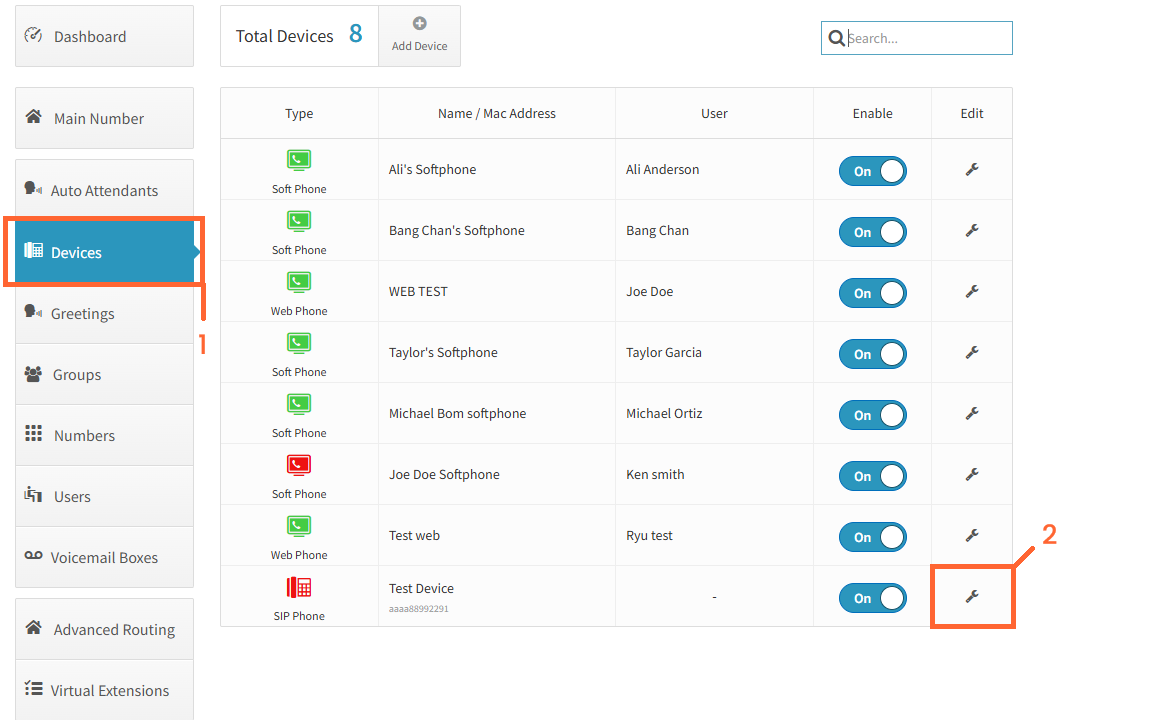
On the Dashboard, click on the “Devices” tab
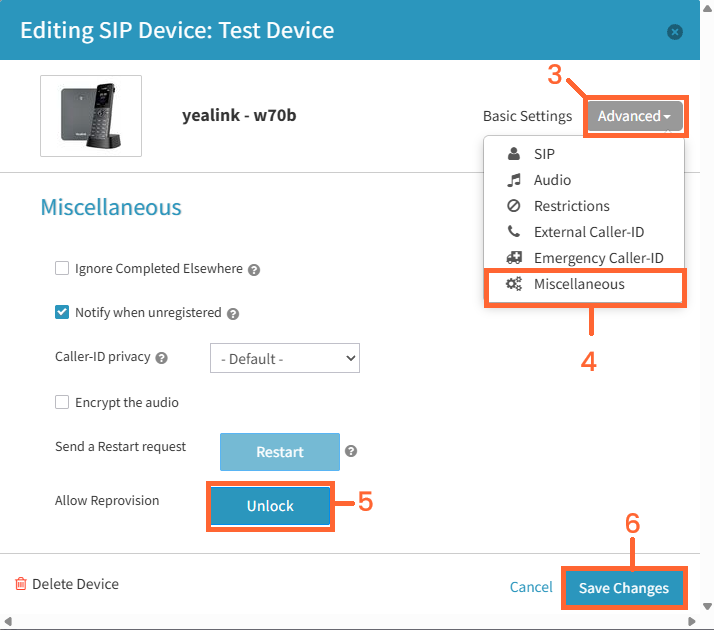
Click on the edit wrench next to the device you wish to unlock
On the edit screen, click on “Advanced”
Click on “Miscellaneous”
Under Miscellaneous, click “Unlock” beside the option “Allow Reprovision”
Click on Save Changes.
Once these steps are completed, please follow the instructions for the specific model of phone you are trying to provision.
Provisioning through Your SIP’s Interface
Yealink Auto-Provisioning
After adding your device in your account, please factory reset your device. Note that this will wipe all existing settings:
On your phone, press Menu Softkey.
Go to Settings—Advanced UI, input password (admin) to enter.
Select Reset to Factory option. The LCD screen will prompt with: ”Warning, Reset to Factory Setting”. Press OK to continue.
Factory resetting a device can vary by phone model. If you’re not able to factory reset your device with the steps below, try a quick search on the internet for “Factory Reset [Phone model]” and if you have any special circumstances, please contact our support team.
qNext, you’ll need to find the private IP address of your device, and then input that in your web browser. You can usually find the IP address in your phone’s settings, look for a “Status”, or potentially a “Network” setting. Private IP addresses typically look like 192.168.1. X (X can be any number between 2 and 255) or 10.0.0. X.
Once you’ve found it, type it in your web browser URL as if you’re entering the address for a website. It should come up with the Manufacturer interface for your device.
Default Login for devices are:
Username: admin
Password: admin
Now that you’re in, complete the following steps:
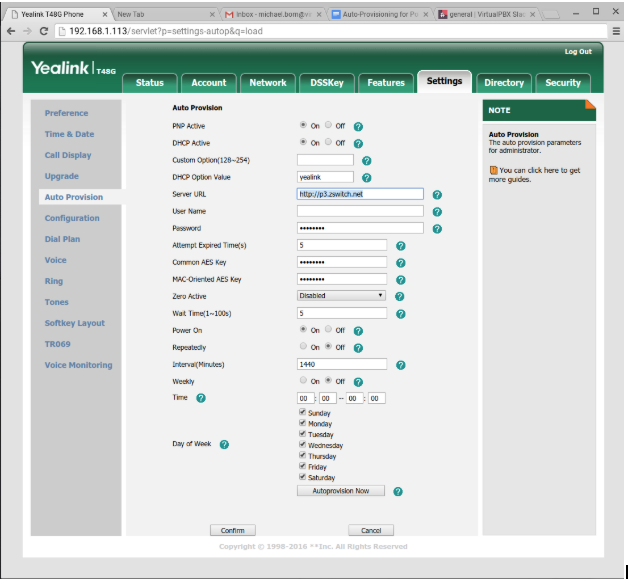
Navigate to Settings on the top right of the screen
Click on “Auto-Provision” on the left
Verify the following setting: Server URL: http://p3.zswitch.net
Click “Confirm” to save.
Click “Autoprovision Now” at the bottom. The phone will reboot and pull configuration automatically. The phone may reboot multiple times, so please wait until it has completed. It is safe to begin using the phone if it has not reset for 10 full minutes
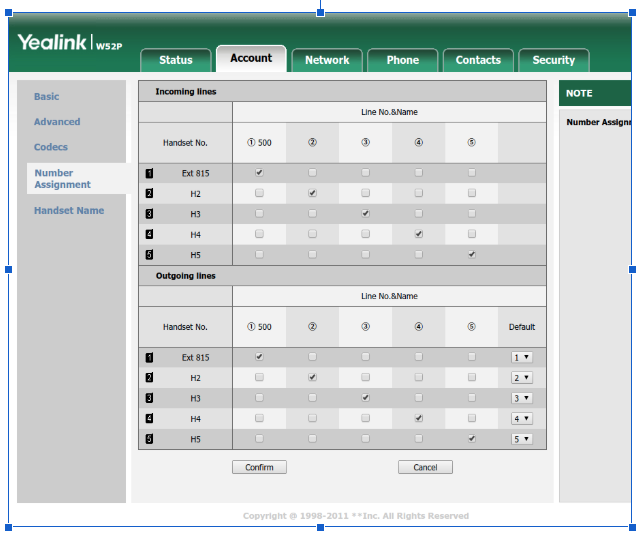
If you are using a wireless version of Yealink - Setting up handset assignments
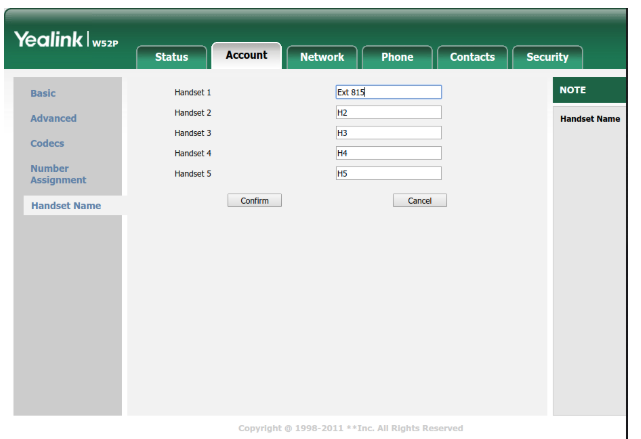
You can re-name your handsets by going to the Account Tab > Handset name. This will change the display on the front of the handset to make it easier to reference for you if you wish
Here, you can set which handsets ring on which line. Keep in mind that in order to have 3 handsets ring on 3 separate lines, you would need to have 3 VoIP lines on your account, which may affect your bill. The picture above shows a configuration fit for that, with each handset belonging to their own separate line. For help setting this up, please feel free to work with our support team with the chat window in your lower right, email us at support@virtualpbx.com or call us at 888-825-0800 option 2
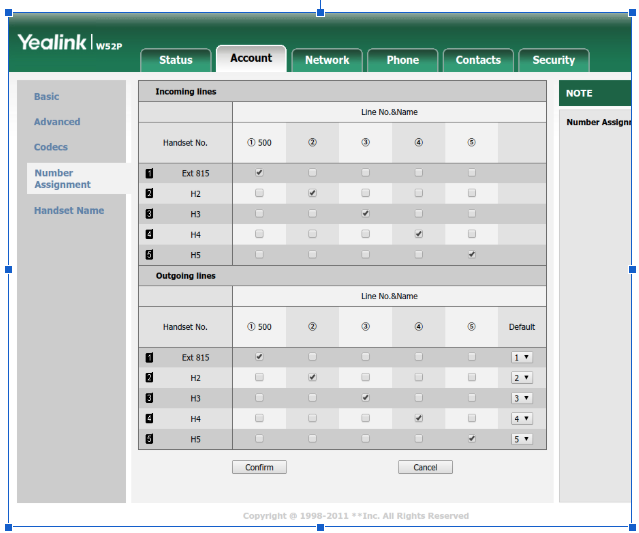
If you wanted to use one line for all handsets, you would simply have a straight column going top to bottom for Line 1, for both Incoming Lines AND Outgoing Lines. This means when your line rings, all handsets will ring, and the first to answer it will be on the call with the customer. However, future calls coming in while the first call is still active will come in as call waiting, hence the need for separate lines mentioned above
Polycom V4 Auto-Provisioning
After adding your device in your account, please factory reset your device. Note that this will wipe all existing settings:
Press the Menu/Home Key.
Select Settings.
Select Advanced. (If you need a password for this step or the next, it is 456 by default)
Select Administration Settings.
Select Reset to Defaults.
Select Reset to Factory.
Select Yes for Are you Sure.
Factory resetting a device can vary by phone model. If you’re not able to factory reset your device with the steps below, try a quick search on the internet for “Factory Reset [Phone model]” and if you have any special circumstances, please contact our support team.
Next, you’ll need to find the private IP address of your device.. You can usually find the IP address in your phone’s settings, look for a “Status”, or potentially a “Network” setting. Private IP addresses typically look like 192.168.1. X (X can be any number between 2 and 255) or 10.0.0. X.
Once you’ve found it, type it in your web browser URL as if you’re entering the address for a website, but lead it with http:// - For example, http://192.168.1.15 - It should come up with the Manufacturer interface for your device.
Default Login for Polycom devices are:
Username: Polycom (Case sensitive)
Password: 456
Now that you’re in, complete the following steps:
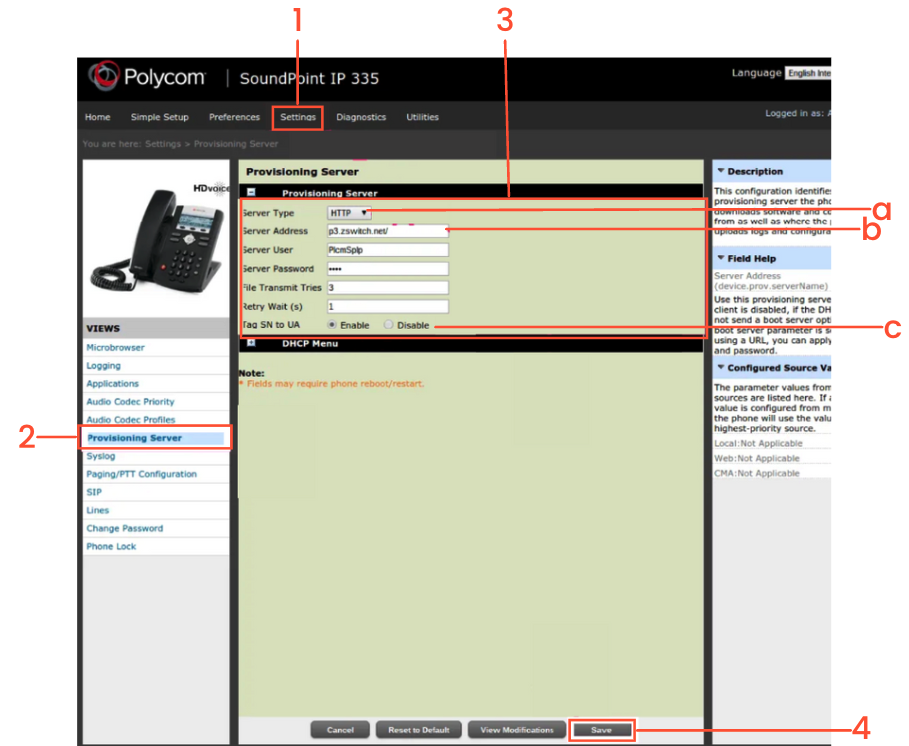
Click on Settings at the top of the screen
Click on Provisioning Server on the left
Under “Provisioning Server” input the following information:Server Type: HTTPServer Address: p3.zswitch.netTag SN to UA: Enable
Save Changes. The phone will reboot and pull the configuration automatically. The phone may reboot multiple times, so please wait until it has completed. It is safe to begin using the phone if it has not reset for 10 full minutes.
Grandstream Auto-Provisioning
After adding your device in your account, in your phone’s interface, log in with the username and password of “admin” for each.
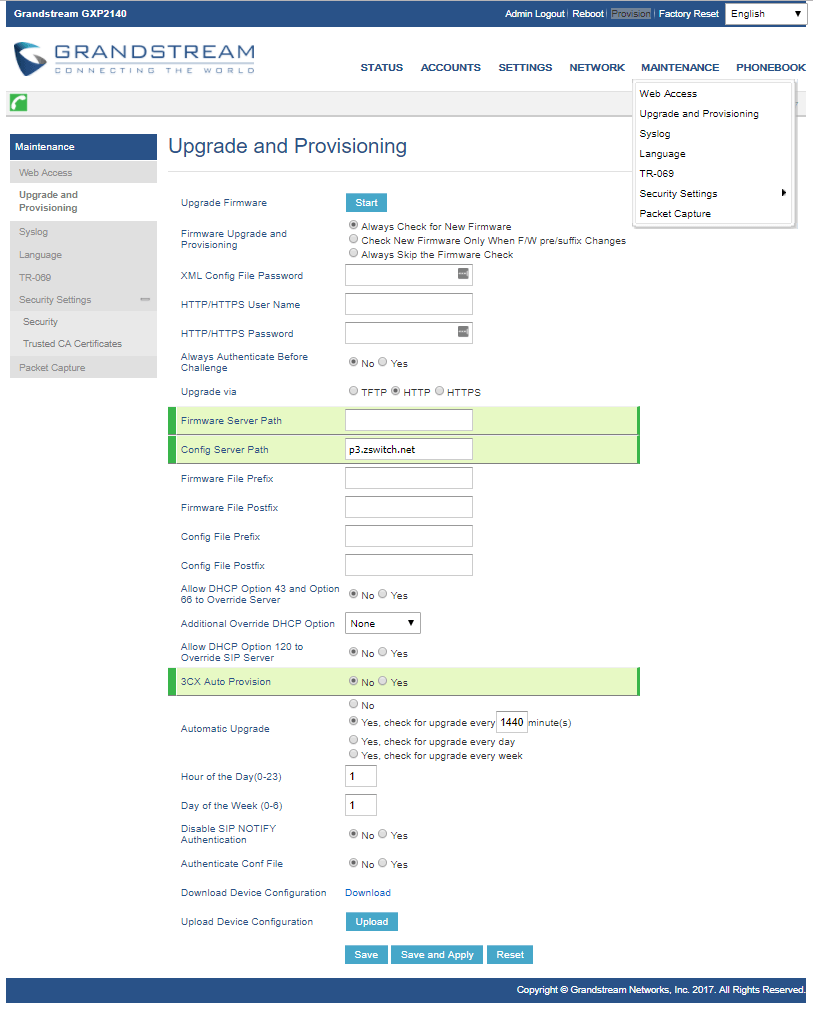
Go to Maintenance > Upgrade and Provisioning
“Upgrade Via” – Set to “HTTP”
Config Server Path – p3.zswitch.net (no http://)
Click “Save and Apply” at bottom of page
Click “Provision” at top of page to have phone provision. Your phone will reboot multiple times before the process is complete.
Cisco Auto-Provisioning
After adding your device in your account, please factory reset the device. Factory resetting a device can vary by phone model. If you’re not able to factory reset your device with the steps below, try a quick search on the internet for “Factory Reset [Phone model]” and if you have any special circumstances, please contact our support team.
Next, you’ll need to find the private IP address of your device, and then input that in your web browser. You can usually find the IP address in your phone’s settings, look for a “Status”, or potentially a “Network” setting. Private IP addresses typically look like 192.168.1. X (X can be any number between 2 and 255) or 10.0.0. X.
Once you’ve found it, type it in your web browser URL as if you’re entering the address for a website. It should come up with the Manufacturer interface for your device.
You may need to check the phone’s user manual or manufacturer website if a username/password is required.

In the upper right, click Admin Login. Then click Advanced.
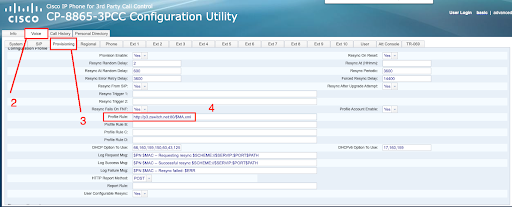
Next, Click the Voice tab at the top
Click on the Provisioning tab below it
Finally, Input http://p3.zswitch.net:80/$MA.xml into the “Profile Rule” field, and then click Submit all changes at the bottom. The phone will reboot and pull the configuration automatically. The phone may reboot multiple times, so please wait until it has completed. It is safe to begin using the phone if it has not reset for 10 full minutes.
At this point, you are finished with the phone. In your web browser, type the IP address found in the first step.
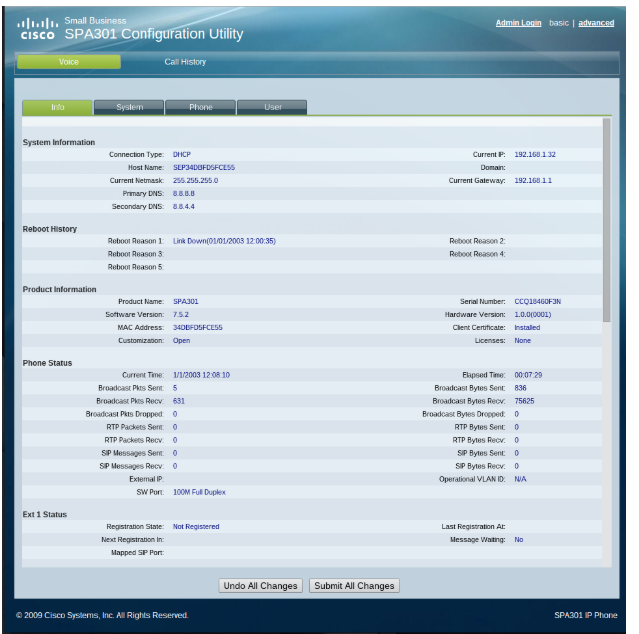
Click Admin Login > Advanced (upper right corner) and login using password “admin”.
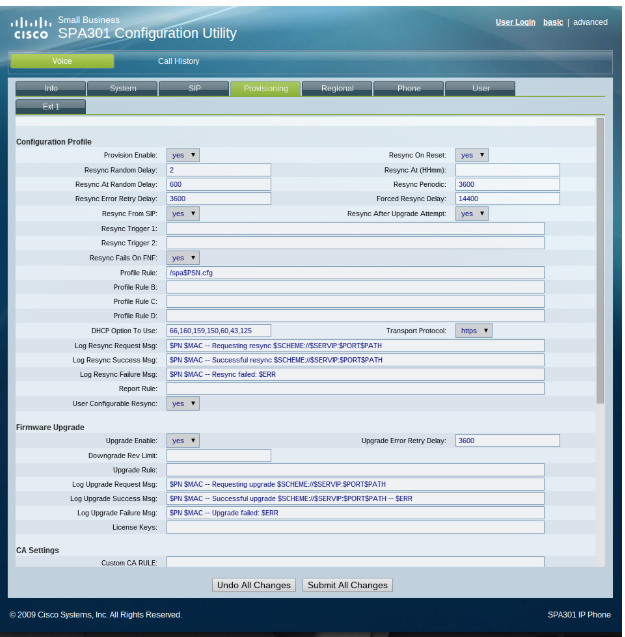
Click on Provisioning
Profile Rule: http://p3.zswitch.net:80/$MA.xml
Transport Protocol: http
Click on Submit All Changes. Wait for the phone to finish rebooting, verify Profile Rule and Transport Protocol are correct; then power cycle phone. The Cisco phone will then process and reboot on its own. This process will take a few minutes.
Obihai Auto-Provisioning
First, you must create an account with ObiHai to properly access the device. Once the Obihai account is created, you can then link the two devices by a special code provided by Obihai. That will then link the two together so you can then use the account to program a 3rd party VoIP provider (VirtualPBX).
After adding your device in your account, please also make sure that you have reset your device to factory settings. To do so, navigate to the “Settings” menu and “Factory Reset” would appear as a soft key. Push it and it’ll ask for the admin password (“admin” is the default password).
Next, obtain your IP Address
The IP address on OBi10xx devices can easily be found by navigating to the “Settings” menu on the phone. You should see a line with the word “Network” and below an IP address. Please make sure that your device jack is plugged in. If it is not plugged in, it will read IP: 0.0.0.0.
On OBi20x, OBi30x and OBi50x, pick up the handset to the ATA and dial ” * “, dial 1 at the promt and you will hear the IP address spoken out. If you need to repeat the IP address, just press 0.
Enter the IP Address and Log in
In your browser, enter this IP address. When logging in for the first time, the default username is admin and password is admin.
The page should look something like below
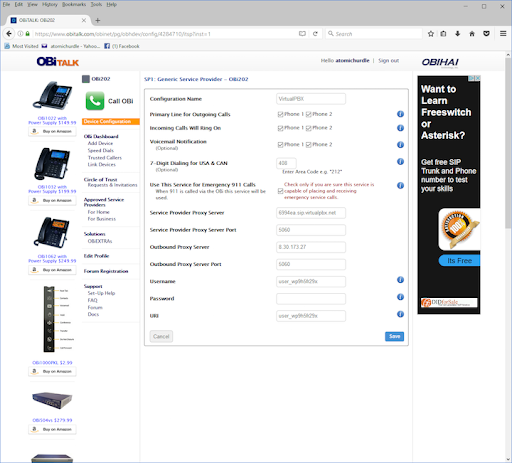
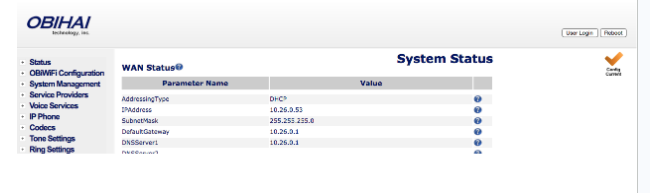
Click on System Management on the side
Click on Auto Provisioning.
Uncheck the “Default” checkbox for the “ConfigURL” field under ITSP Provisioning
Input the provisioning URL http://p3.zswitch.net/$DM.xml under “ConfigURL”
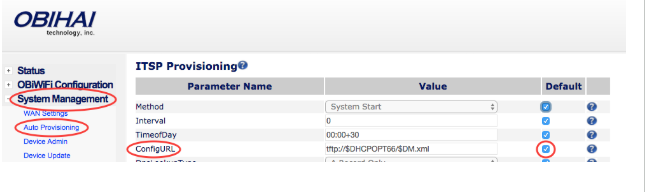
Please ensure there are no extra spaces or characters in this field. Click “Submit” on the bottom of the page
Click the Reboot button on the top right. This may take up to a few minutes, but if done correctly, you’ll notice your device reboot as it is provisioning. You are now all set up. In the end, your page should look like this:
Htek Auto-Provisioning
After adding your device in your account, please also make sure that you have reset your device to factory settings. To do so dial *, *, *, and then hold the x button for 10 seconds.
Obtain Phone’s IP Address
The IP address for a Htek UC9xx device can be found on the device itself. In order to provision a Htek UC9xx phone, you will first need to get its IP address in order to access the phone’s web interface. The IP address on Htek UC9xx devices can easily be found by pressing the center button on the directional pad, select “Information”. You should see a line with, for example: “IPV4: 10.10.9.88”. Please make sure that your device jack is plugged in. If it is not plugged in, it will read IP: 0.0.0.0.
Enter the IP Address and Login
In your browser, enter this IP address. When logging in for the first time, the default username is admin and password is admin. The page should look something like this:
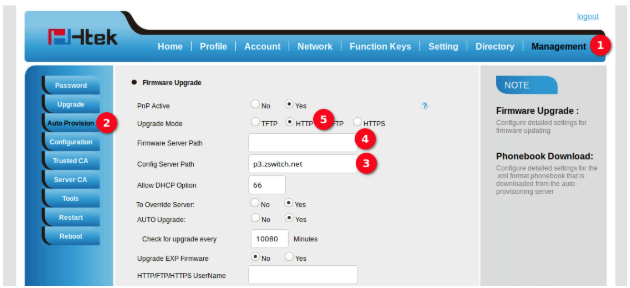
Click on “Management”
Click on “Auto Provisioning” on the left side menu.
In the “Config Server Path”, input the provisioning URL: p3.zswitch.net
Remove the URL from “Firmware Server Path”.
Select “HTTP” for the “Upgrade Mode” setting.
Click “SaveSet” on the bottom of the page:
Then click “AutoProvision Now” at the middle of the page: This may take up to a few minutes, but if done correctly, you will notice your device reboot as it going through the Initial Provisioning phase. The Initial Provisioning phase is part of the security measure to verify the device before providing the full provisioning URL path to the configuration file. After Initial Provisioning, the “Firmware Server Path” is populated and the “Config Server Path” is updated with two folders appended to the end (e.g. p3.zswitch.net/05ba94c0fe6f/ac438d0d3c39). It should look like this:
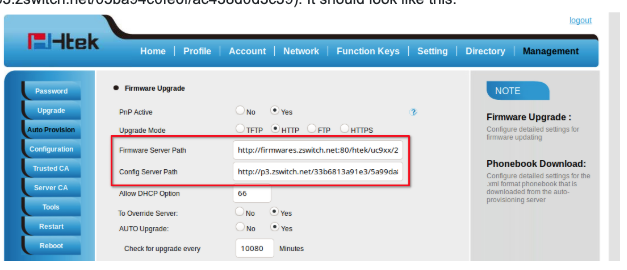
Click again the “Autoprovision Now” button at the middle of the page to finish provisioning the phone.
Removing a VoIP phone
You must be logged in as a system administrator in order to delete devices.
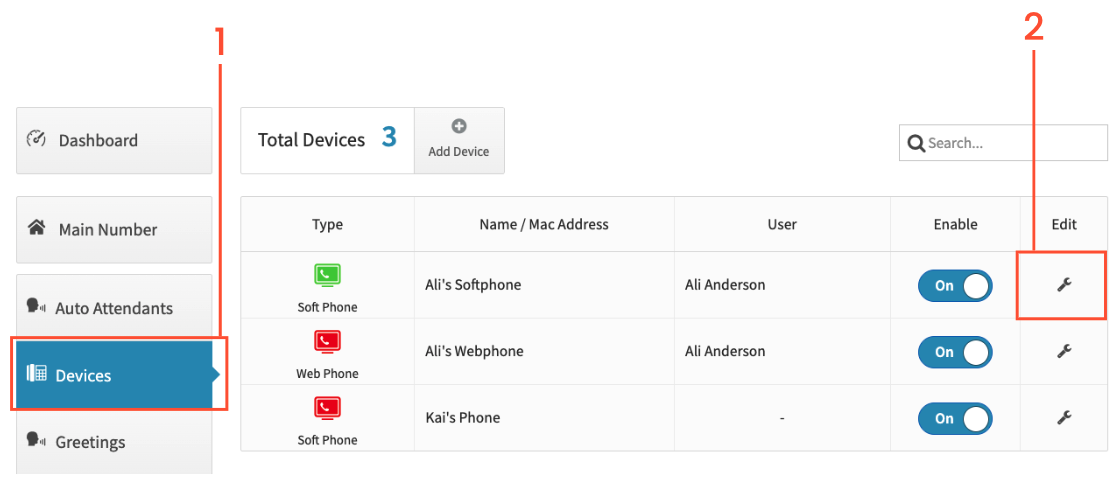
On the left click on Devices
Click on the wrench icon to the right of the device you want to delete
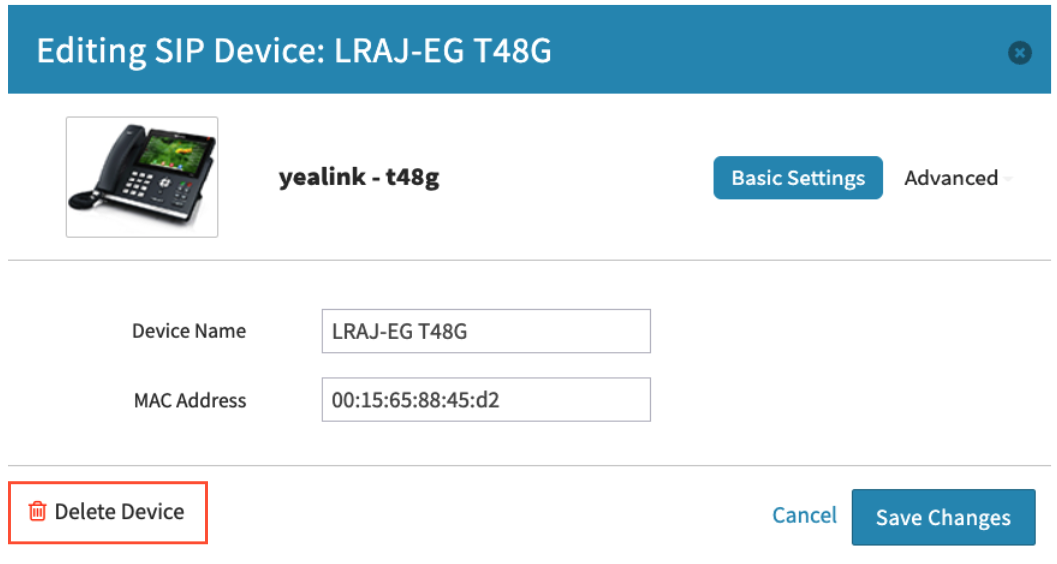
Click on Delete Device on the lower left
Alternatively, you can start on the user’s tab
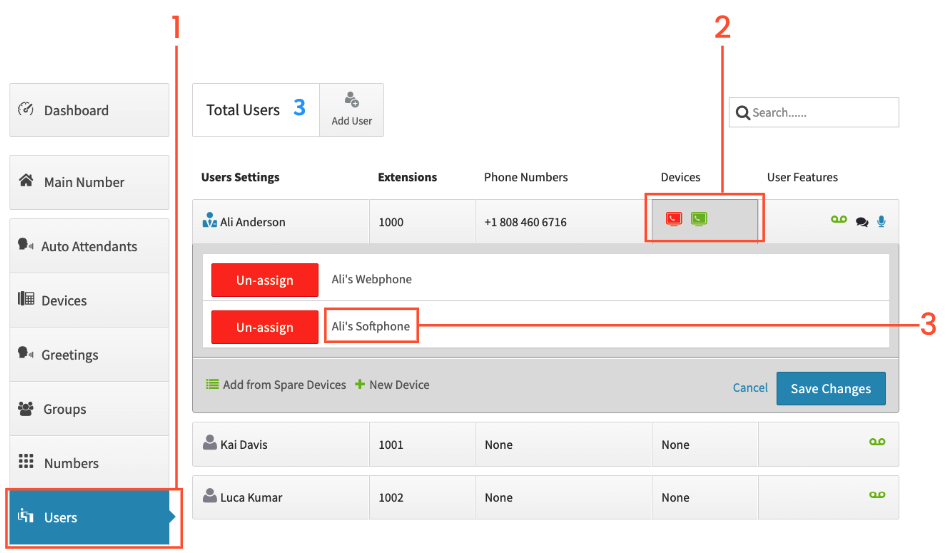
Click on the Users tab
Click on the device box to the right of the user’s name
In the expanded box, click on the device’s name
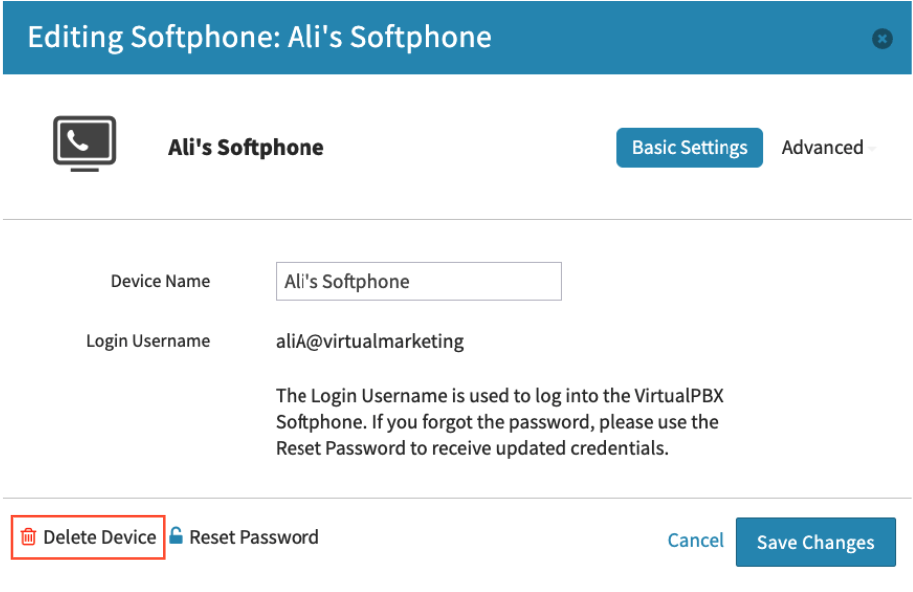
Click on Delete Device on the lower left
Click on OK to confirm the deletion