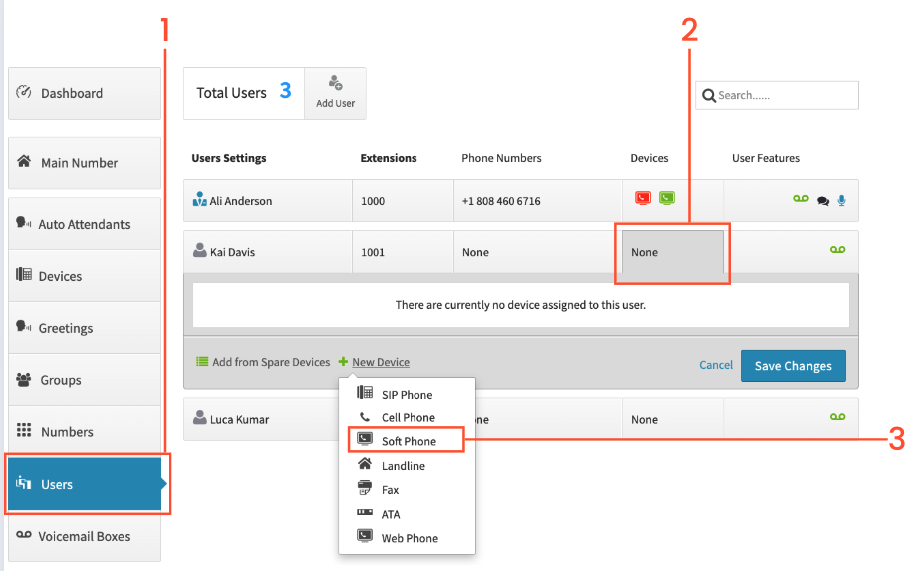
Click on Users on the left
Click on the Devices box for the user
On ‘New Devices’, click on Softphone
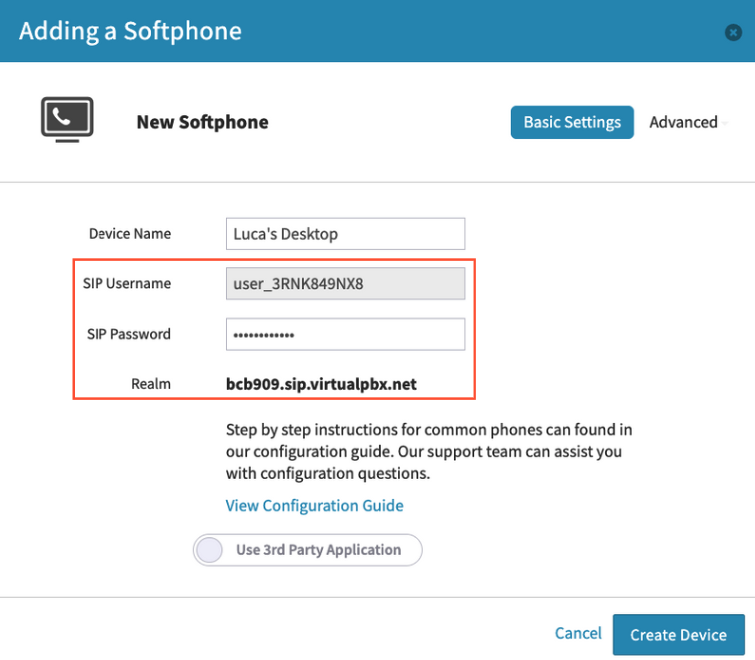
Give your device name & record the SIP Username/Password for future use
Click Create Device.
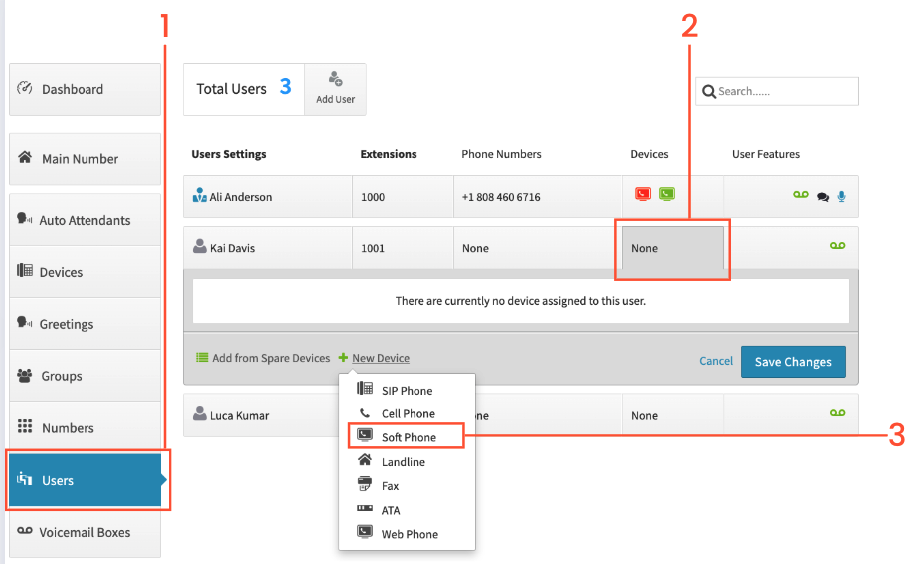
Click on Users on the left
Click on the Devices box for the user
On ‘New Devices’, click on Softphone
Give your device name & record the SIP Username/Password for future use
Click Create Device.
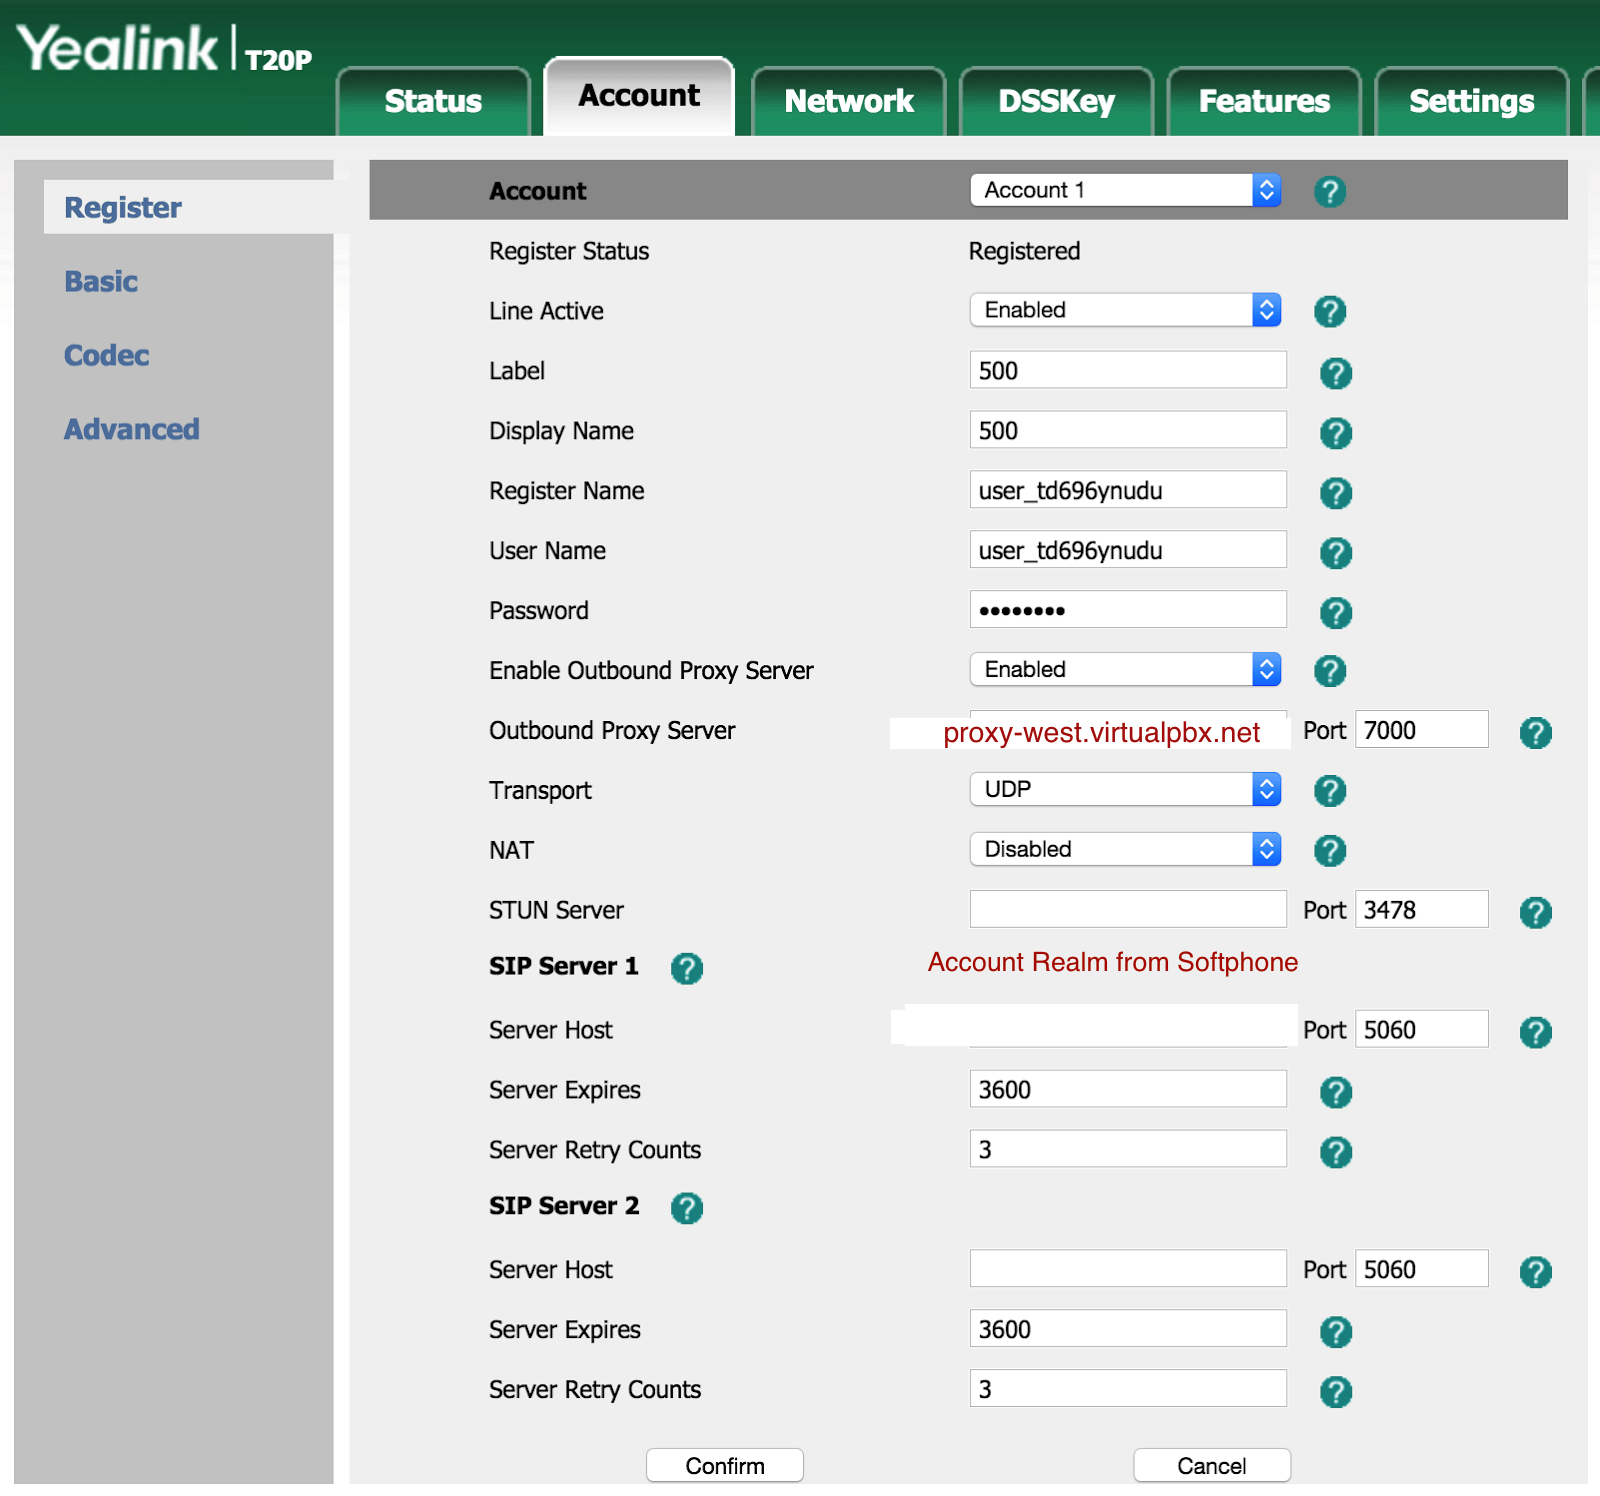
Get the IP Address:On Handset click “Ok” in middle of direction pad > Status > System Status. Enter this in to where you need to place your URL in your browser. Username: adminPassword: adminOnce logged in go to Account > Basic and make sure the following are set correctYou may notice that Account 1 is selected at the top. If you would like multiple lines on a supported desktop softphone, you must have a third party softphone item for each line, and program each individually for Account 1, Account 2, etc. Line Active: EnabledLabel: Extension NumberDisplay Name: Extension NumberRegister Name: SIP UsernameUsername: SIP UsernamePassword: SIP PasswordEnable Outbound Proxy Server: EnabledOutbound Proxy Server: proxy-west.virtualpbx.net / Outbound Proxy Server Port: 0SIP Server: realm name / SIP Server Port: 0Click “Confirm” to save
Then click on Account > Codecs
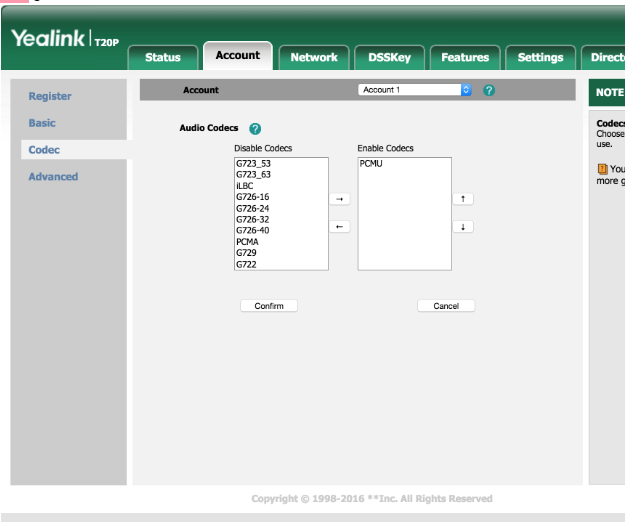
Drag the PCMU codec from the left column to the right column
Confirm changes
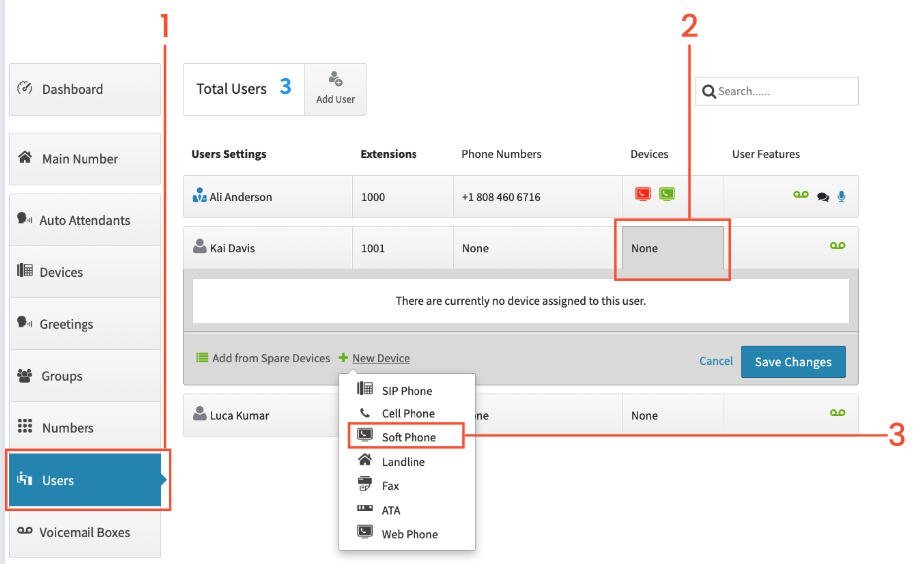
Click on Users on the left
Click on the Devices box for the user
On ‘New Devices’, click on Softphone
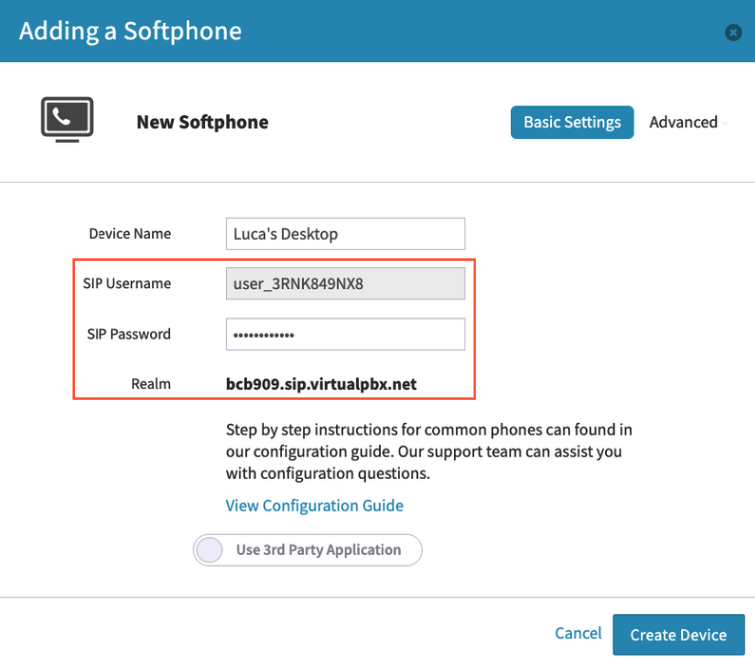
Give your device name & record the SIP Username/Password for future use
Click Create Device.
Get the IP Address:On Handset click “Ok” in middle of direction pad > Status > System Status. Enter this in to where you need to place your URL in your browser. Username: adminPassword: admin
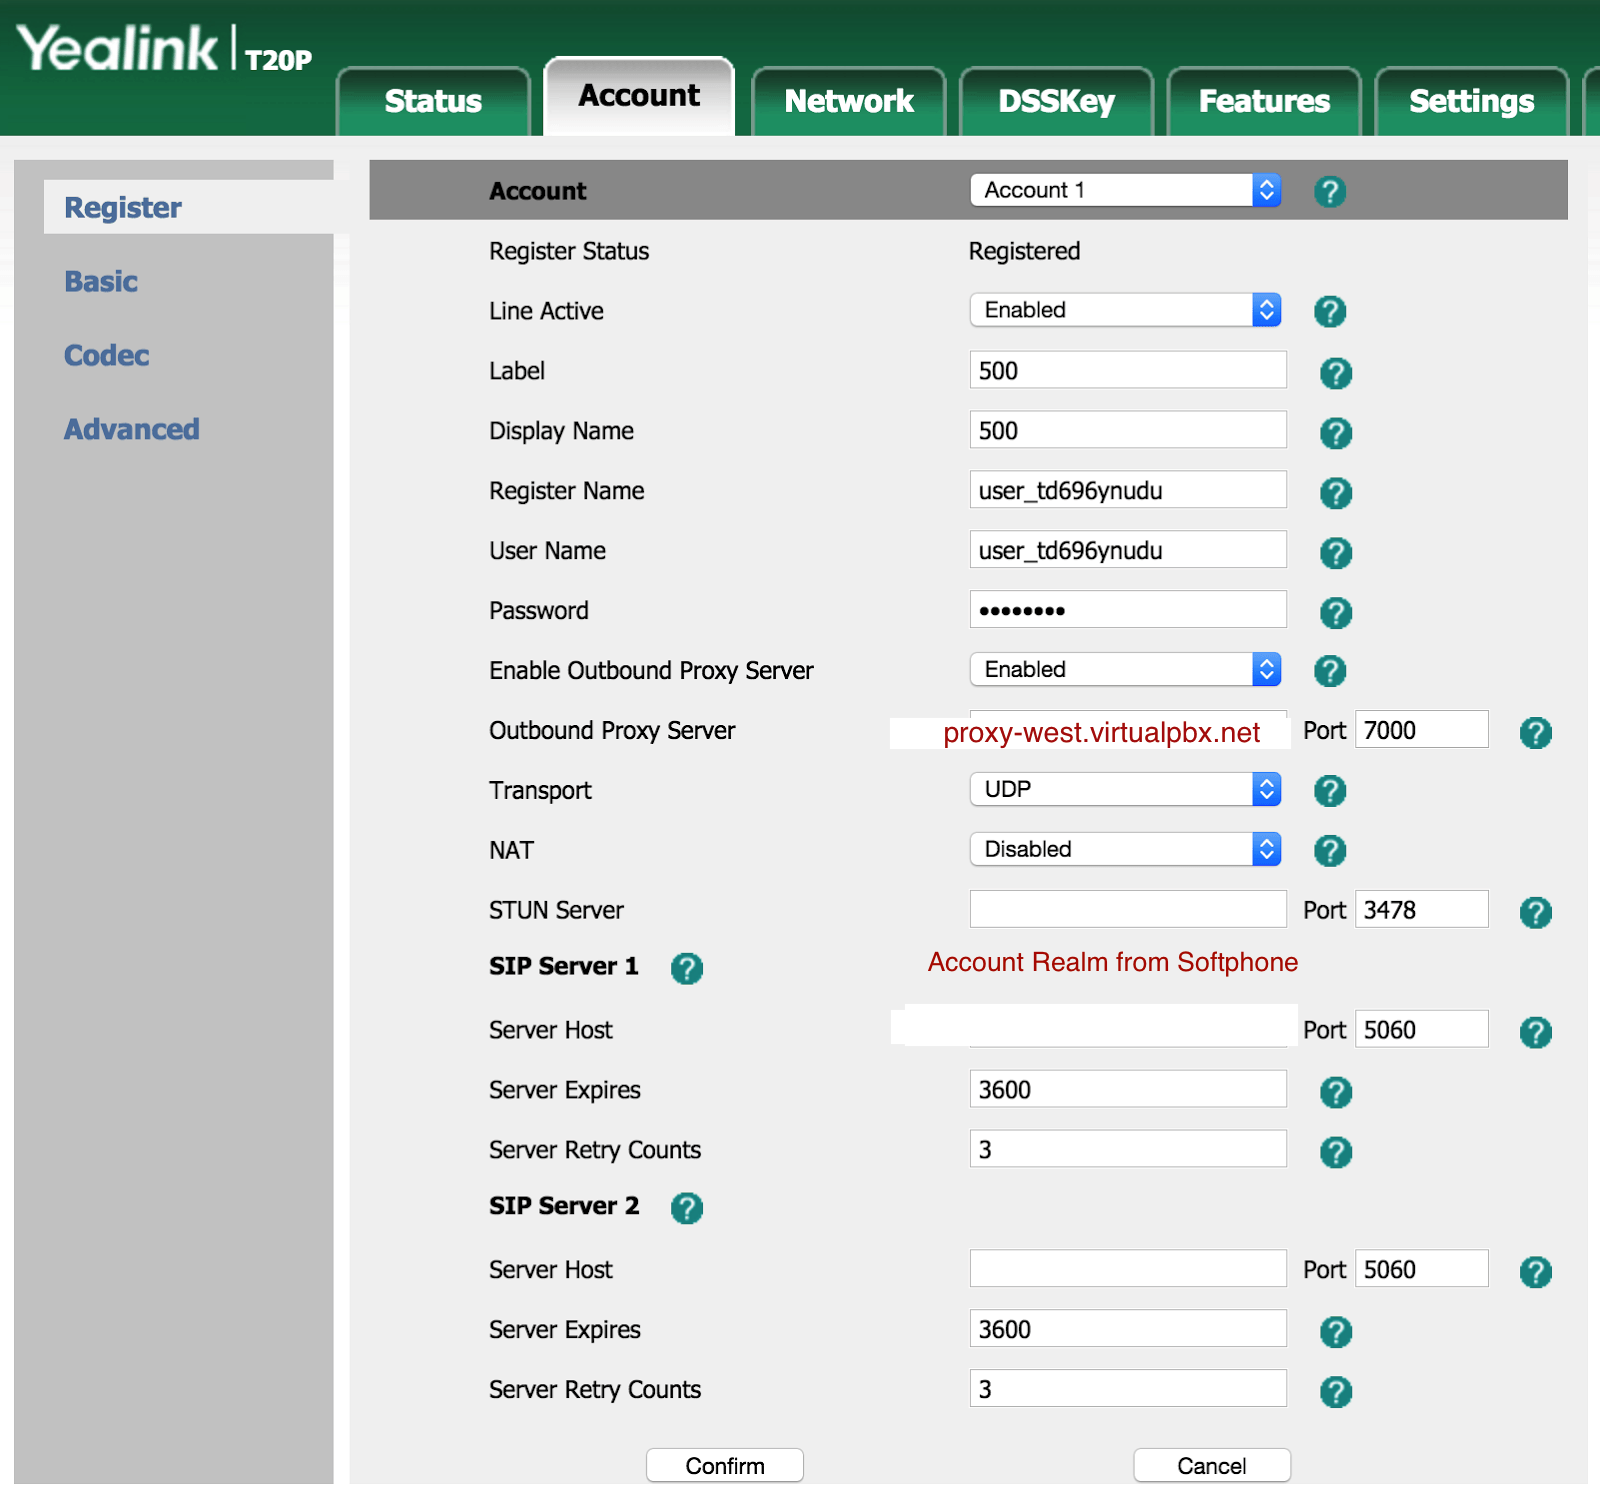
Once logged in go to Account > Basic and make sure the following are set correctly
You may notice that Account 1 is selected at the top. If you would like multiple handsets to register individual lines with VirtualPBX, you must have a third party softphone item (Instructed above) for each line, and program each individually for Account 1, Account 2, etc.
Line Active: Enabled
Label: Extension Number
Display Name: Extension Number
Register Name: SIP Username
Username: SIP Username
Password: SIP Password
Enable Outbound Proxy Server: Enabled
Outbound Proxy Server: proxy-west.virtualpbx.net / Outbound Proxy Server Port: 7000
SIP Server 1 - Server Host - Account Realm - SIP Server Port: 5060
Click “Confirm” to save
Account > Codecs
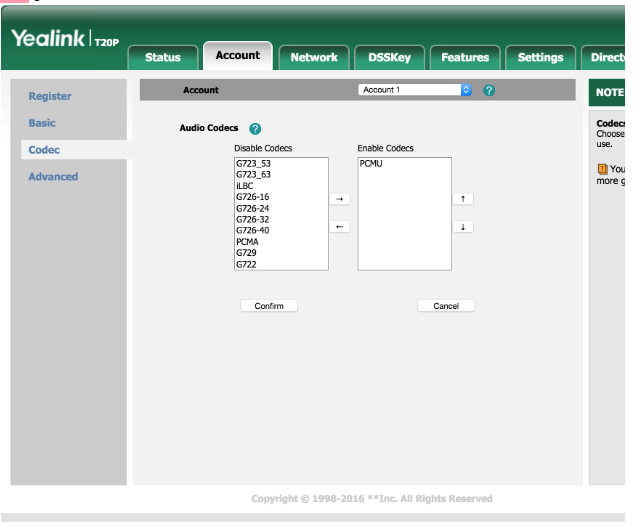
Enable PCMU codec only.
Click “Confirm” to save.
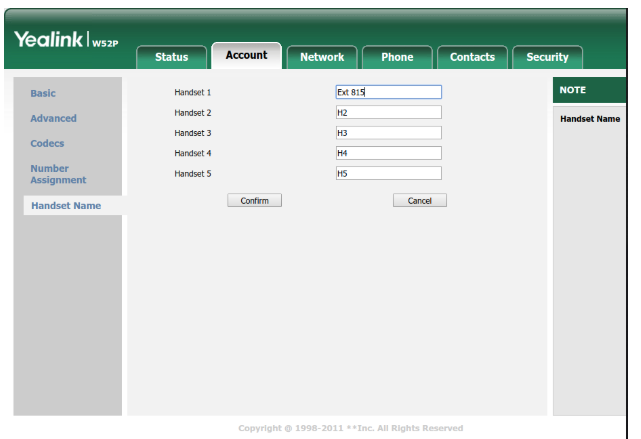
1. Navigate to Account > Handset Name. 1. Name each handset what you would like to see displayed on handset. Name, extension number or something else. 1. Click “Confirm” to save.
1. Navigate to Account > Handset Name.
1. Name each handset what you would like to see displayed on handset. Name, extension number or something else.
1. Click “Confirm” to save.
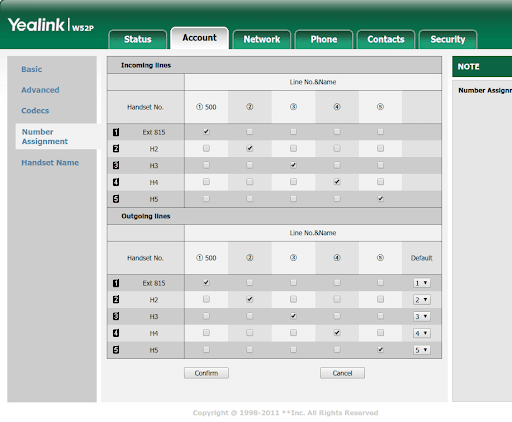
Navigate to Account > Number Assignment. This is where you determine which handset can answer which lines when taking and making calls. Right now ext 815 will ring only handset 1. You can have it ring others or different ones based on the checkboxes selected above. Click “Confirm” when the changes are made.
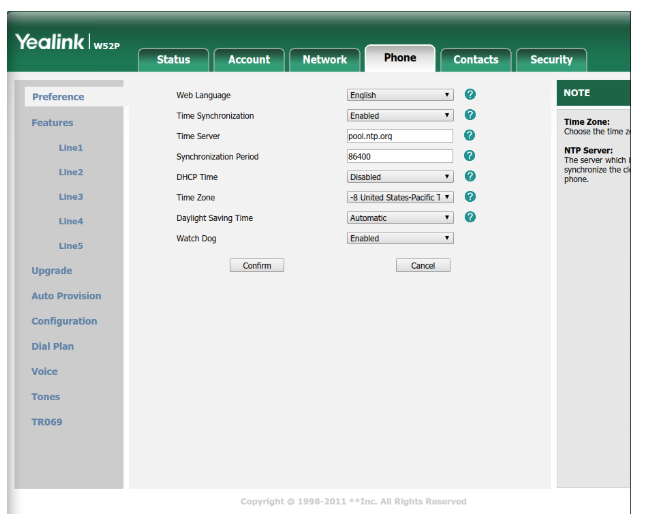
Navigate to Phone > Preference and make sure the following are set correctly:
Time Server: pool.ntp.org
Time Zone: Select local time zone
Daylight Savings Time: Automatic
Click “Confirm” to save
 Start by creating a Soft Phone
Click on Users
Click on the Devices tab
Choose Soft Phone
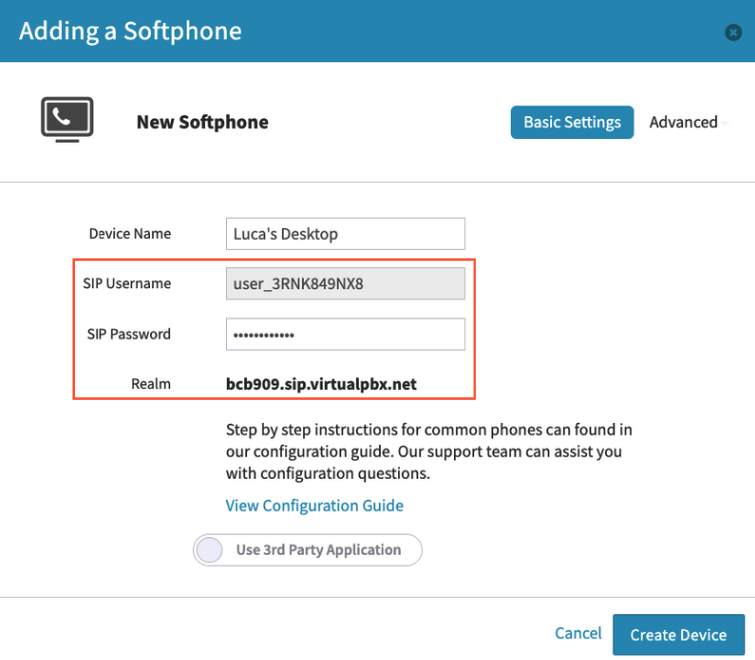 Change your device name and record the SIP Username, password, and realm to use in the Aastra interface. You can always return to reference your credentials by clicking on devices (under users), selecting the device, clicking edit, advanced, and selecting “SIP”.
### Provisioning your Aastra
Change your device name and record the SIP Username, password, and realm to use in the Aastra interface. You can always return to reference your credentials by clicking on devices (under users), selecting the device, clicking edit, advanced, and selecting “SIP”.
### Provisioning your Aastra
Change your device name and record the SIP Username, password, and realm to use in the Aastra interface. You can always return to reference your credentials by clicking on devices (under users), selecting the device, clicking edit, advanced, and selecting “SIP”.
Click “Create Device”.
Next, find the phone’s IP Address by pressing the Options button, scrolling down to and selecting Phone Status, then IP and MAC Addresses. If it says 0.0.0.0, the device is not properly set up on the network and you should talk to your system administrator.
Open a browser window and go to http://[IP Address] using the IP Address found in the last step.
Next, you will be asked to enter a username and password. If the default username and password below do not work, please contact Aastra to reset the phone to factory defaults:User: adminPassword: 22222
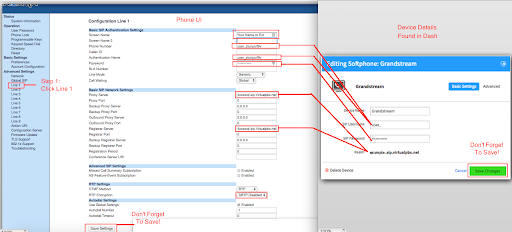
Select Line 1 in the Aastra interface and enter the following information:
Screen Name: Your Name or Extension
Phone Number: use the SIP Username from Dash
Authentication Name: use the SIP Username from Dash
Password: use the SIP Password from Dash (click on the field to reveal the password in plain text)
Proxy Server: use the Realm from Dash
Registrar Server: use the Realm from Dash
RTP Encryption: Please set to SRTP Disabled
Click on Save Settings.
Your phone should now be successfully registered.
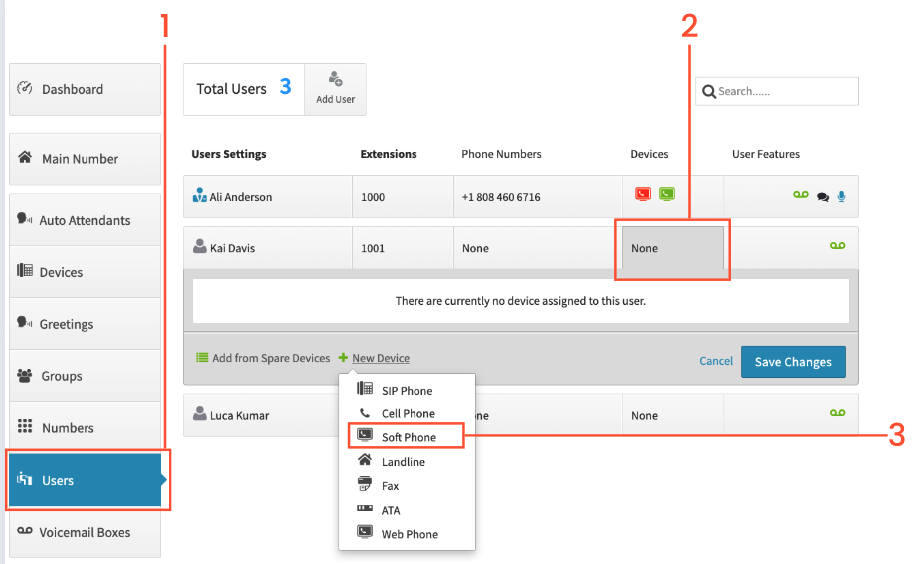
Click on Users on the left
Click on the Devices box for the user
On ‘New Devices’, click on Softphone
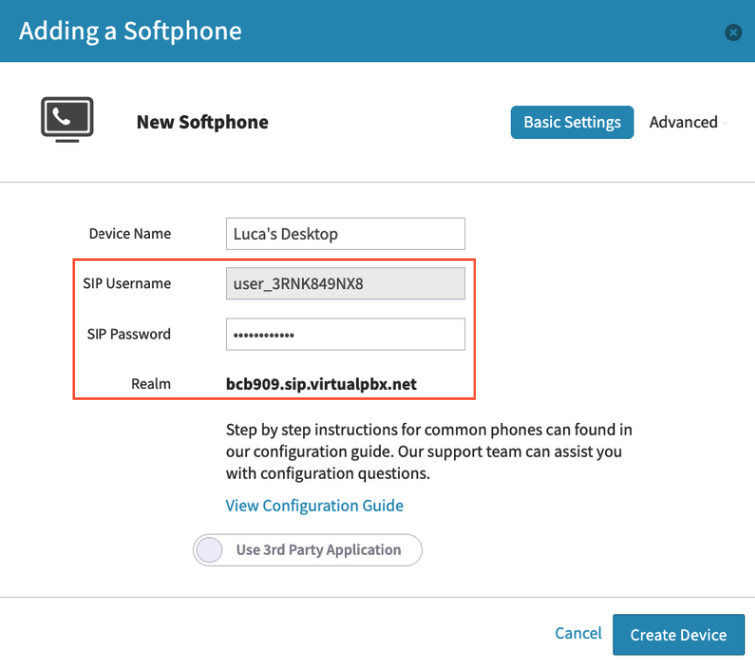 1. Once selected, a window will appear. Here you will need to name the device. You’ll see that the SIP Username, password and realm will be provided. Save once you have named the device. You can get back to this screen by clicking on the devices wrench (edit) icon to the right of the new device then click on advanced and select “SIP”. You will need this information in the next step.
### Provisioning your SNOM
To access the web interface of the SNOM device, go to the physical phone and press the Settings key. Scroll down to Maintenance, and then System Info. Type the IP address found here into your web browser. You will be prompted to login. The default username is “admin” and the default password is also “admin”. Please note that the computer and phone must be on the same network.
1. Once selected, a window will appear. Here you will need to name the device. You’ll see that the SIP Username, password and realm will be provided. Save once you have named the device. You can get back to this screen by clicking on the devices wrench (edit) icon to the right of the new device then click on advanced and select “SIP”. You will need this information in the next step.
### Provisioning your SNOM
To access the web interface of the SNOM device, go to the physical phone and press the Settings key. Scroll down to Maintenance, and then System Info. Type the IP address found here into your web browser. You will be prompted to login. The default username is “admin” and the default password is also “admin”. Please note that the computer and phone must be on the same network.
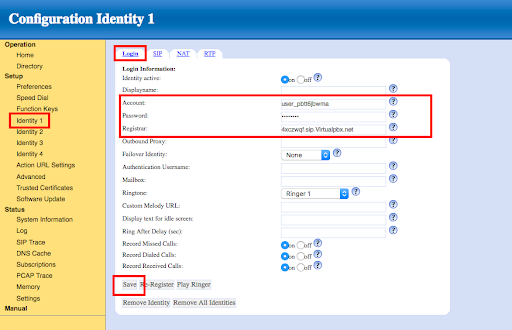
Once logged in, go to Identity 1 > Login and input the credentials from step 4 in your Dash account. When you are finished, click Save. Account = SIP UsernamePassword = Password (click on the password field in Dash to reveal the password)Registrar = Realm
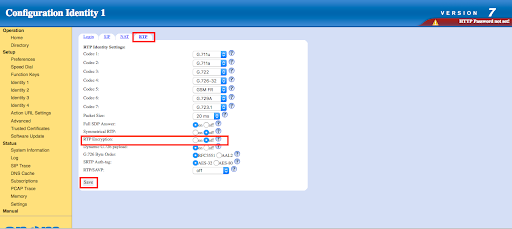
Go to Identity 1 > RTP Tab and turn RTP Encryption Off. When you are finished, click Save.
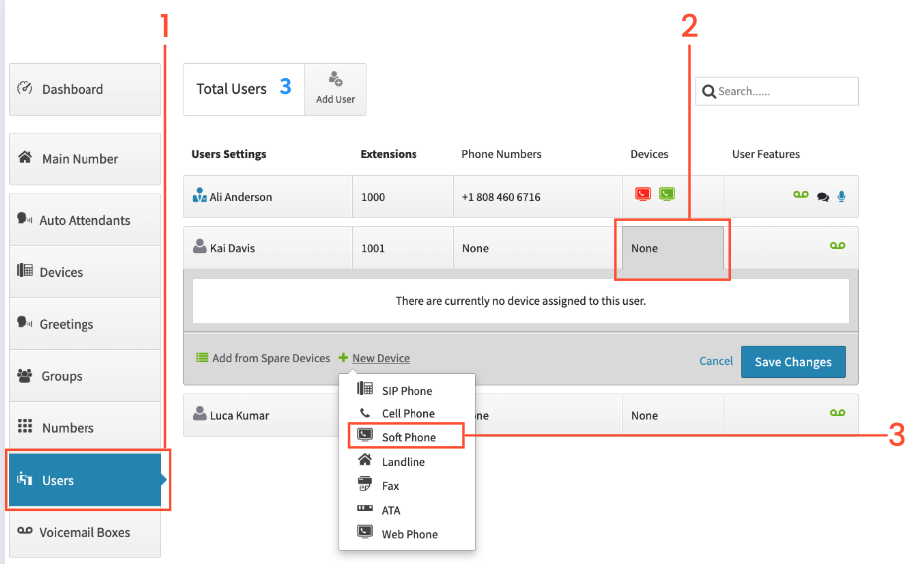
Click on Users on the left
Click on the Devices box for the user
On ‘New Devices’, click on Softphone
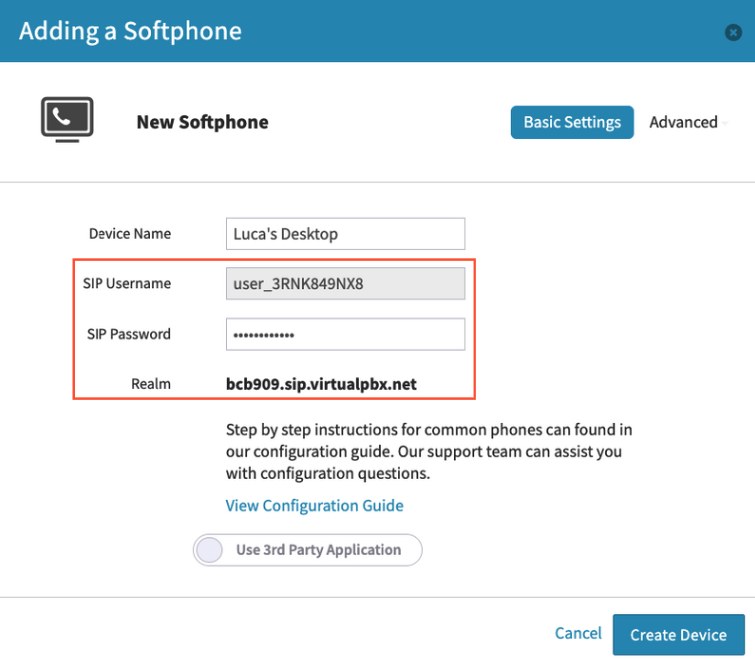
You’ll be using the SIP user name SIP Password and Realm information, along with http://proxy-west.virtualpbx.net to enter into the Cloud PBX.
Make sure to click on Create Device, and then Save changes on the user.
In Bitrix 24 navigate to Telephony and click on Cloud PBX.
Click on Connect Cloud PBX in the upper right and fill in the following fields.
Once this is done click Save.
You can check the status by clicking on Connection Settings.
Go to the main Telephony screen and Click on Configure Telephony. You’ll need to configure the Telephony Settings followed by the Telephony user. See the screenshots below.
Then, set up your Telephony Settings.
Under Telephony Users select the agent you wish to place into this setup. Click on the hamburger menu to configure. Set the extension number if it is not already set. Choose the sip connector and sip phone then save.
Going Back to Cloud PBX, you can add additional devices and adjust incoming call rules.
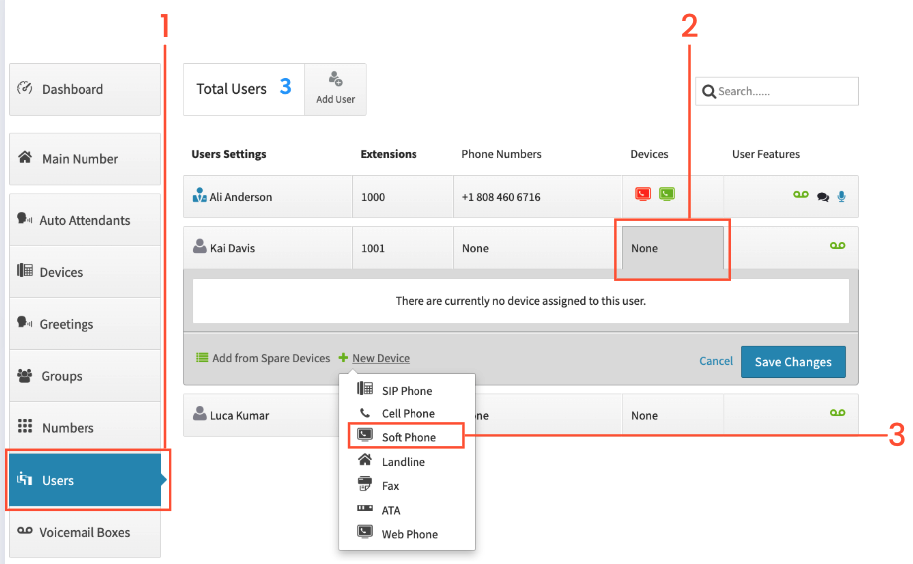
Click on Users on the left
Click on the Devices box for the user
On ‘New Devices’, click on Softphone
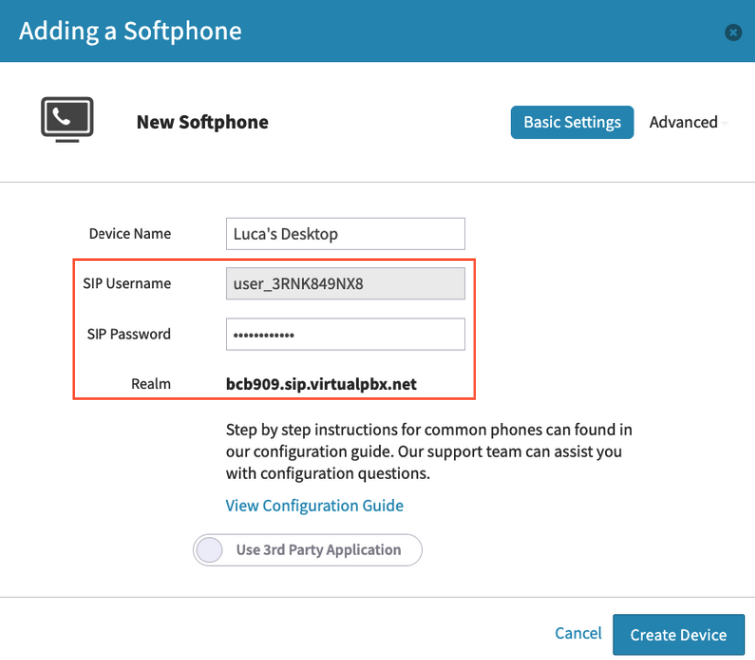
Give your Device a name for your identification.
Record your SIP Username, SIP Password, and Realm – you will need these shortly. To display your SIP Password simply click on the text box to reveal it.
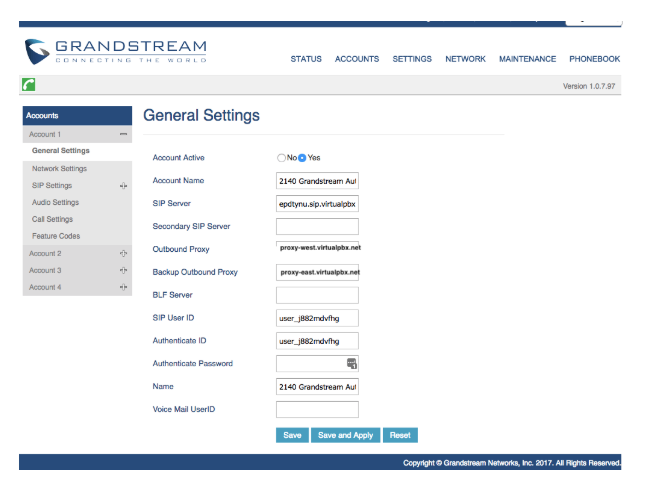
Click on Accounts
Click on “General Settings” under account 1 on the left
Account Active: Set to Yes
Account Name - Name this device for your identification
SIP Server: (enter the Realm you were given in the Dash interface)
Outbound Proxy - proxy-west.virtualpbx.net
Backup Outbound Proxy - proxy-east.virtualpbx.net
SIP UserID: (enter the SIP Username you were given in the Dash interface)
SIP Authentication ID: (enter the SIP Username you were given in the Dash interface)
SIP Authentication Password: (enter the SIP Password you were given in the Dash interface)
Click on Save
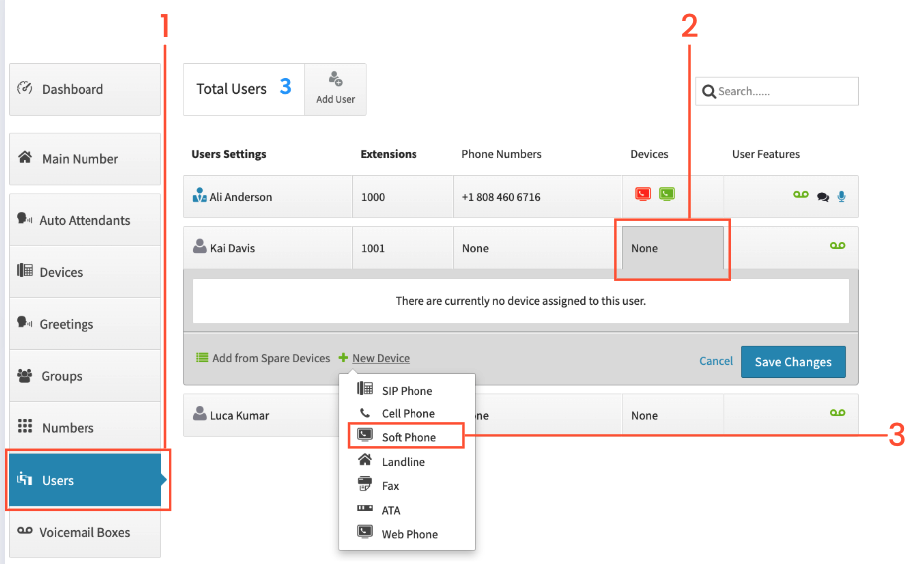
Click on Users on the left
Click on the Devices box for the user
On ‘New Devices’, click on Softphone
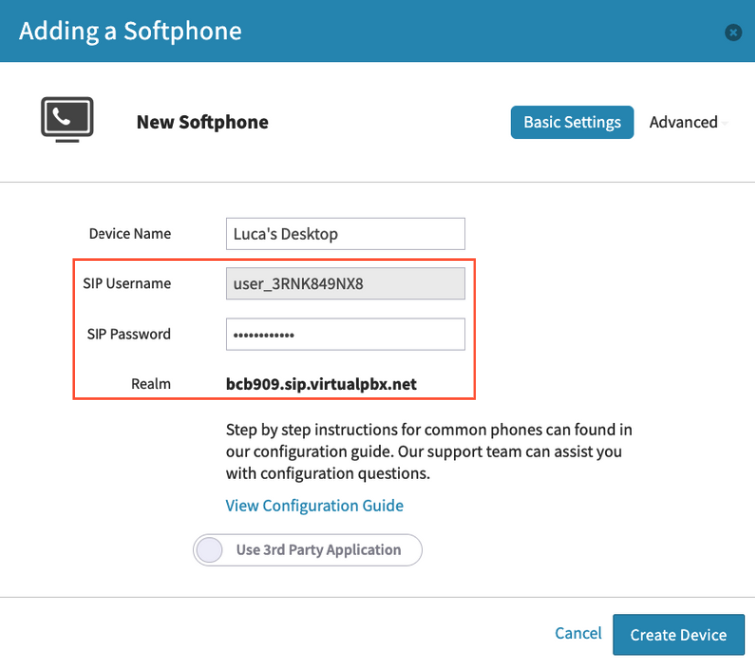
Give your device name & record the SIP Username/Password for future use
Click Create Device.
First, you’ll need your IP AddressPress Menu (center joystick)Enter #501Write your IP address down
Next, enable Web InterfacePress Menu (center joystick)Enter #534Set Embedded Web to “On”Press Enter
Enter IP Address into Web browserUsername: adminPassword: adminpass
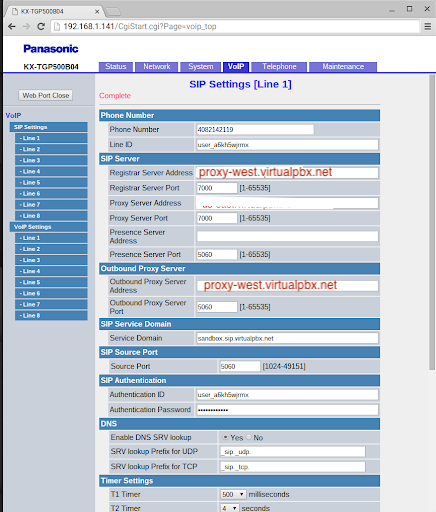 ### VoIP > SIP Settings > Line 1
Phone Number: Enter what you want displayed (does not display on TGP50 Handsets)
Line ID: Enter SIP Username
Registrar Server Address: proxy-west.virtualpbx.net
Registrar Server Port: 7000
Proxy Server Address: proxy-west.virtualpbx.net
Proxy Server Port: 7000SIP
Service Domain – Enter realm
SIP Source Port – 7000 (increased by 10 for each line)
Authentication ID – Enter SIP Username
Authentication Password – Enter SIP Password
Enable SSAF (SIP Source Address Filter): Yes
Click “Save” on Bottom
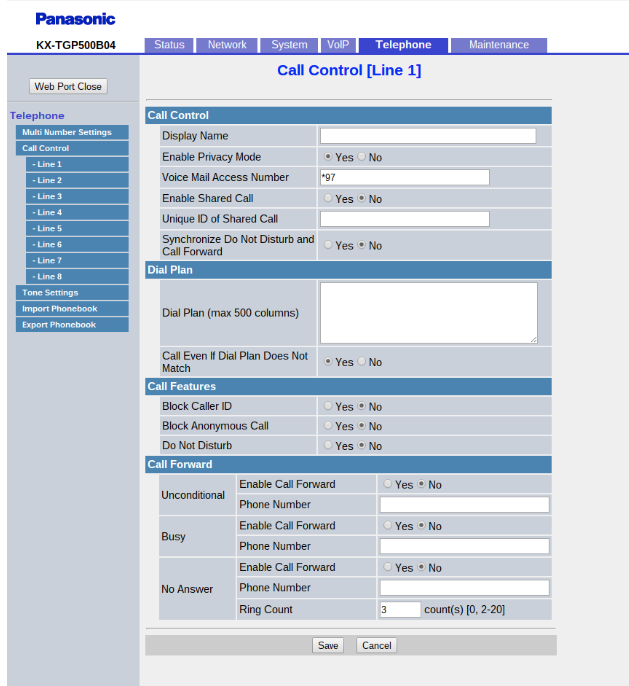 ### Telephone > Call Control > Line 1
Voice Mail Access Number – *97Click “Save”
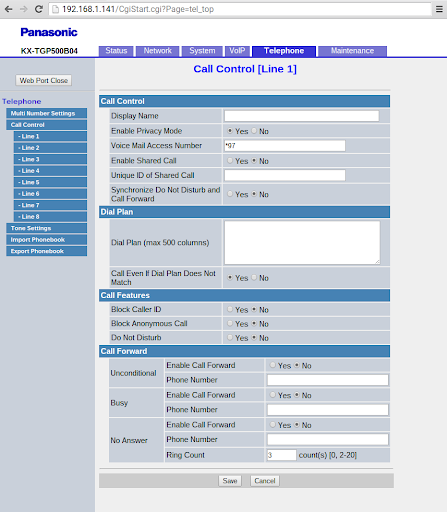 ### Telephone
After programing multiple lines as necessary, you can use the “Telephone” tab to determine which lines ring/use which handsets. The top part “Grouping Handset/Handset selection for receiving calls” tells the Panasonic base when a call comes in on Line X, ring handset X. In the example below, line 1 will ring all registered handsets (1-6). You can program line 1 to only ring handset 1, or handset 3 and 6 or any combination.
The bottom part “Handset and Line No. selection for making calls” allows you to select when a handset makes an outbound call, which line it can use. In the above example, Handset 1 can make an outbound call on any line but by default it goes through line 1. You can change it so handset 2 only rings from line 2 or handset 4 rings from line 2 and 5 but defaults to 5.
There are two main types of behavior you can program.
### Telephone
After programing multiple lines as necessary, you can use the “Telephone” tab to determine which lines ring/use which handsets. The top part “Grouping Handset/Handset selection for receiving calls” tells the Panasonic base when a call comes in on Line X, ring handset X. In the example below, line 1 will ring all registered handsets (1-6). You can program line 1 to only ring handset 1, or handset 3 and 6 or any combination.
The bottom part “Handset and Line No. selection for making calls” allows you to select when a handset makes an outbound call, which line it can use. In the above example, Handset 1 can make an outbound call on any line but by default it goes through line 1. You can change it so handset 2 only rings from line 2 or handset 4 rings from line 2 and 5 but defaults to 5.
There are two main types of behavior you can program.
All handsets ring simultaneous (which is the default selection)
Have each line ring handsets individually. You will want to adjust the Telephone tab so each handset is assigned to it’s own individual line (IE: Line 1 / Handset 1 - Line 2 / Handset 2).
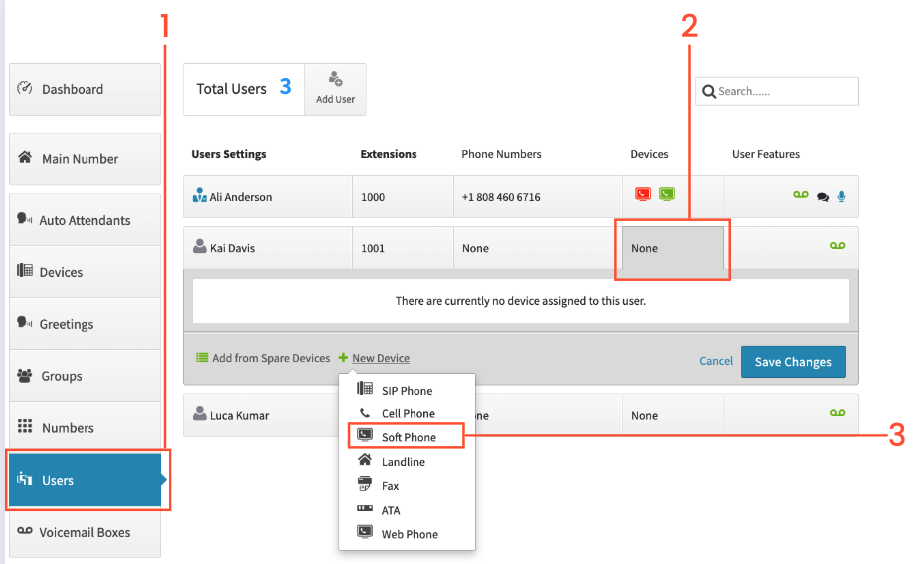
Click on Users on the left
Click on the Devices box for the user
On ‘New Devices’, click on Softphone
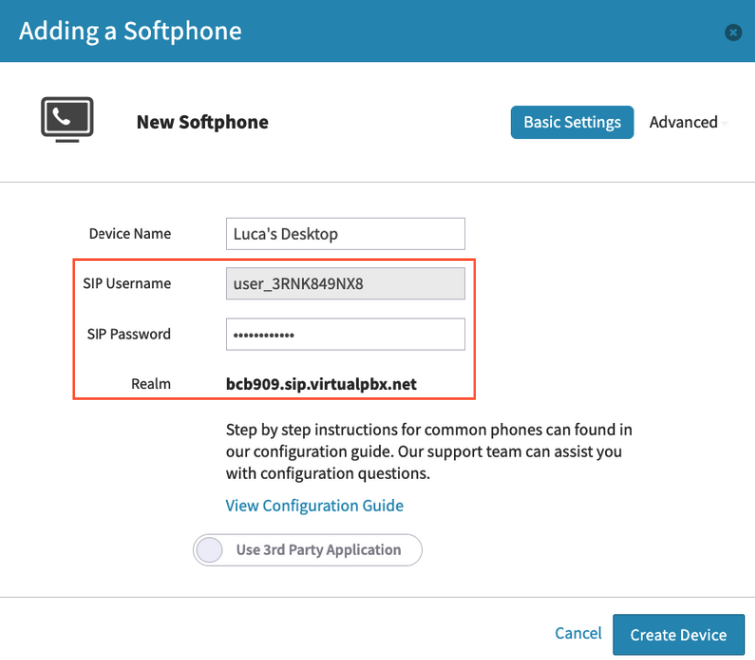
Give your device name & record the SIP Username/Password for future use
Click Create Device.
Find your IP Address:Go to Settings > Information Display > IP address, on your computerEnable Web Interface by going to Setting > #534 > Set Embedded Web to “On” on your computer > EnterEnter IP address into Web browserUsername: adminPassword: adminpass
To Enable VoIP - Click on SIP Settings > Line 1
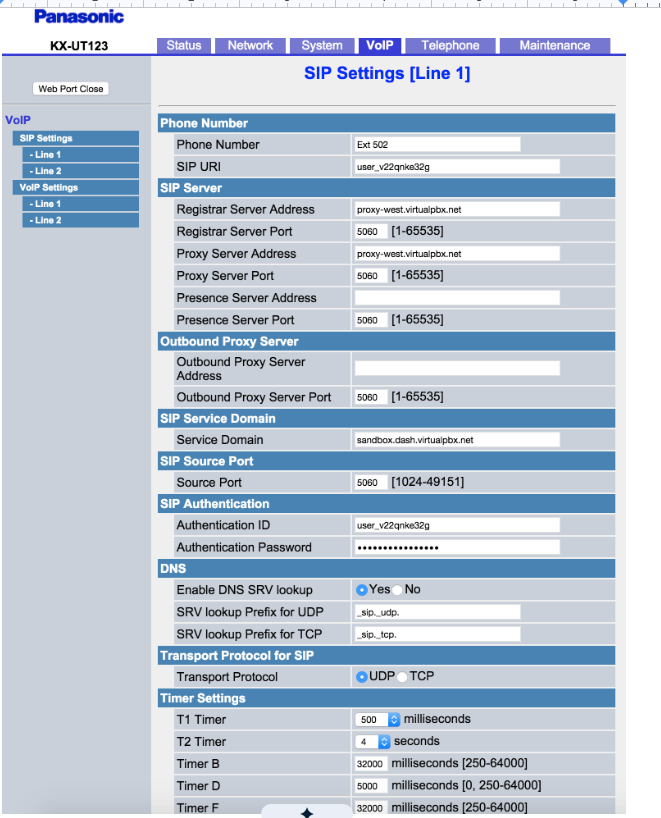
Phone Number – Enter what you want to be displayed on the phone
SIP URI – Enter SIP Username
Registrar Server Address: proxy-west.virtualpbx.net
Registrar Server Port - 5060
Proxy Server Address – proxy-west.virtualpbx.net
Proxy Server Port - 5060
SIP Service Domain – Enter realm
SIP Source Port – 5060
Authentication ID – Enter SIP Username
Authentication Password – Enter SIP Password
Enable SSAF (SIP Source Address Filter) – Yes
Click Save on bottom
Phone Number – Enter what you want to be displayed on the phone
SIP URI – Enter SIP Username
Registrar Server Address: proxy-west.virtualpbx.net
Registrar Server Port - 5060
Proxy Server Address – proxy-west.virtualpbx.net
Proxy Server Port - 5060
SIP Service Domain – Enter realm
SIP Source Port – 5060
Authentication ID – Enter SIP Username
Authentication Password – Enter SIP Password
Enable SSAF (SIP Source Address Filter) – Yes
Click Save on bottom
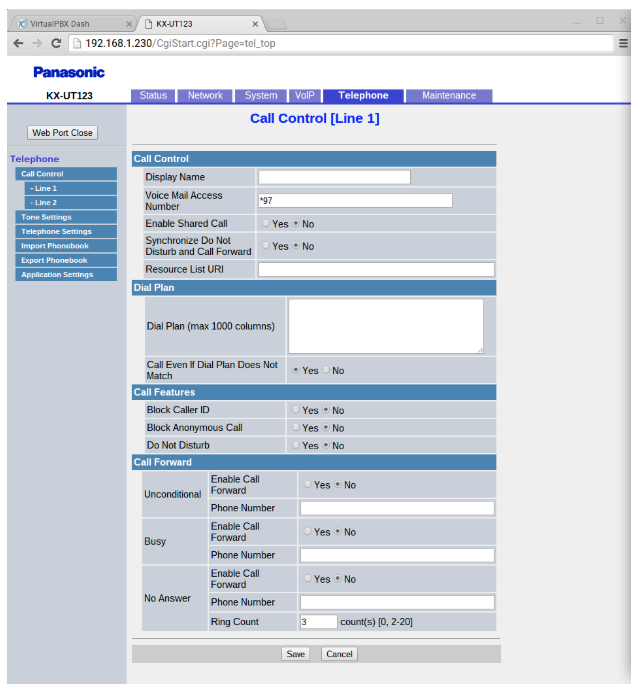
To Enable Call ControlTelephone > Call Control > Line 1Voice Mail Access Number – *97Click Save on bottom
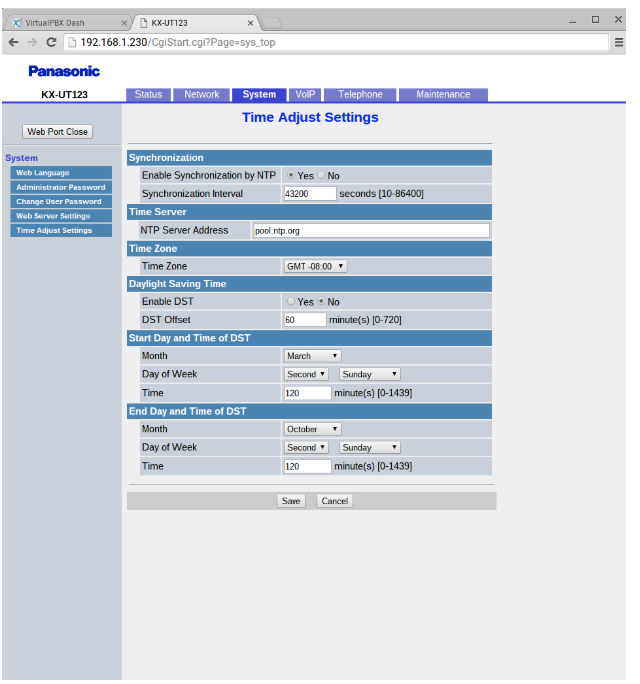
To Adjust Your Time Settings - System > Time Adjust Settings
1. NTP Server Address – pool.ntp.org
2. Time Zone – Select based off your time zone (pacific -8, mountain -7, central -6, eastern -5) 3. Click save on bottom
NTP Server Address – pool.ntp.org
Time Zone – Select based off your time zone (pacific -8, mountain -7, central -6, eastern -5)
Click ‘Save’ on bottom
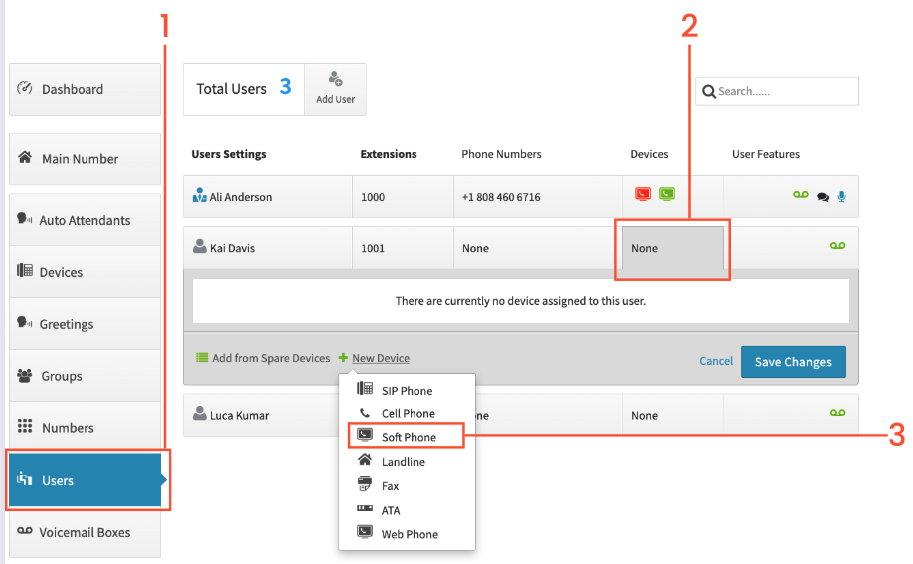
Click on Users on the left
Click on the Devices box for the user
On ‘New Devices’, click on Softphone
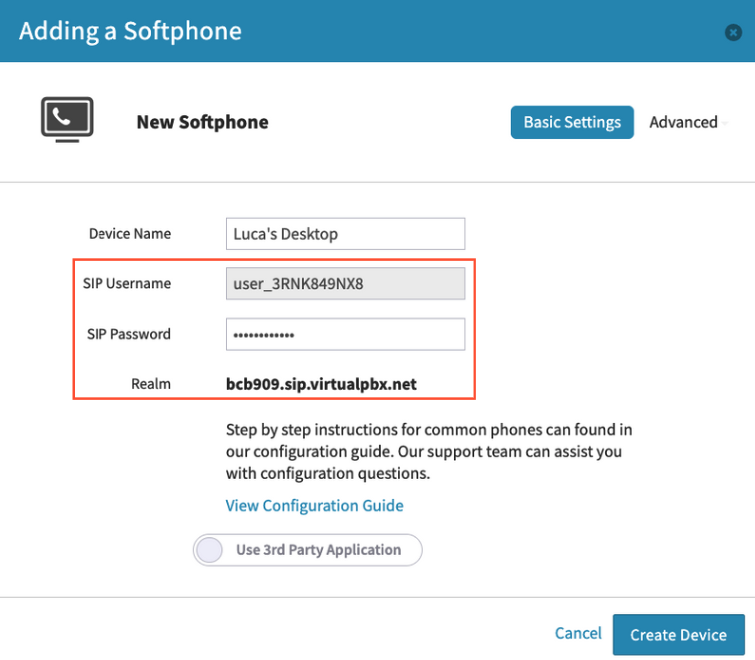
Give your device name & record the SIP Username/Password for future use
Click Create Device.
Next, open a browser and login to the phone’s IP address: Admin / 4221200 (this may vary depending on your provider. Please verify with your system administrator)”.
Click on “Go to the “Account” Tab – “Basic””.
Finally, verify that the settings match the following:
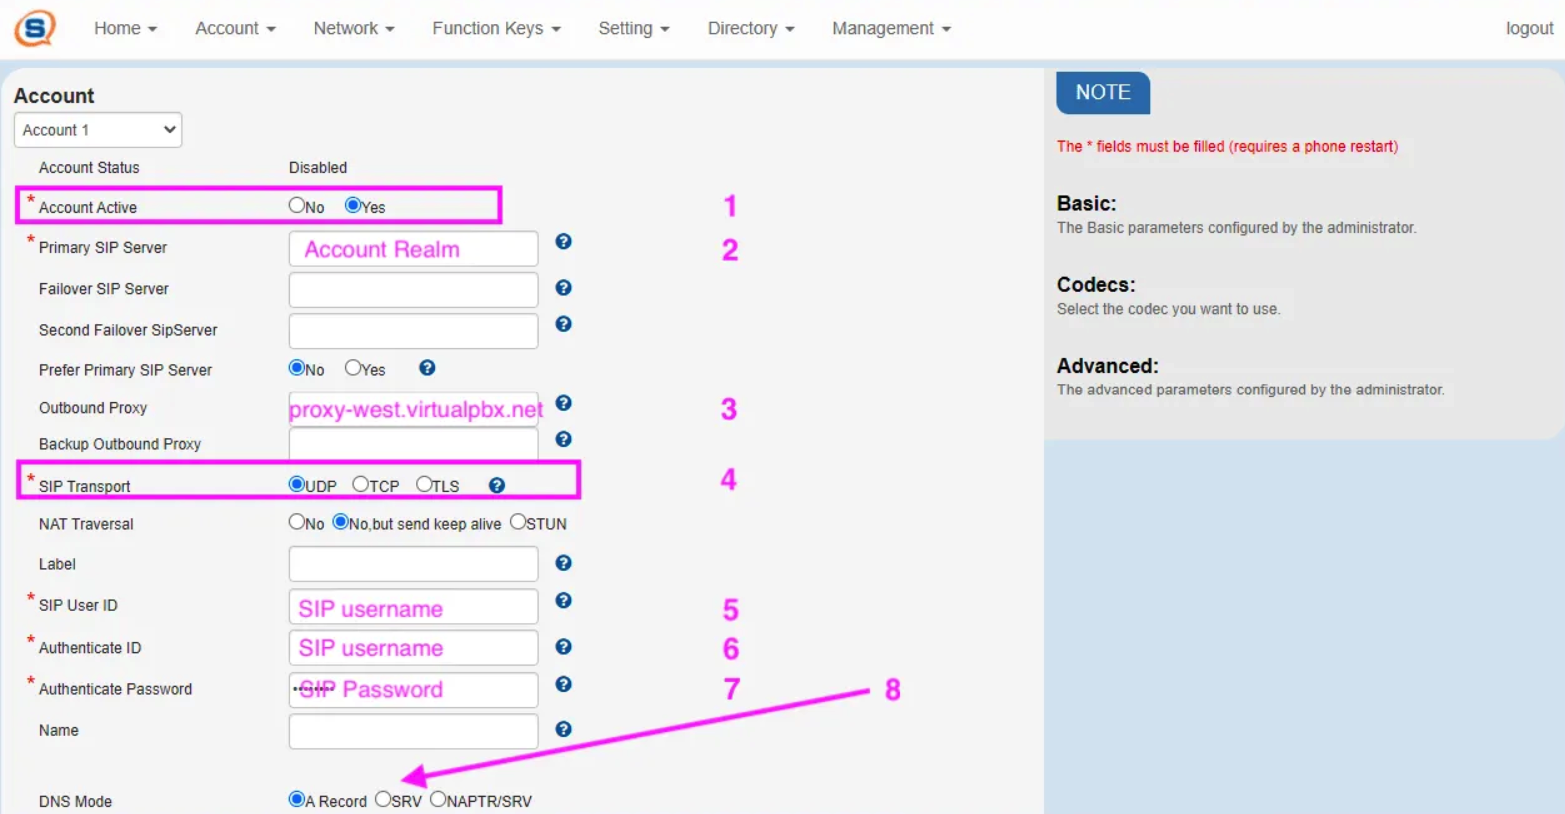
Account Active – Yes
Primary Sip Server – Account Realm
Outbound Proxy – proxy-west.virtualpbx.net
SIP Transport: UDP
SIP User ID – SIP Username
Authenticate ID – SIP Username
Authenticate Password – SIP Password
DNS Mode – SRV
Click on “Save Settings”.
Congratulations! Your Sangoma S305phone should now be successfully registered.
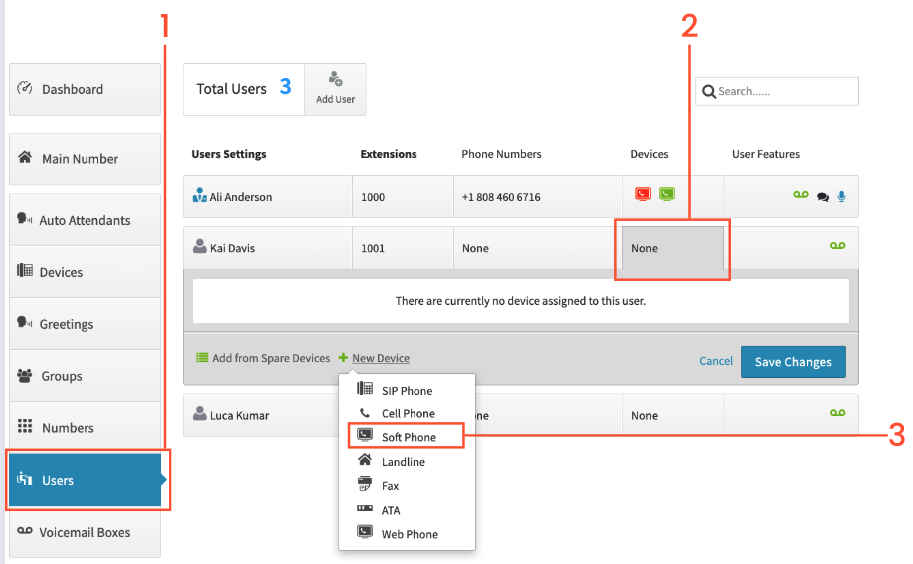
Click on Users on the left
Click on the Devices box for the user
On ‘New Devices’, click on Softphone
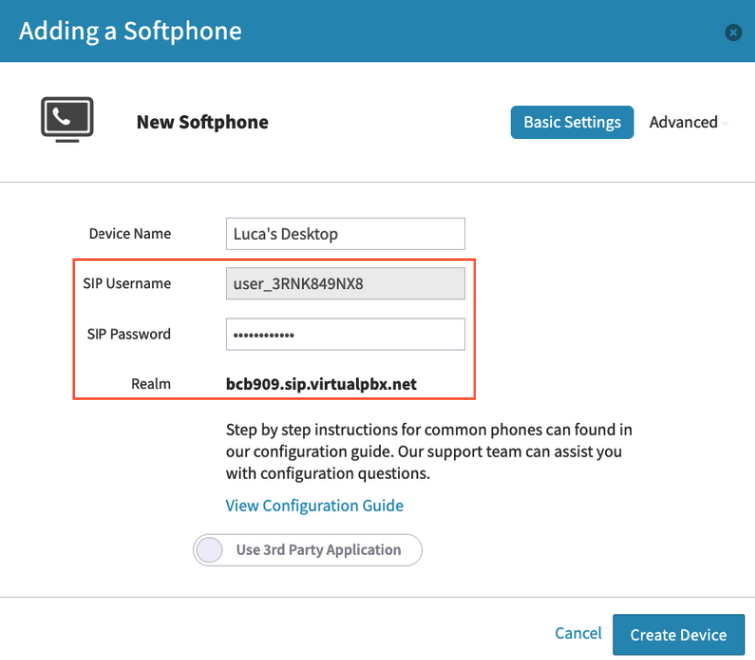
Give your Device a name for your identification.
Record your SIP Username, SIP Password, and Realm – you will need these shortly. To display your SIP Password simply click on the text box to reveal it.
Username: Polycom (Case sensitive)
Password: 456
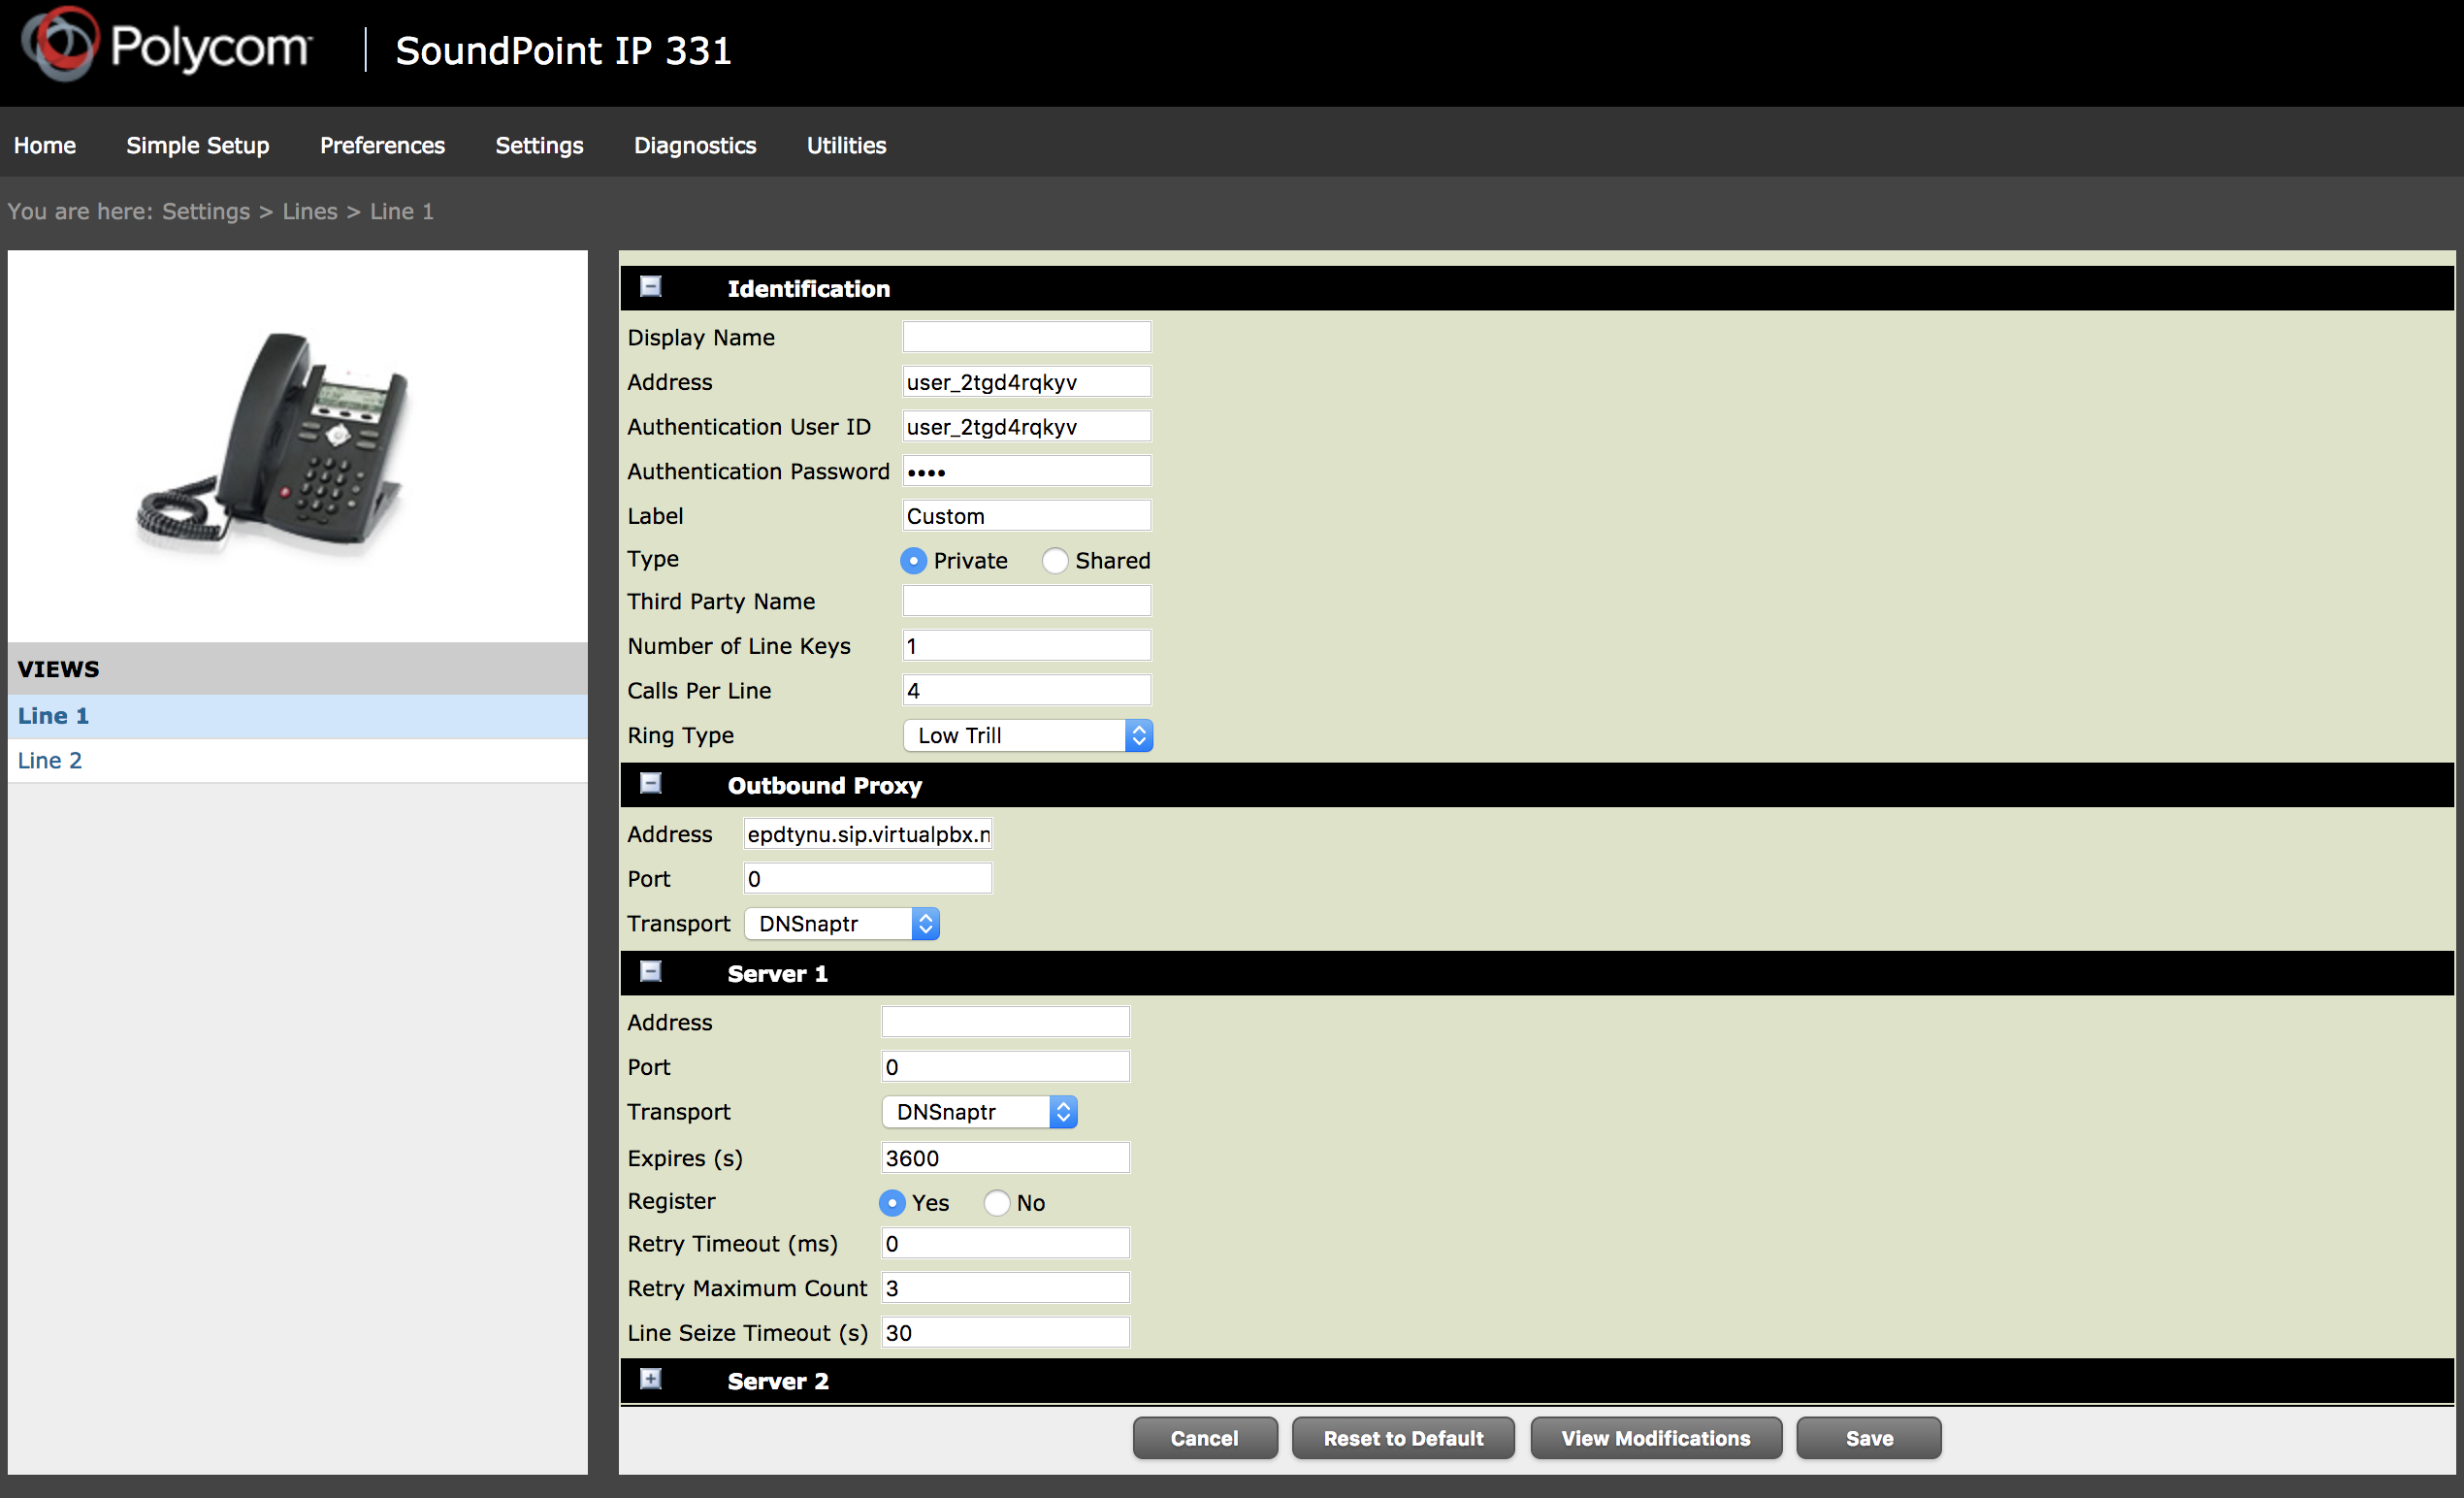 Under Identification:
SIP Username: Enter in The Address and Authentication User ID
SIP Password: enter in the Authentication Password
3. Realm: Enter in the Address field
Click Save
Setting Date/Time: Click on Preferences > Date & Time
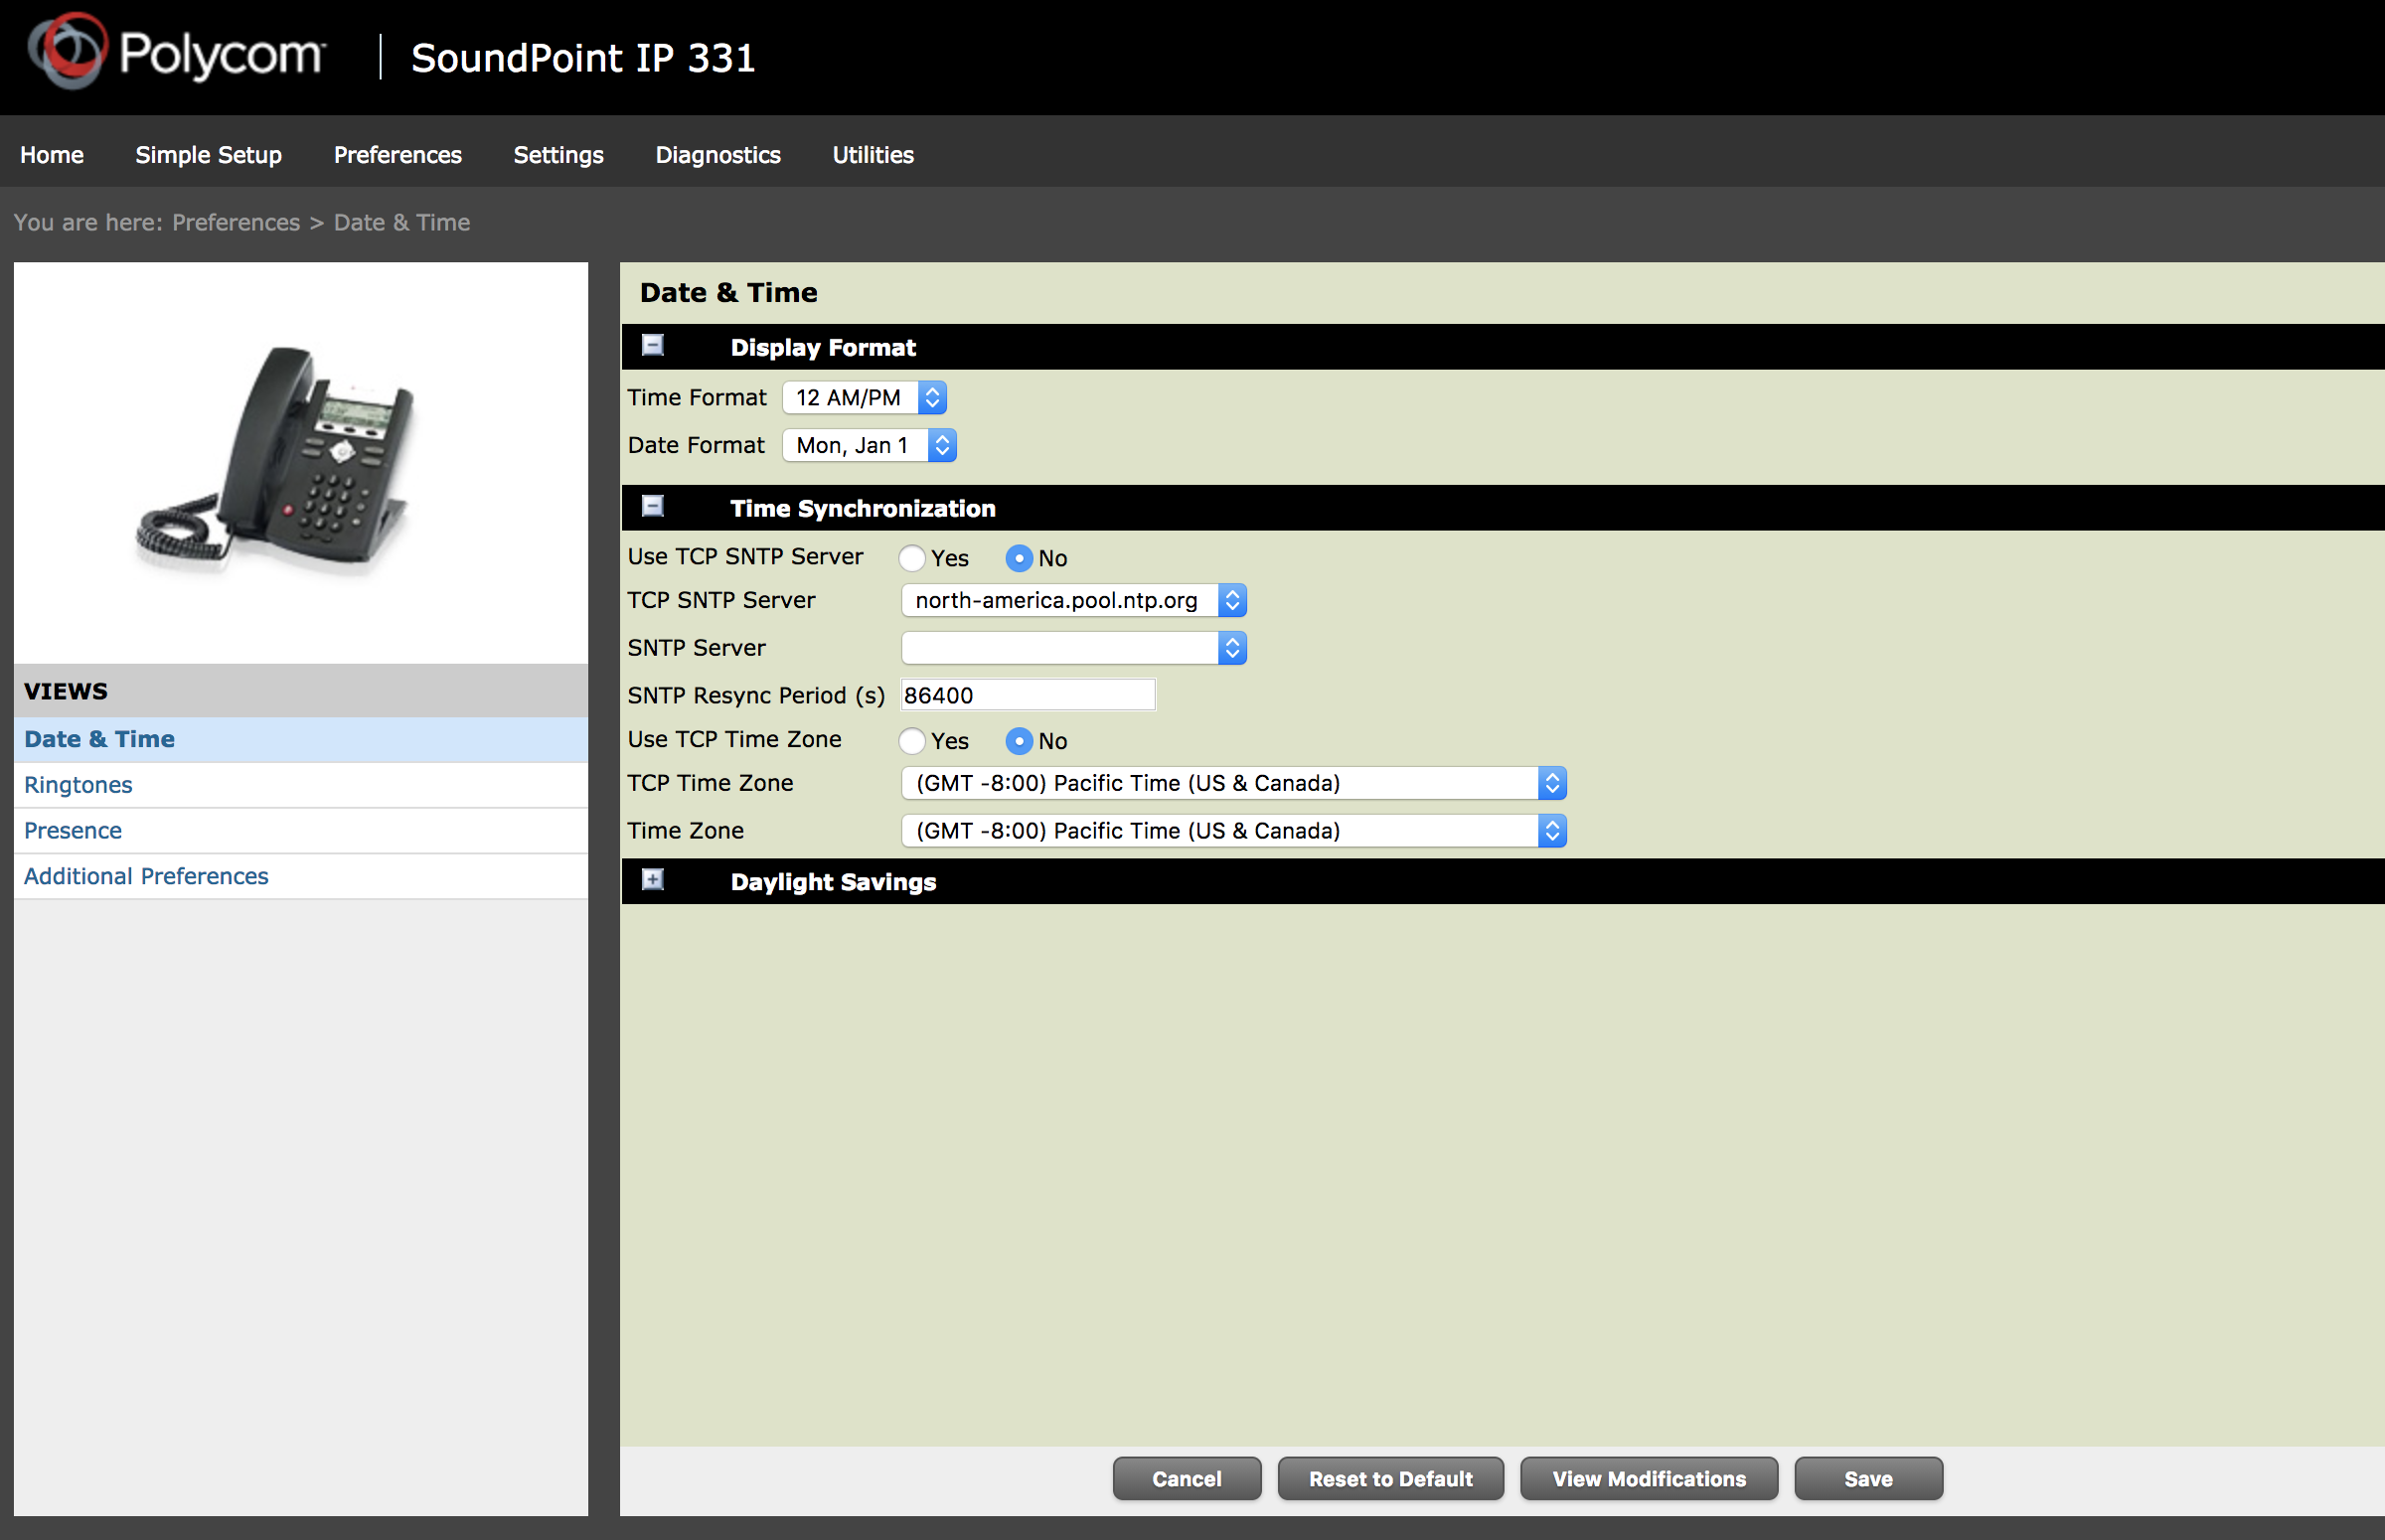
Adjust the time/date format to suit your preference
Then select the correct time zone for your location
Click Save
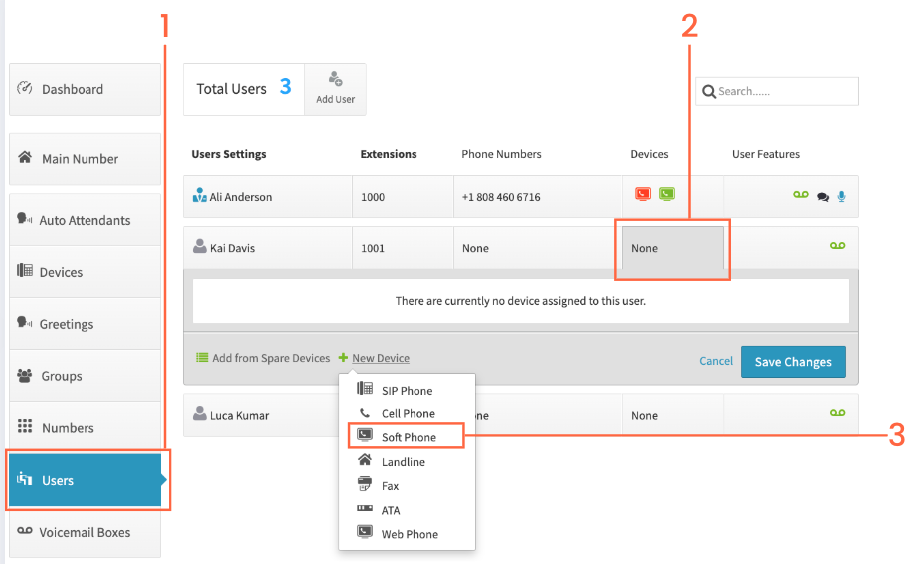
Click on Users on the left
Click on the Devices box for the user
On ‘New Devices’, click on Softphone
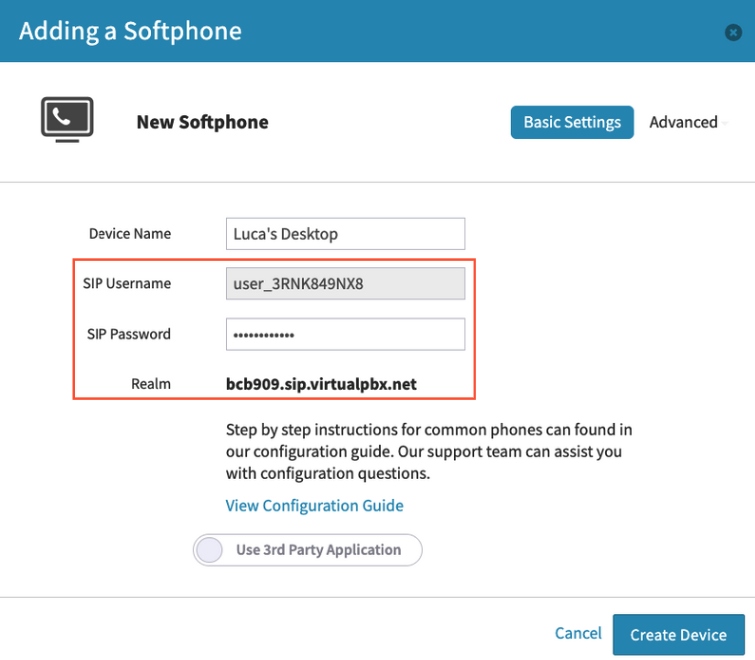
Give your Device a name for your identification.
Record your SIP Username, SIP Password, and Realm – you will need these shortly. To display your SIP Password simply click on the text box to reveal it.
Find the IP Address: On your VTech deskset or base station (for DECT), press Menu, go to Status, then Network. Note the IP Address.
Access WebUI: Open a web browser on a computer connected to the same network and type in the VTech phone's IP address.
Log In: Log in with the administrator account. (Default credentials are typically admin for the username and 1592 for the password).
Configure the SIP Account:Navigate to the Network or Account settings tab. Select an unused Account / Line. Set Account Active to Yes. Enter your Dash Username into the Auth Name, User ID, and Label fields. Enter your Dash Password into the Password field. Enter your Dash Realm into the Server Address or SIP Server field. Set the SIP Transport (usually UDP).
Save and Reboot: Click Save or Apply at the bottom of the page. The phone will register to the Dash platform
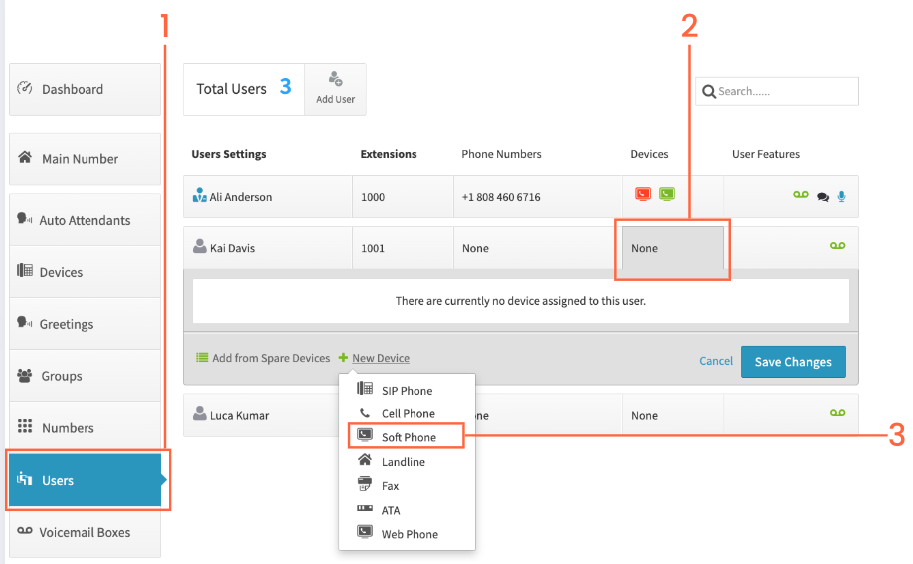
Click on Users on the left
Click on the Devices box for the user
On ‘New Devices’, click on Softphone
To remove any previous enterprise configurations:
Press the Main Menu or Admin key on the phone.
Enter the default administrator password (e.g., 27238) and press Enter.
Scroll to and select Reset to defaults (or Clear).
Press Reset to confirm and reboot the phone.
Configure SIP Settings. You can program the phone via its physical keypad:
During the initial boot session, press No to skip Auto-Provisioning.
Go to the Administration menu and enter the admin passcode (27238). Select IP Configuration > Servers.
Enter your Dash SIP details into the appropriate fields:SIP Server/Proxy: Your Dash domain. Registrar Server: Your Dash domain. Domain: Your Dash realm. Port: 5060 (or your specific Kazoo proxy port).
Navigate to your Accounts/Extension settings and input your Kazoo Extension Username and Password.
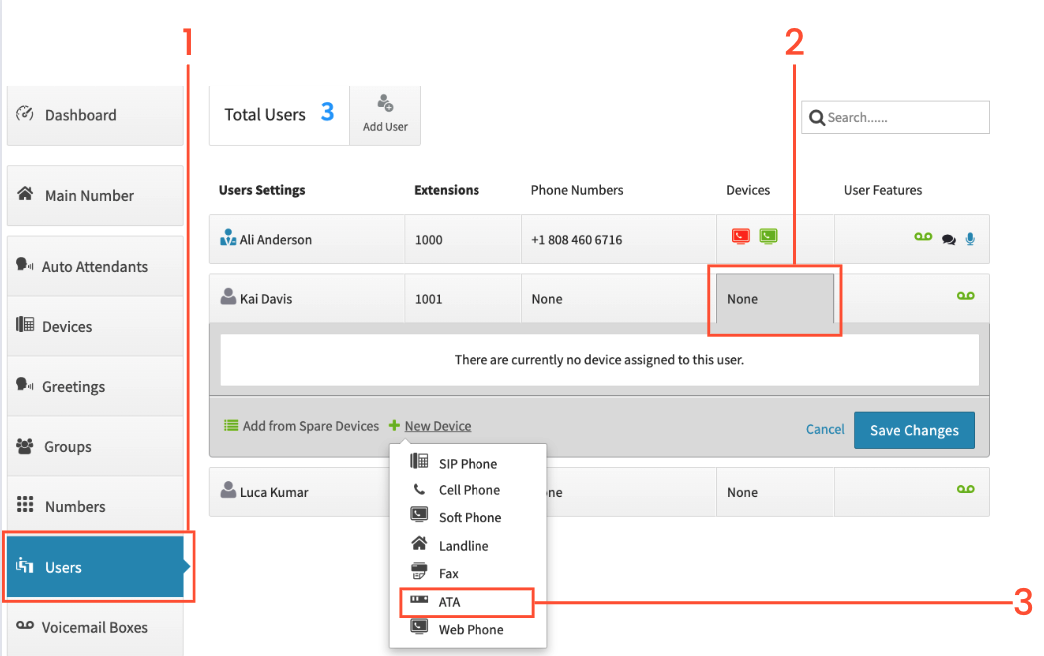 An ATA adaptor is a converter box that allows you to use an analog phone/fax machine via your internet connection. On one side you plug in the analog device, on the other is a network cable that will go to your router. Utilize this option for an analog fax machine.
Device Name: This is the name of the device that will show up in your Dashboard. It does not affect any part of provisioning or your system functionality.
SIP Username: This is a system-generated username that will be used to input into your ATA device’s web interface. Please avoid changing this item in the Dashboard to avoid complications with provisioning and registration.
SIP username is often entered into fields such as: User ID / Account name / Authentication name or ID / Authorization name / SIP User ID
SIP Password: This is a system-generated username that will be used to input into your ATA device’s web interface. Please avoid changing this item in the Dashboard to avoid complications with provisioning and registration.
SIP Password is often entered into fields such as: Password / account password / authentication password / SIP password
Realm: This is a system-generated string unique to your VirtualPBX account which will be input into your ATA device’s web interface
Realm is often entered into fields such as: Domain / Server / Proxy or Proxy Server / Register server / SIP domain or Server
It is possible that you may need to setup the Outbound Proxy server as well
Outbound Proxy should be set to proxy-west.virtualpbx.net
Mouse over Advanced and you will see your Advanced options. In general these can be adjusted as you see fit or simply left as is.
An ATA adaptor is a converter box that allows you to use an analog phone/fax machine via your internet connection. On one side you plug in the analog device, on the other is a network cable that will go to your router. Utilize this option for an analog fax machine.
Device Name: This is the name of the device that will show up in your Dashboard. It does not affect any part of provisioning or your system functionality.
SIP Username: This is a system-generated username that will be used to input into your ATA device’s web interface. Please avoid changing this item in the Dashboard to avoid complications with provisioning and registration.
SIP username is often entered into fields such as: User ID / Account name / Authentication name or ID / Authorization name / SIP User ID
SIP Password: This is a system-generated username that will be used to input into your ATA device’s web interface. Please avoid changing this item in the Dashboard to avoid complications with provisioning and registration.
SIP Password is often entered into fields such as: Password / account password / authentication password / SIP password
Realm: This is a system-generated string unique to your VirtualPBX account which will be input into your ATA device’s web interface
Realm is often entered into fields such as: Domain / Server / Proxy or Proxy Server / Register server / SIP domain or Server
It is possible that you may need to setup the Outbound Proxy server as well
Outbound Proxy should be set to proxy-west.virtualpbx.net
Mouse over Advanced and you will see your Advanced options. In general these can be adjusted as you see fit or simply left as is.
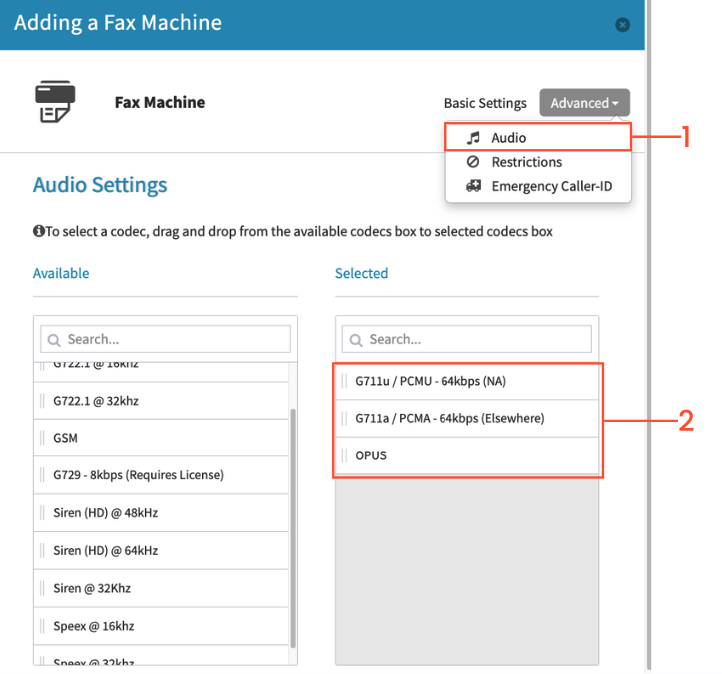 1: Click on Advanced in the top right, and select “Audio”
2: Move the following options from the left column to the right column in descending order: PCMU / PCMA / OPUS
Click on Create Device when done.
### Cisco SPA 112
Depending on your Cisco model and firmware version, your Cisco interface may look different than the screenshots included below. The steps, however, are the same.
1: Click on Advanced in the top right, and select “Audio”
2: Move the following options from the left column to the right column in descending order: PCMU / PCMA / OPUS
Click on Create Device when done.
### Cisco SPA 112
Depending on your Cisco model and firmware version, your Cisco interface may look different than the screenshots included below. The steps, however, are the same.
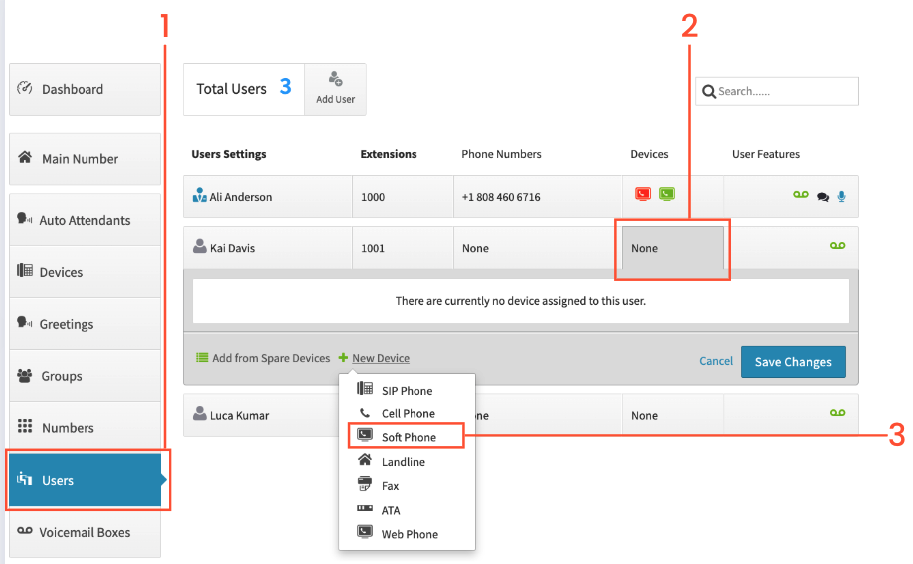
Click on Users on the left
Click on the Devices box for the user
On ‘New Devices’, click on Softphone
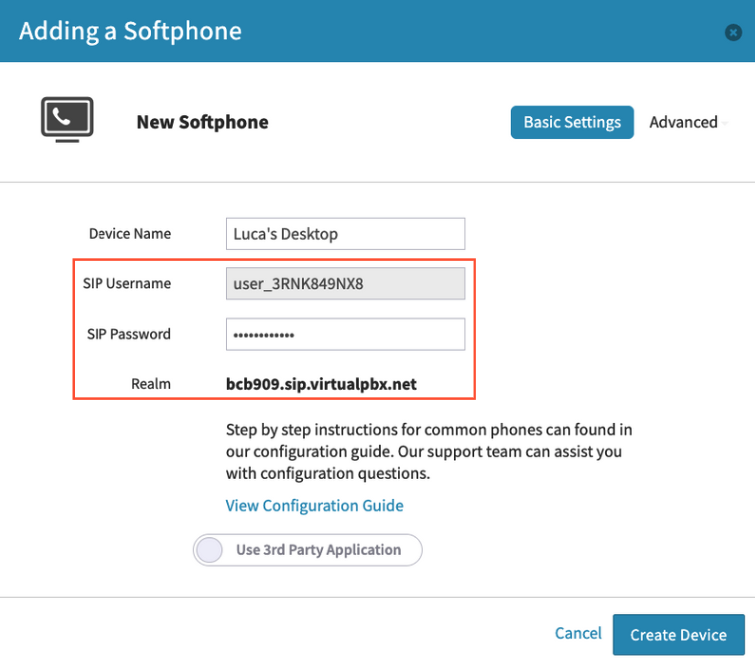
Give your device name & record the SIP Username/Password for future use
Click Create Device.
Get the IP Address for your Cisco SPA 112Hook up analog phone to Phone 1Pick up and press ****Enter 110# and record IP address
Enter IP Address into web browser and loginusername: adminpassword: admin
In Quick Setup (Initial Screen) enter the following informationProxy – SIP RealmDisplay Name – Name of PhoneUser ID- SIP usernamePassword – SIP Password
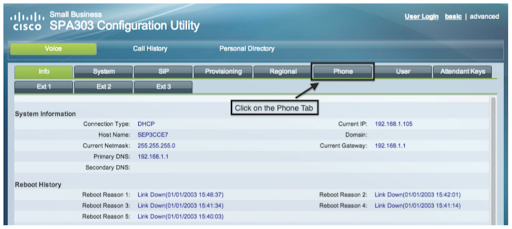
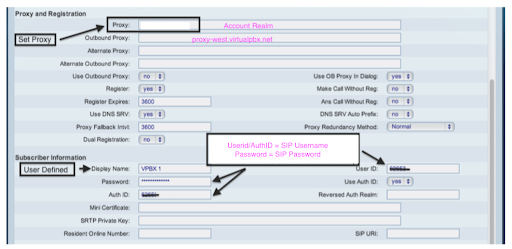
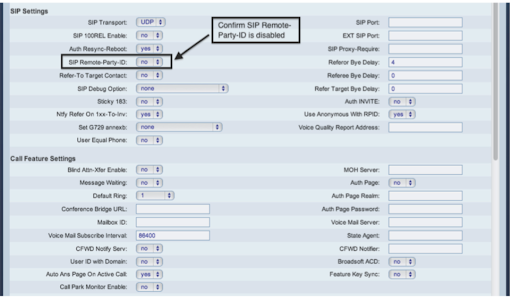
Navigate to the Administration tab, select Voice > Line 1, and ensure the outbound proxy and DNS SRV information is correct.
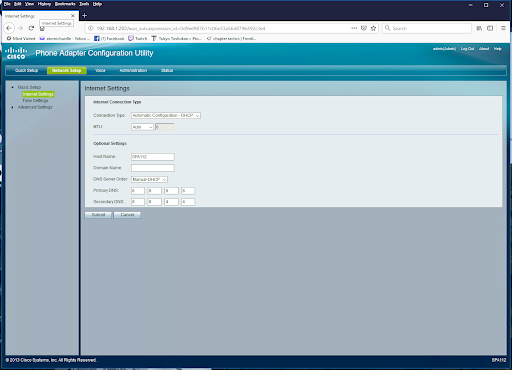
Click Submit to save. No other changes are needed by default.
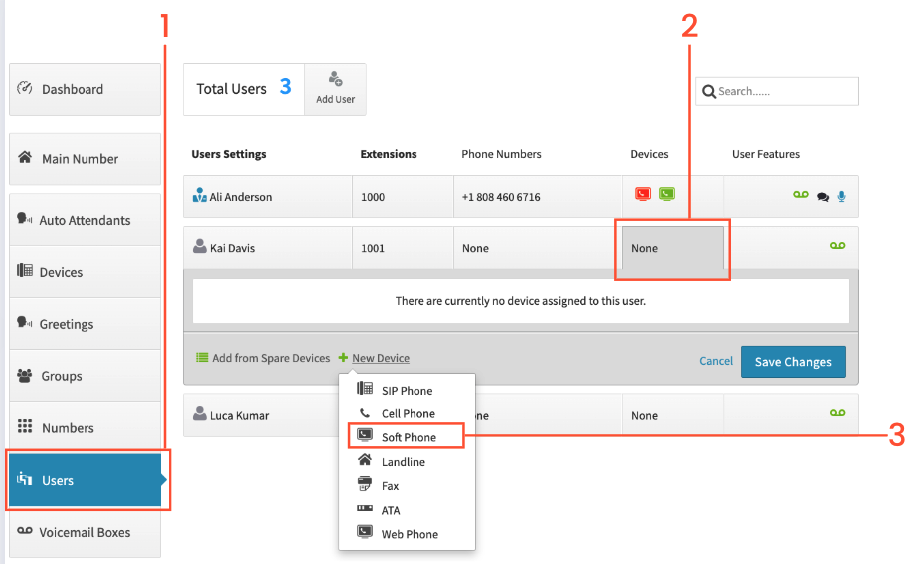
Click on Users on the left
Click on the Devices box for the user
On ‘New Devices’, click on Softphone
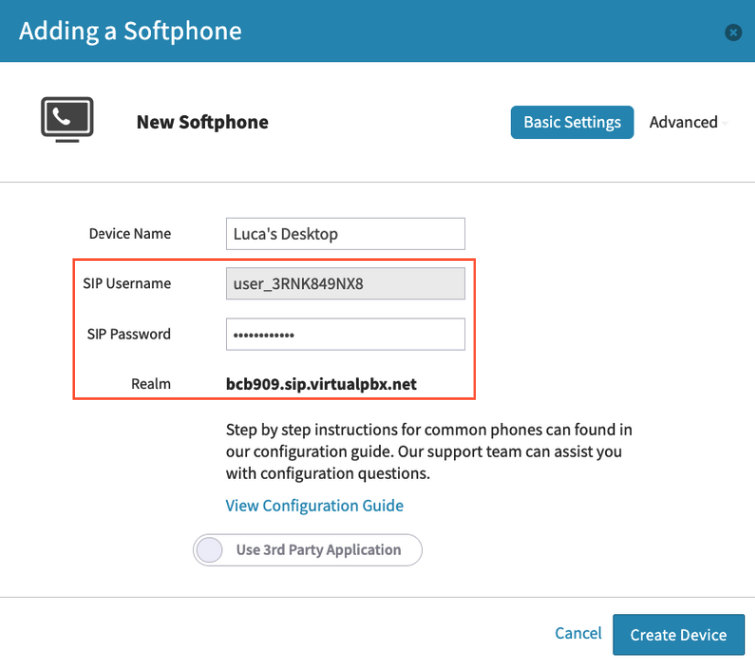
Give your device name & record the SIP Username/Password for future use
Click Create Device.
Go to the Basic Settings Tab
Click on the SIP tab, and input the following information copied previously
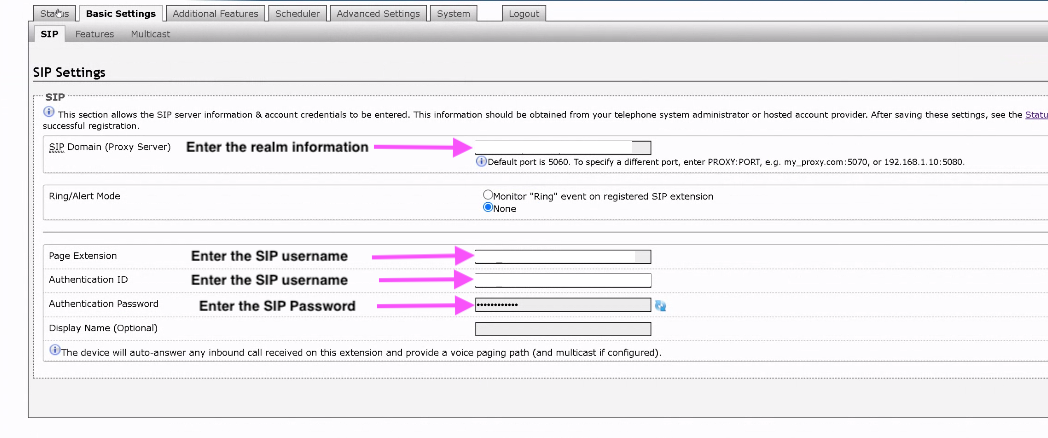
Domain : Realm
Page Extension: SIP Username
Authentication ID: SIP Username (Again)
Authentication Password: SIP Password
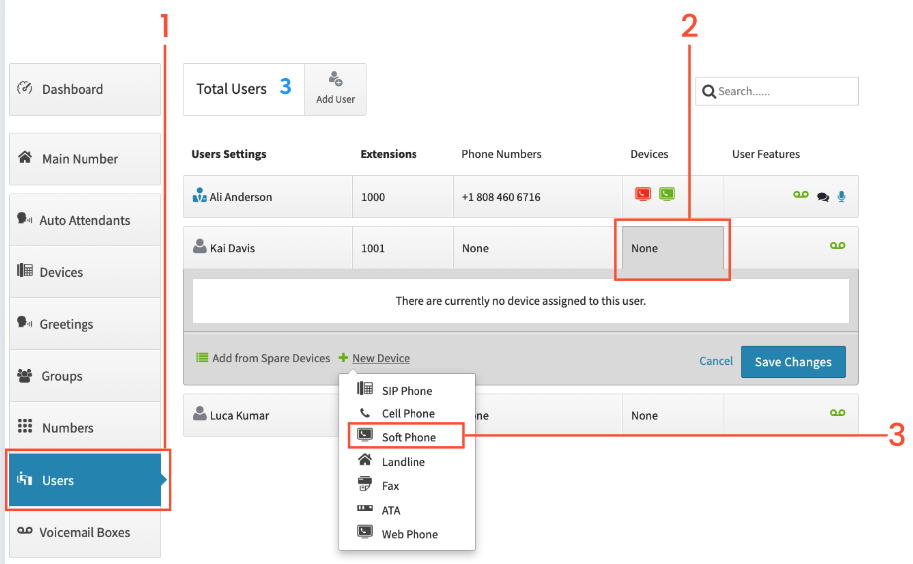
Click on Users on the left
Click on the Devices box for the user
On ‘New Devices’, click on Softphone
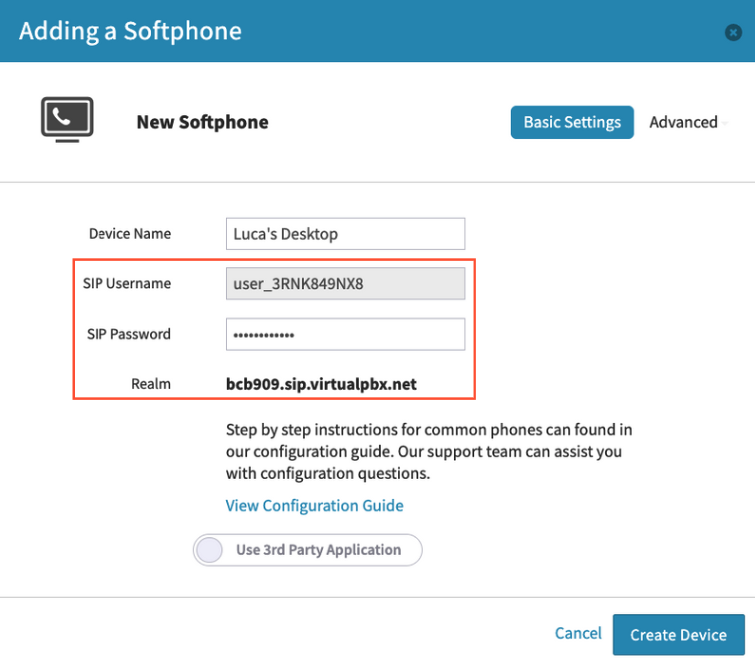
Give your device name & record the SIP Username/Password for future use
Click Create Device.
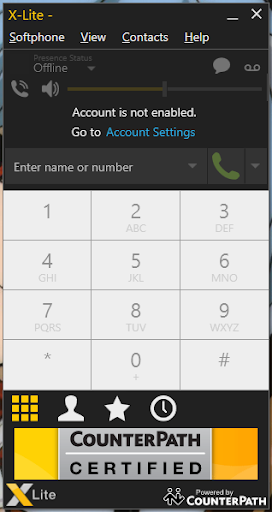
Open X-Lite/Bria
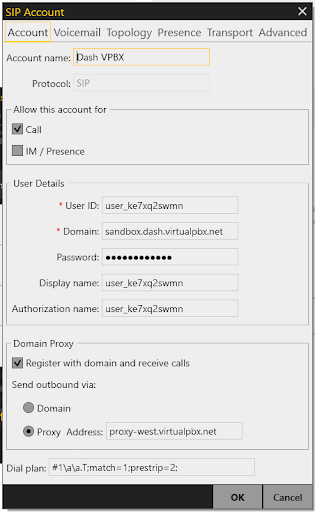
Go to Account Settings and complete the following:Uncheck IM/PresenceUser ID = SIP UsernameDomain = realm listed for softphonePassword = SIP PasswordDisplay Name = SIP usernameAuthorization Name = SIP Username
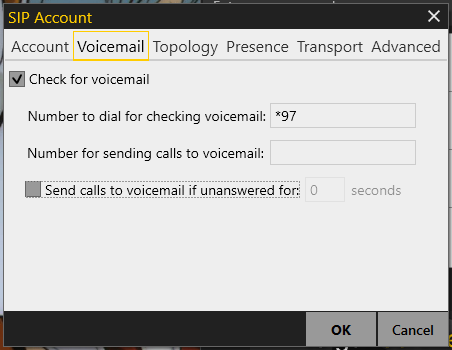
Review Voicemail settings. Set the number to dial for checking voicemail to *97
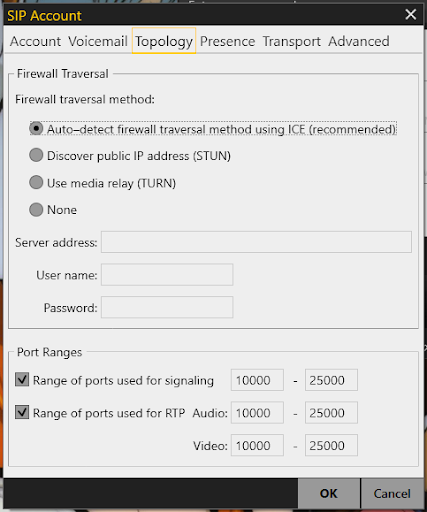
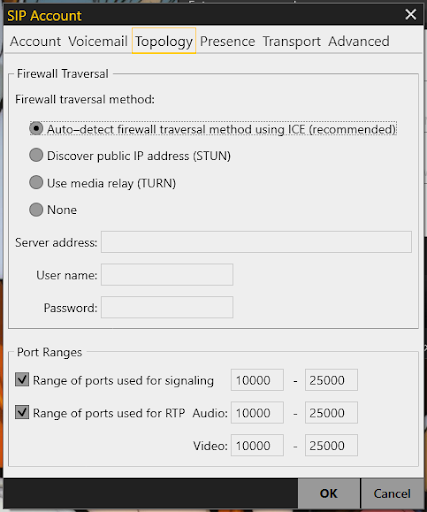
Review Topology SettingsRange of ports used for signaling – 10000 to 25000Range of ports used for RTP (both audio and video) – 10000 to 25000
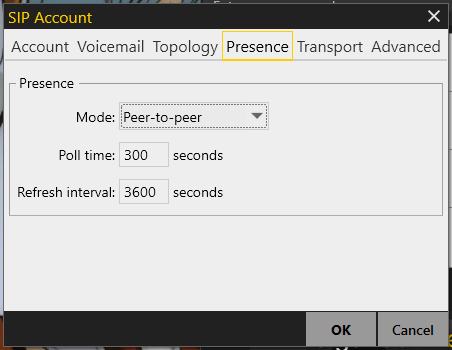
Review Presence settings. In most cases no changes will be necessary.
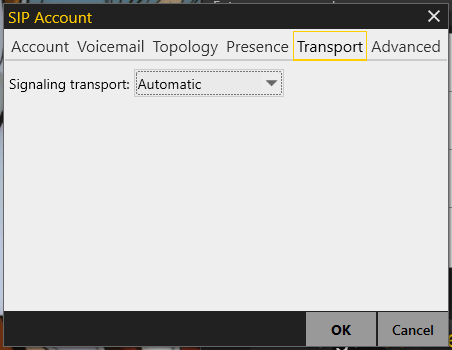
If you use the X-Lite version, review Transport settings. In most cases no changes will be necessary. If you use the Bria version, your Transport settings should look like this:
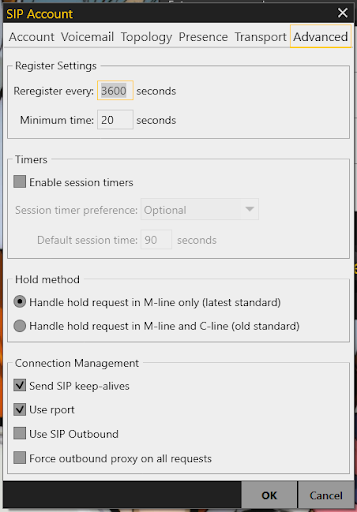
Review the Advanced settings. In most cases no changes will be necessary.
 ### Grandstream GDS3712 Intercom
The GDS3712 requires a manual wiring setup with an ethernet cable as it does not have an RJ45 plug. You can find the wiring instructions here: [https://documentation.grandstream.com/knowledge-base/gds3710-gds3712-user-manual/](https://documentation.grandstream.com/knowledge-base/gds3710-gds3712-user-manual/)
We recommend that you start by making sure that your Grandstream device has the most recent version of the [firmware](https://www.grandstream.com/support/firmware). Please note that updating the firmware may change the screen images that we present here. The purpose of the fields should be the same regardless of version.
### Grandstream GDS3712 Intercom
The GDS3712 requires a manual wiring setup with an ethernet cable as it does not have an RJ45 plug. You can find the wiring instructions here: [https://documentation.grandstream.com/knowledge-base/gds3710-gds3712-user-manual/](https://documentation.grandstream.com/knowledge-base/gds3710-gds3712-user-manual/)
We recommend that you start by making sure that your Grandstream device has the most recent version of the [firmware](https://www.grandstream.com/support/firmware). Please note that updating the firmware may change the screen images that we present here. The purpose of the fields should be the same regardless of version.
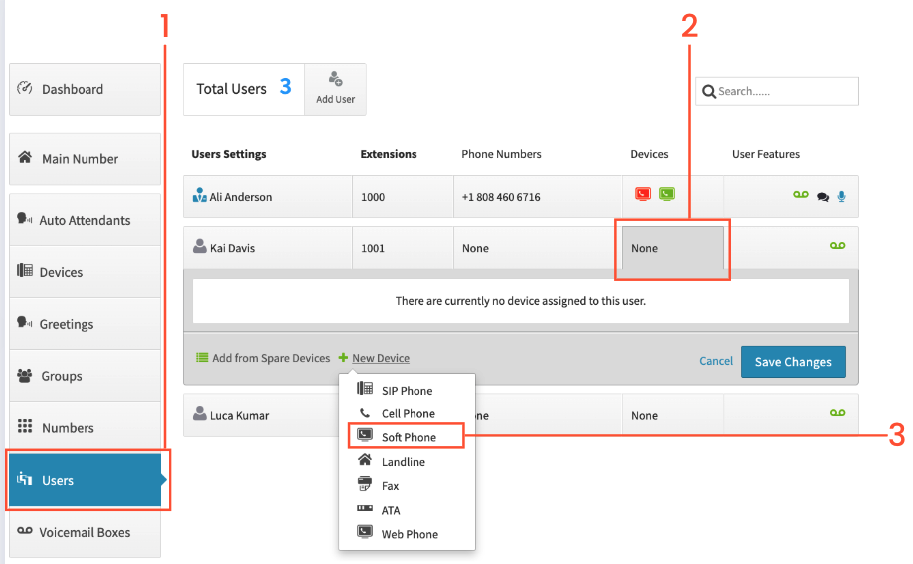
Click on Users on the left
Click on the Devices box for the user
On ‘New Devices’, click on Softphone
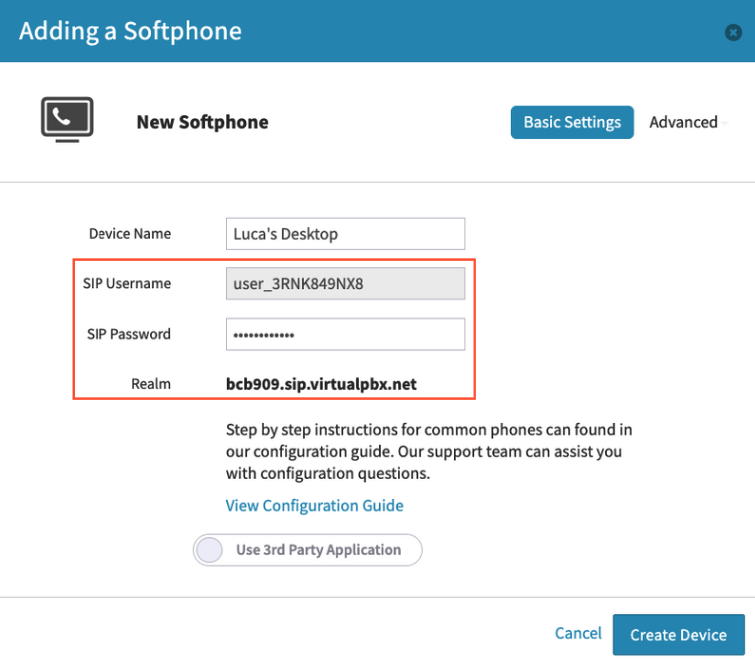
Give your device name & record the SIP Username/Password for future use
Click Create Device.