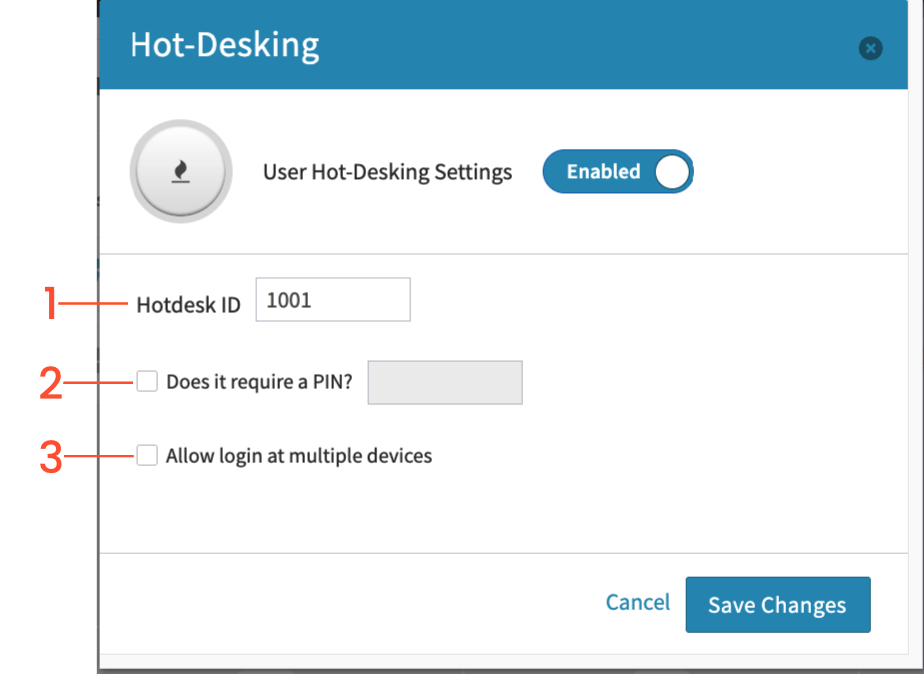
Once Hot Desking is enabled, enter the Hot-Desk ID number for the user.
You may also set a PIN number but it is not required
“Allow multiple devices.” When this is checked, the user may log into multiple devices at the same time.
Disable Hot Desking 12
This User Feature Code allows you to log-out of a phone. Just as logging into the phone, once a user has entered their ID and optional pin, the phone will cease to receive their inbound calls, voicemail updates, and other features. Inbound calls will likely go straight to voicemail (unless the user is permitted to be logged into multiple phones at once).
To disable:
Dial *12 from the phone
The system will prompt to enter your Hot Desk ID (numeric code)
If the user has a PIN configured, there will be a voice prompt requesting the PIN. Enter it, followed by #
You will hear a confirmation that Hot Desking has been disabled.
Toggle Hot Desking 13
This User Feature Code allows you to toggle the current state of the user's devices. If logged out, toggling logs the user into owned devices. If logged in, toggling logs the user out of all the devices they're logged into, and vice versa.
Dial *13 from the phone
The system will prompt to enter your Hot Desk ID (numeric code)
If the user has a PIN configured, there will be a voice prompt requesting the PIN. Enter it, followed by #
You will hear a confirmation that Hot Desking has been enabled/ disabled.
## Extensions
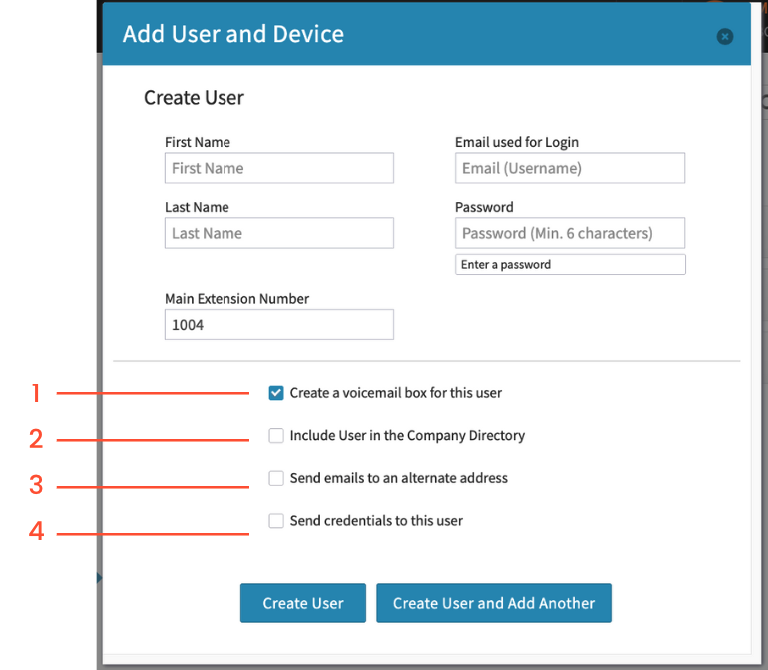
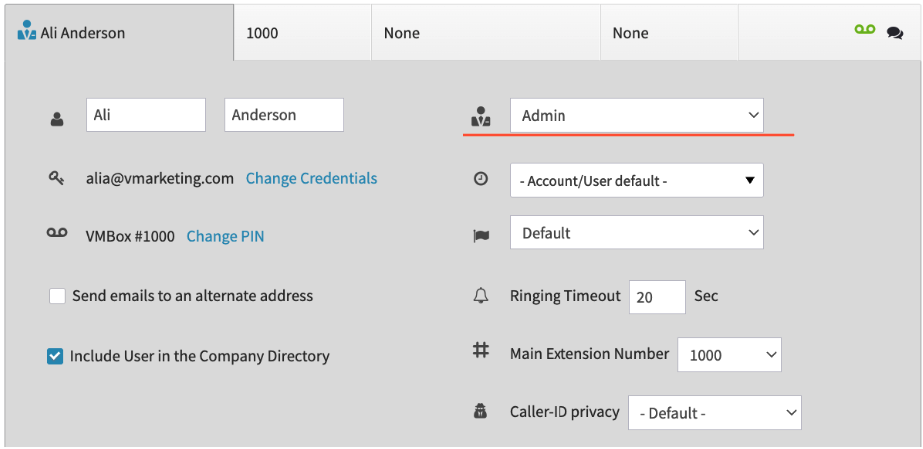
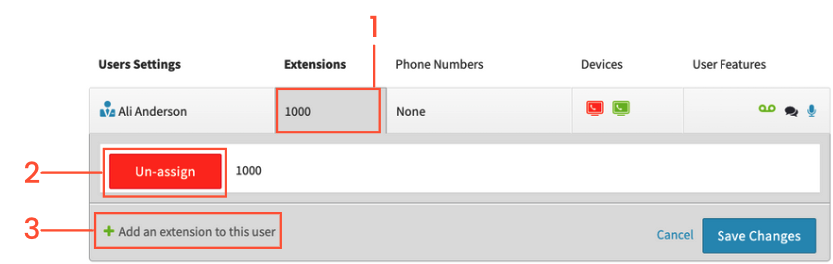
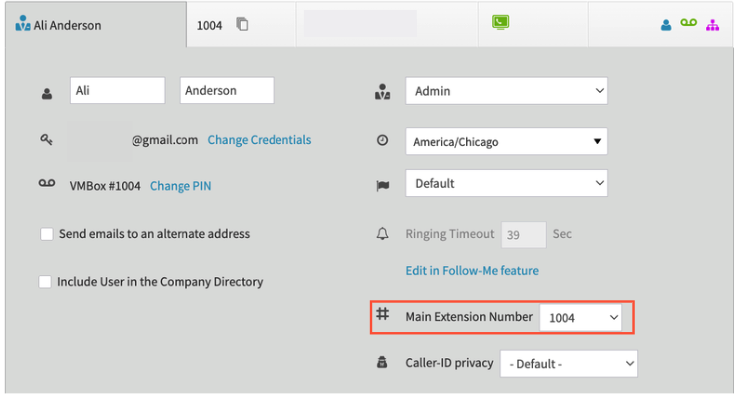
Extensions are a shorter direct way to reach a specific agent or group. You can utilize multiple extensions on the same user - you will need to choose one as your Main Extension
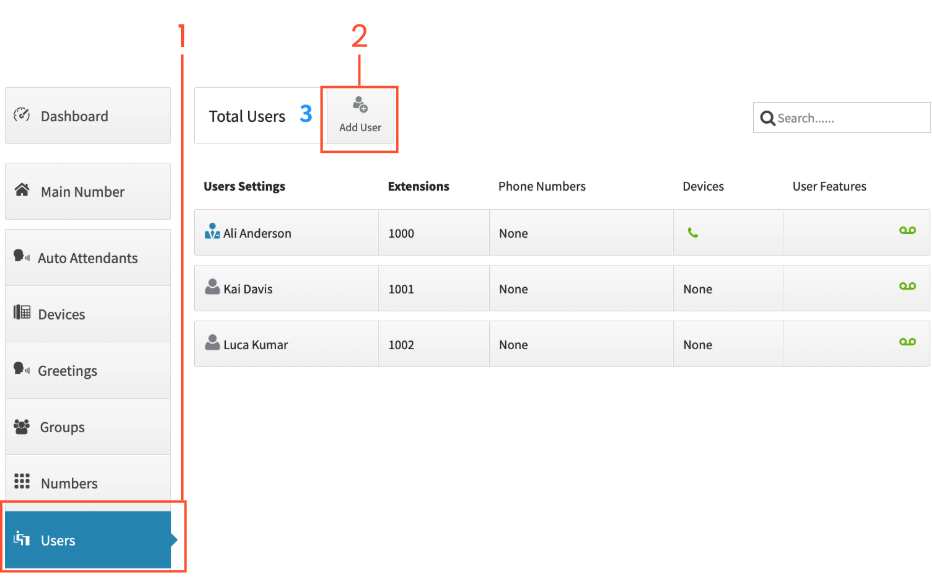 A user represents a seat on the platform for each person. Users can make or take phone calls through the phone system when they have devices linked such as their cell phones or voice-over IP devices.
 ## User Features
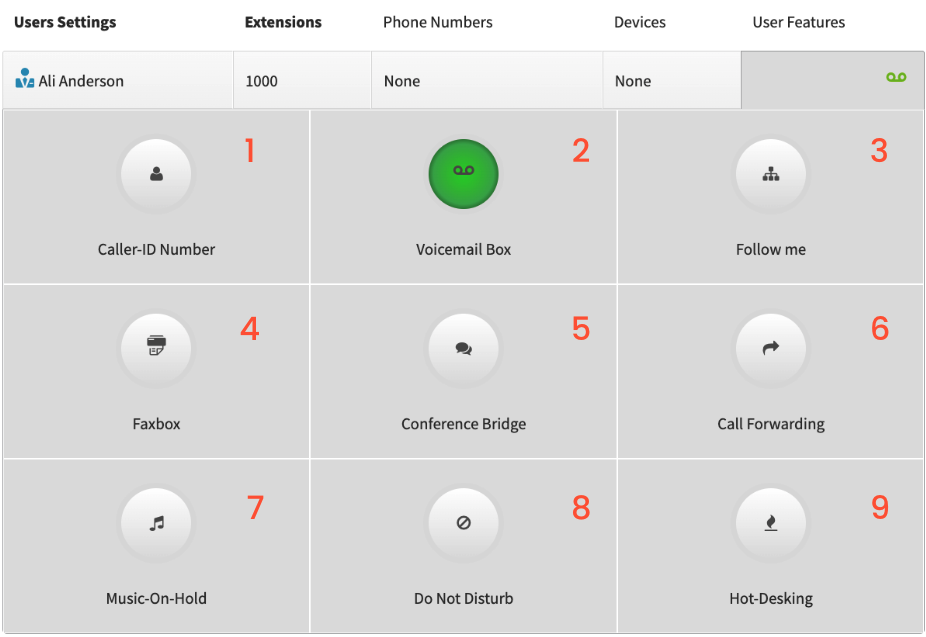 ### 1. Caller-ID Number
Enables users to use their personal number as oppposed to the main number. You will need to have a number assigned to the user before utilizing Caller-ID Numbers. - Turn the feature on when a number is assigned, and choose your new number.
### 2. Voicemail Box
### 1. Caller-ID Number
Enables users to use their personal number as oppposed to the main number. You will need to have a number assigned to the user before utilizing Caller-ID Numbers. - Turn the feature on when a number is assigned, and choose your new number.
### 2. Voicemail Box
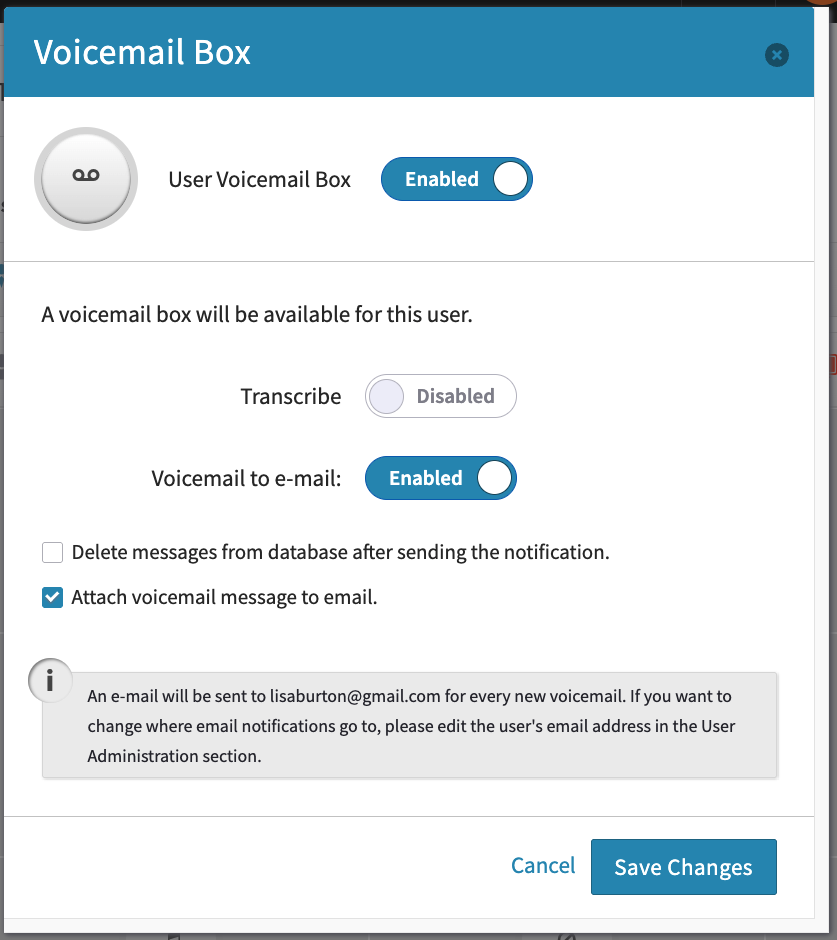 Utilize this page to manage voicemail transcriptions, and where your voicemails will be sent when left.
### 3. Follow Me
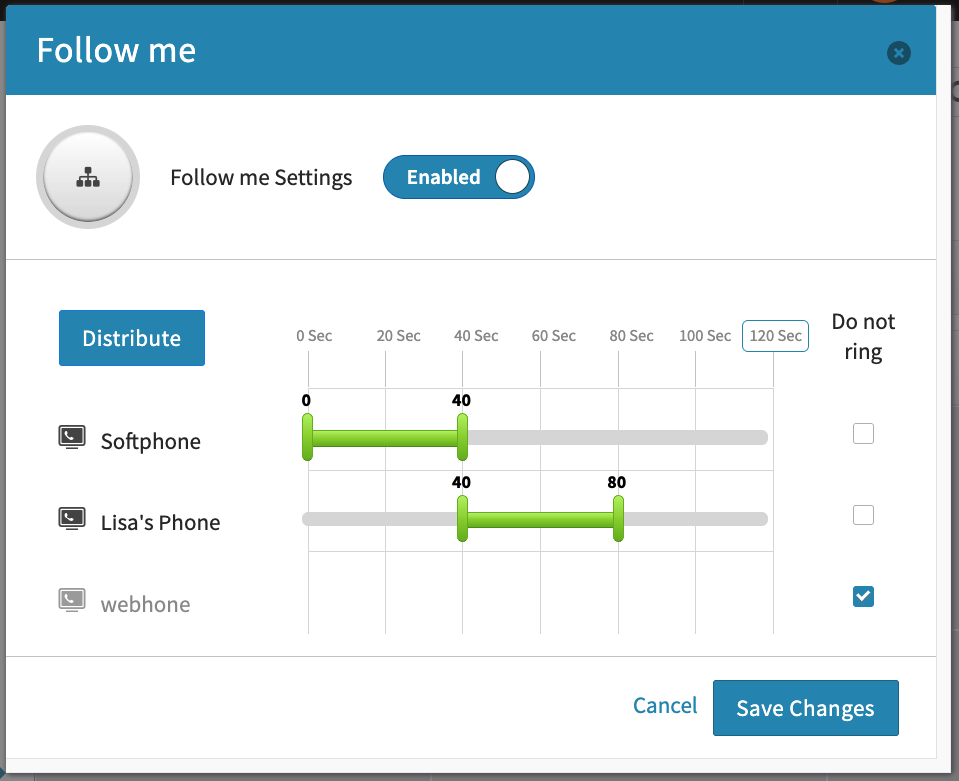
Utilize this feature to set up call distribution. Turn on which devices you would like to ring, and set the ring duration for each device.
Utilize this page to manage voicemail transcriptions, and where your voicemails will be sent when left.
### 3. Follow Me
Utilize this feature to set up call distribution. Turn on which devices you would like to ring, and set the ring duration for each device.
 ### 4. Faxbox
Find out more about faxing in our [Faxing](/business-phone/send-a-fax) Guide!
### 5. Conference Bridge
Find out more about faxing in our [Audio Conferencing](/business-phone/audio-conferencing) Guide!
### 6. Call Forwarding
### 4. Faxbox
Find out more about faxing in our [Faxing](/business-phone/send-a-fax) Guide!
### 5. Conference Bridge
Find out more about faxing in our [Audio Conferencing](/business-phone/audio-conferencing) Guide!
### 6. Call Forwarding
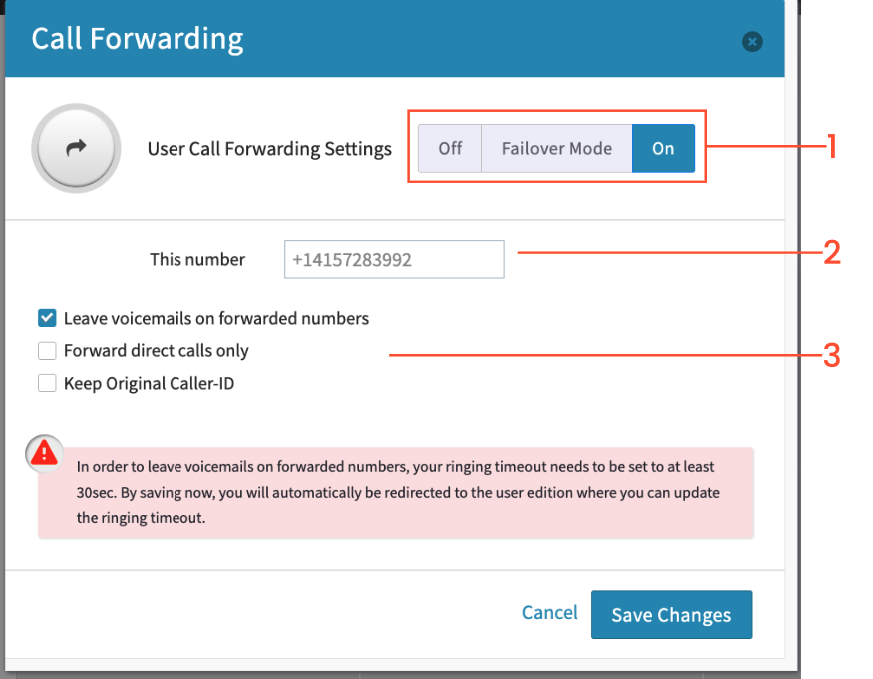 Call forwarding is generally has three modes:
 ## Direct Number
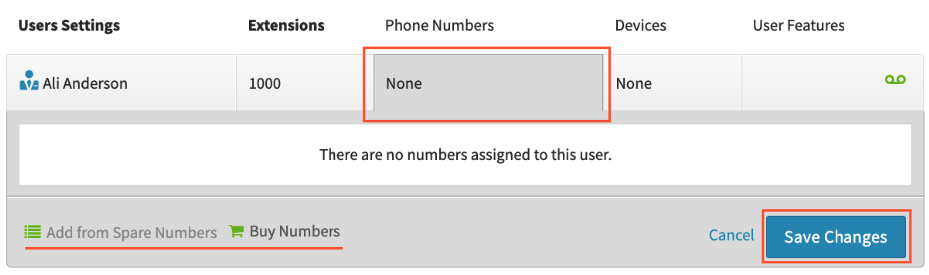
Adding a direct number to your user will allow customers/clients to route directly to the user.
## Direct Number
Adding a direct number to your user will allow customers/clients to route directly to the user.
 Check the settings available to our phone numbers in our [Number Settings](/business-phone/number-settings) Guide!
## Creating Devices for Users
Check the settings available to our phone numbers in our [Number Settings](/business-phone/number-settings) Guide!
## Creating Devices for Users
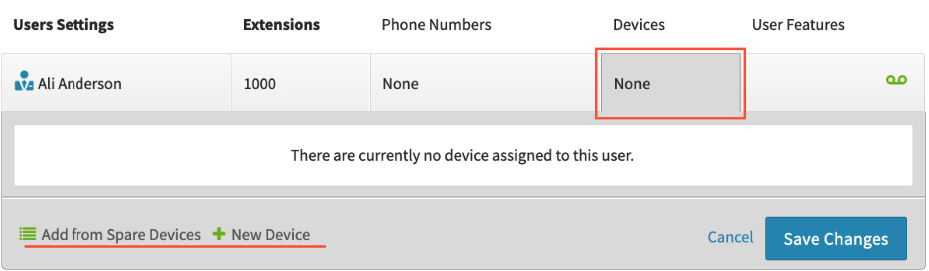 There are two ways to add a device to a user.
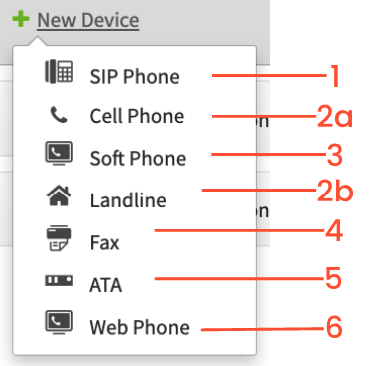 ### 1. SIP Phone
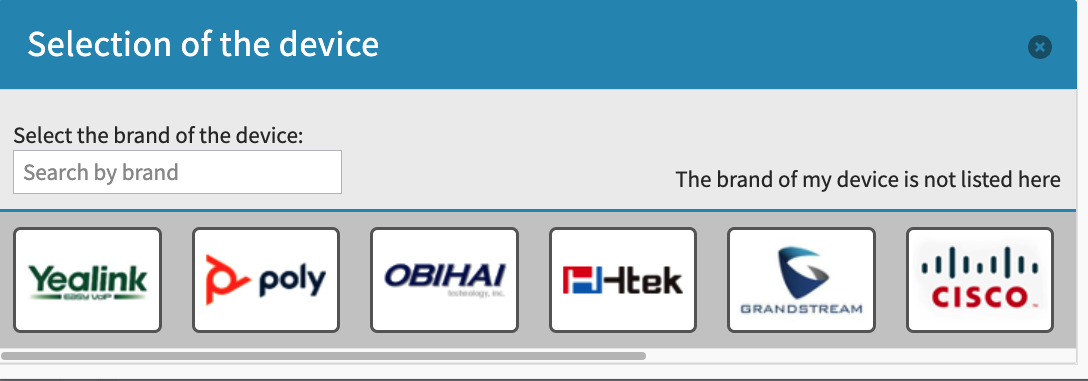 Once you choose the SIP option, you will be able to choose your device first by the brand, then by the model of the device. If the brand of your device is not listed, choose the above option and enter the MAC address and name your device.
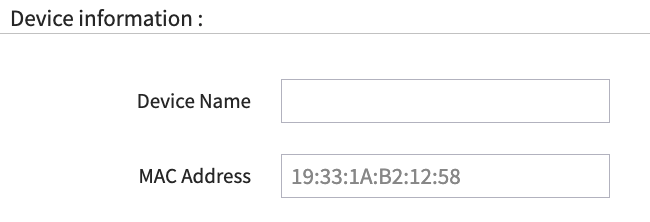 Once you have entered your information, choose ‘Create Device’
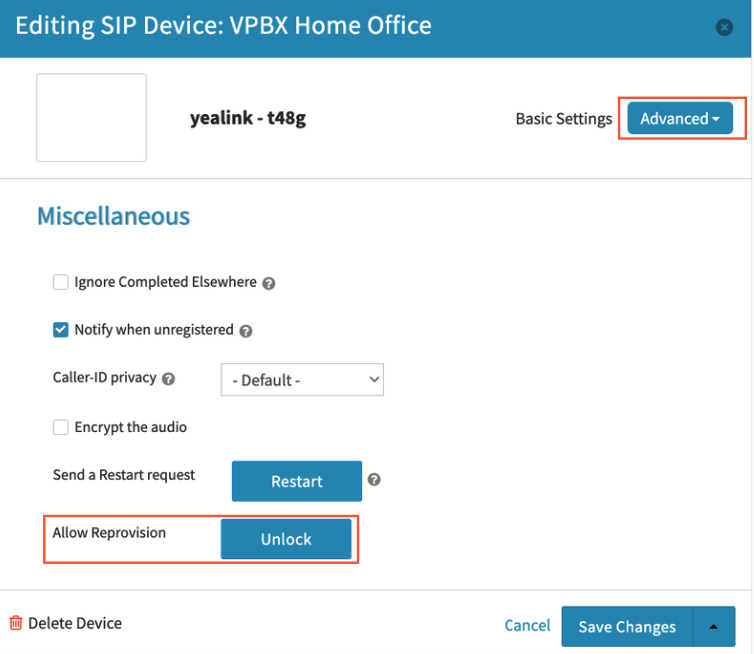
IF THIS IS A NEW DEVICE - Once you have created the device, click in to the device name, and choose ‘Advanced - Miscellaneous’.
Unlock the device, then unplug your phone, wait 2-5 minutes, and plug back in.
Once you have entered your information, choose ‘Create Device’
IF THIS IS A NEW DEVICE - Once you have created the device, click in to the device name, and choose ‘Advanced - Miscellaneous’.
Unlock the device, then unplug your phone, wait 2-5 minutes, and plug back in.
 IF THIS IS A DEVICE USED BEFORE - Factory reset your device before creating it on the system here.
### 2. Cell Phone or Landline
Adding a cell phone or landline allows for use of receiving calls from your business number to any 10 digit (Or international number if you’re qualified for that) number, be that your cell phone or an outside number of some kind. Please note that to make outbound calls through your system, you would need to use a VOIP device, like a Web Phone, Softphone, or SIP desk phone.
IF THIS IS A DEVICE USED BEFORE - Factory reset your device before creating it on the system here.
### 2. Cell Phone or Landline
Adding a cell phone or landline allows for use of receiving calls from your business number to any 10 digit (Or international number if you’re qualified for that) number, be that your cell phone or an outside number of some kind. Please note that to make outbound calls through your system, you would need to use a VOIP device, like a Web Phone, Softphone, or SIP desk phone.
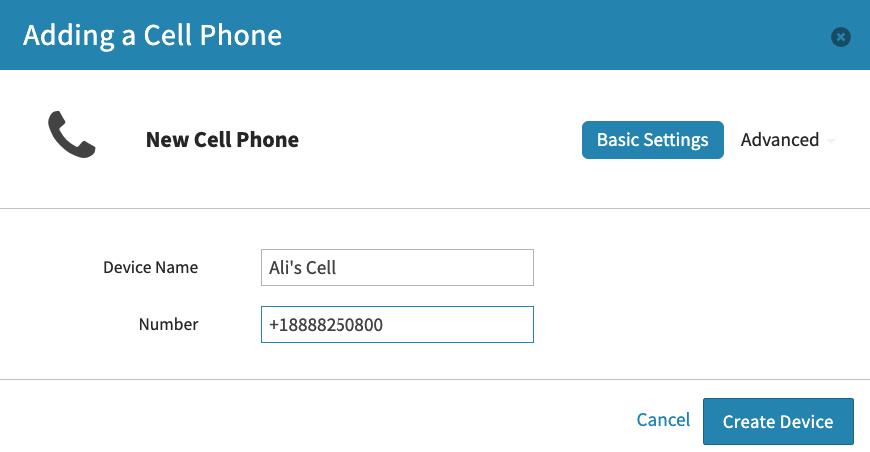
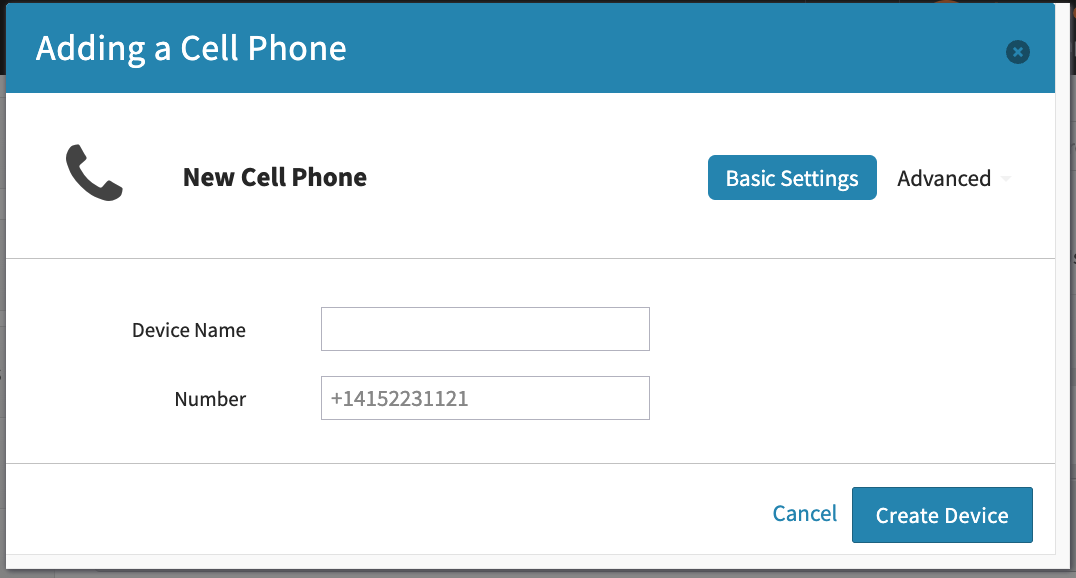 Give the device a name (this will only be used to internally track devices) and add your phone number. Follow the format given, beginning the number with a +1 (For normal 10 digit numbers).
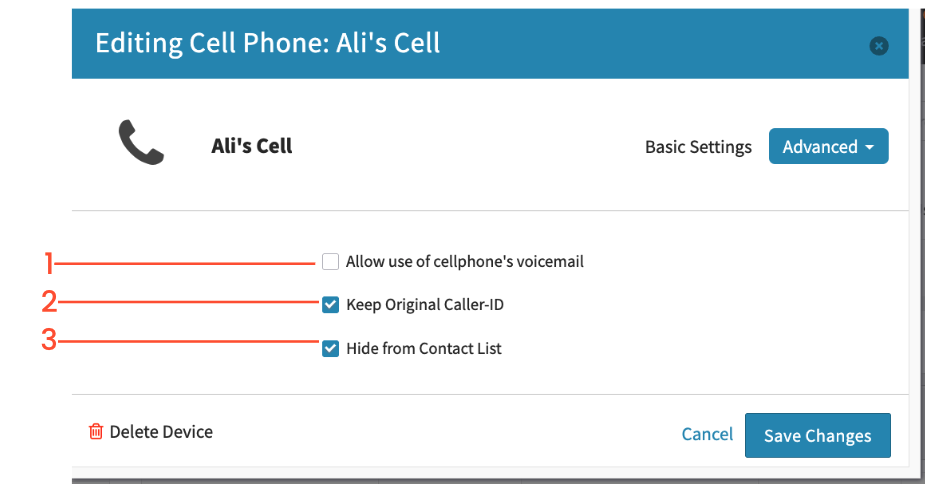
Additional options for Cell phones and Landlines
Give the device a name (this will only be used to internally track devices) and add your phone number. Follow the format given, beginning the number with a +1 (For normal 10 digit numbers).
Additional options for Cell phones and Landlines
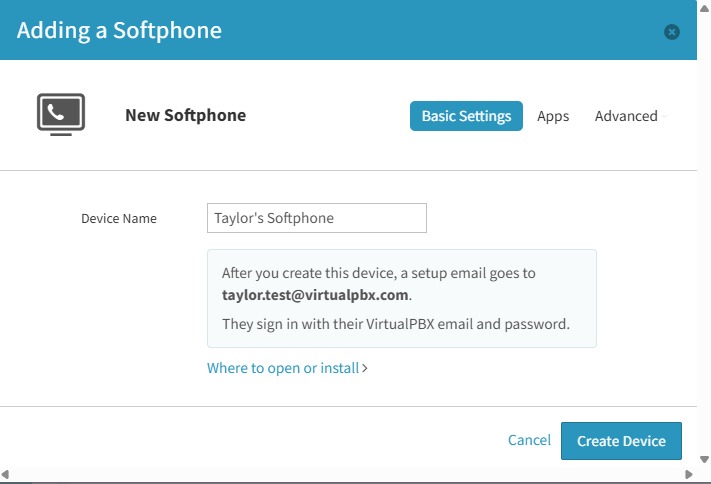
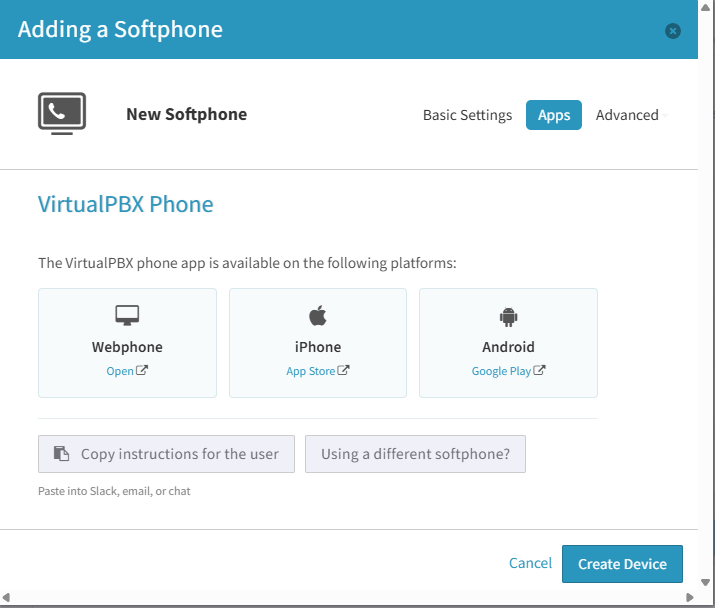 You can click on the “Apps” tab in order to find the download links for the new Softphone for your specific platform.
Enter a device name to identify your new Softphone. Once done, click ‘Create Device’. Once out of the page, make sure to hit ‘Save Changes’ on your user’s device page.
### 4. Fax
Find out more about faxing in our [Faxing](/business-phone/send-a-fax) Guide!
### 5. ATA
An ATA adaptor is a converter box that allows you to use an analog phone/fax machine via your internet connection. On one side you plug in the analog device, on the other is a network cable that will go to your router. Utilize this option for an analog fax machine.
Device Name: This is the name of the device that will show up in your Dashboard. It does not affect any part of provisioning or your system functionality.
SIP Username: This is a system-generated username that will be used to input into your ATA device’s web interface. Please avoid changing this item in the Dashboard to avoid complications with provisioning and registration.
SIP username is often entered into fields such as: User ID / Account name / Authentication name or ID / Authorization name / SIP User ID
SIP Password: This is a system-generated username that will be used to input into your ATA device’s web interface. Please avoid changing this item in the Dashboard to avoid complications with provisioning and registration.
SIP Password is often entered into fields such as: Password / account password / authentication password / SIP password
Realm: This is a system-generated string unique to your VirtualPBX account which will be input into your ATA device’s web interface
Realm is often entered into fields such as: Domain / Server / Proxy or Proxy Server / Register server / SIP domain or Server
It is possible that you may need to setup the Outbound Proxy server as well
Outbound Proxy should be set to proxy-west.virtualpbx.net
Mouse over Advanced and you will see your Advanced options. In general these can be adjusted as you see fit or simply left as is.
You can click on the “Apps” tab in order to find the download links for the new Softphone for your specific platform.
Enter a device name to identify your new Softphone. Once done, click ‘Create Device’. Once out of the page, make sure to hit ‘Save Changes’ on your user’s device page.
### 4. Fax
Find out more about faxing in our [Faxing](/business-phone/send-a-fax) Guide!
### 5. ATA
An ATA adaptor is a converter box that allows you to use an analog phone/fax machine via your internet connection. On one side you plug in the analog device, on the other is a network cable that will go to your router. Utilize this option for an analog fax machine.
Device Name: This is the name of the device that will show up in your Dashboard. It does not affect any part of provisioning or your system functionality.
SIP Username: This is a system-generated username that will be used to input into your ATA device’s web interface. Please avoid changing this item in the Dashboard to avoid complications with provisioning and registration.
SIP username is often entered into fields such as: User ID / Account name / Authentication name or ID / Authorization name / SIP User ID
SIP Password: This is a system-generated username that will be used to input into your ATA device’s web interface. Please avoid changing this item in the Dashboard to avoid complications with provisioning and registration.
SIP Password is often entered into fields such as: Password / account password / authentication password / SIP password
Realm: This is a system-generated string unique to your VirtualPBX account which will be input into your ATA device’s web interface
Realm is often entered into fields such as: Domain / Server / Proxy or Proxy Server / Register server / SIP domain or Server
It is possible that you may need to setup the Outbound Proxy server as well
Outbound Proxy should be set to proxy-west.virtualpbx.net
Mouse over Advanced and you will see your Advanced options. In general these can be adjusted as you see fit or simply left as is.
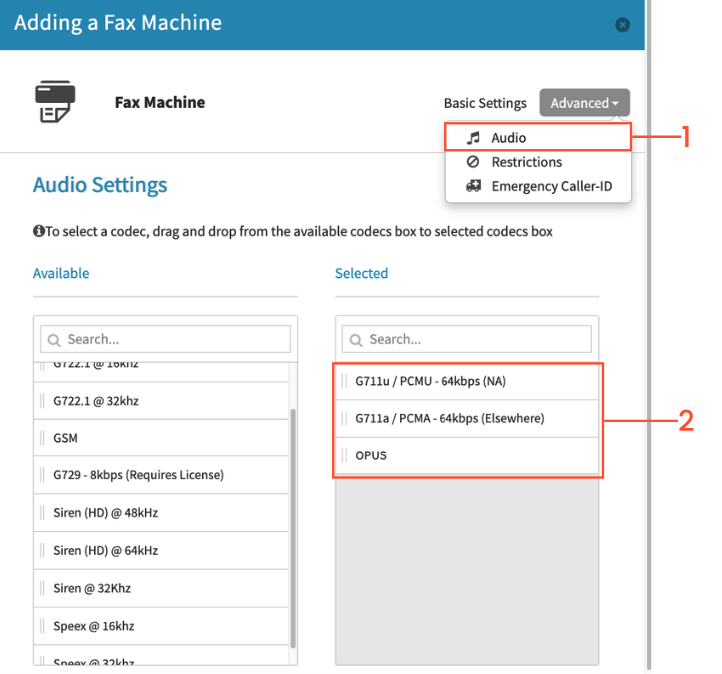 1: Click on Advanced in the top right, and select “Audio”
2: Move the following options from the left column to the right column in descending order: PCMU / PCMA / OPUS
Click on Create Device when done.
### 6. Webphone
A Webphone is the browser version of our Softphone application. You can use it on any browser to make and receive calls through your business number.
Choose the Webphone option and name your device. This will solely be an internal name.
1: Click on Advanced in the top right, and select “Audio”
2: Move the following options from the left column to the right column in descending order: PCMU / PCMA / OPUS
Click on Create Device when done.
### 6. Webphone
A Webphone is the browser version of our Softphone application. You can use it on any browser to make and receive calls through your business number.
Choose the Webphone option and name your device. This will solely be an internal name.
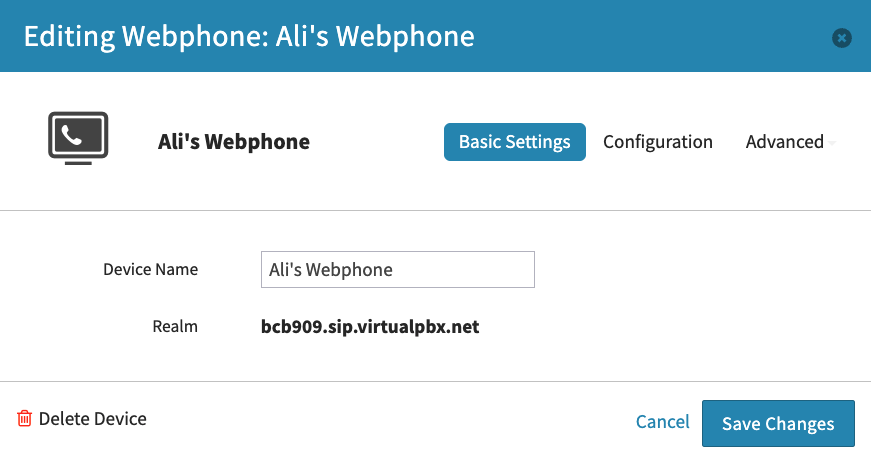 Users can launch their webphone by either clicking ‘Configuration’ and logging in with their dashboard credentials, or by visiting [https://webphone.virtualpbx.net/](https://webphone.virtualpbx.net/). Find user guides on the Webphone [here](/business-phone/mobile-softphone).